Crochet Hen Pattern: Make an Adorable 11 cm Amigurumi Chicken
Crochet Hen Pattern: Make an Adorable 11 cm Amigurumi Chicken
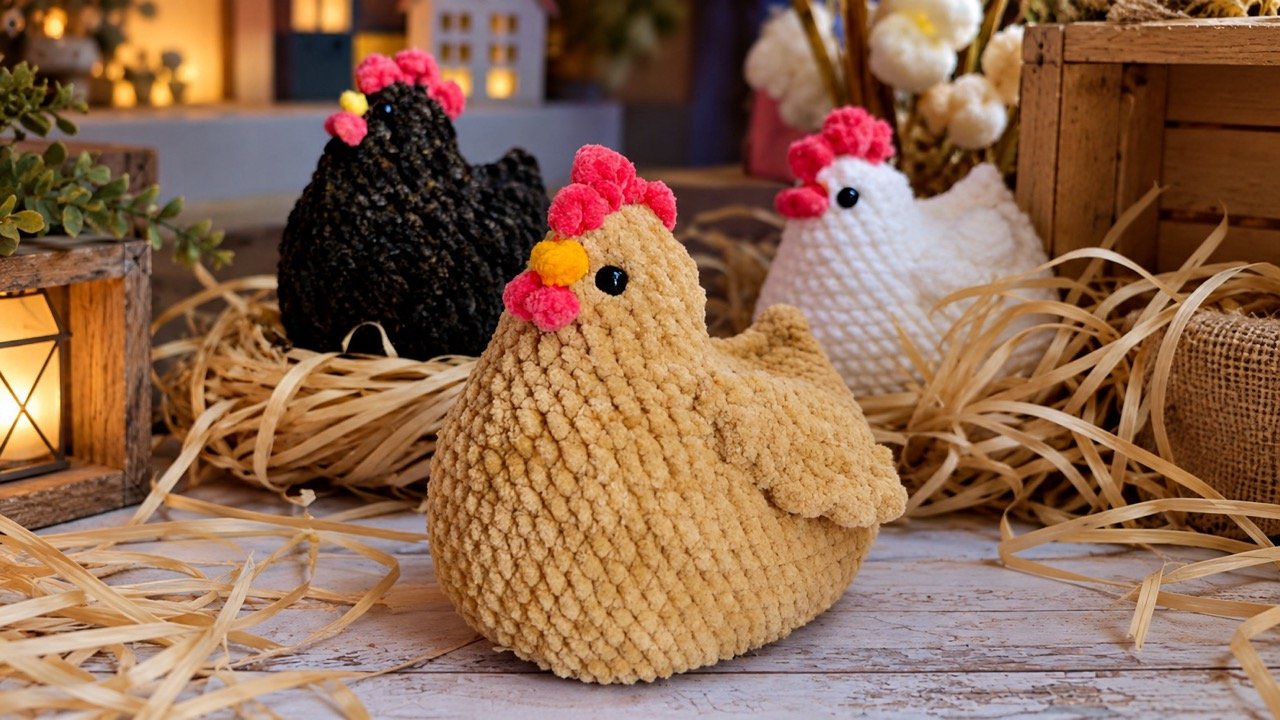
There’s something irresistibly cheerful about a handmade chicken. Maybe it’s the little comb, the tiny beak, or the way a soft, round body just begs to be squeezed. If you’ve been looking for a crochet hen pattern that’s quick, beginner-friendly. She stands about 11 cm tall, uses plush yarn for a velvety finish, and comes together with simple single crochet shaping. Whether you keep her on a shelf, add her to a farmyard set, or give her as a gift, she’s the kind of small project that brings a smile every time you look at her.
Below is a complete guide to this crochet hen pattern. You’ll find the materials, abbreviations, step-by-step body and wing instructions, details for the comb, beak, and wattles, plus assembly tips and answers to common questions.
Why This Crochet Hen Pattern Stands Out
Plenty of amigurumi patterns exist, but this one has a few qualities that make it especially appealing.
What You Need Before You Start
Gather your supplies first. The pattern is designed for plush yarn, which gives the finished hen her cuddly look.
Yarn and Hook
| Item | Details |
|---|---|
| Plush yarn | Wolans Bunny Baby 18 (main color). You’ll use more than half a skein. |
| Accent yarn | Small amounts of orange and coral yarn for the beak and comb. |
| Crochet hook | 3.75 mm. Choose the hook size that gives you a firm, even fabric. |
| Stuffing | Polyester toy filling (fiberfill). |
| Eyes | 7–8 mm safety eyes or half-beads. |
| Needle | Yarn needle for sewing pieces together. |
Optional
- Stitch marker.
- Scissors.
- Pins for holding pieces in place.
Abbreviations You’ll See
| Abbreviation | Meaning |
|---|---|
| MR | magic ring |
| sc | single crochet |
| ch | chain |
| hdc | half double crochet |
| sl st | slip stitch |
| dec | decrease |
| inc | increase |
How to Crochet the Hen Body
The body and head are worked in one piece, starting with a chain. The pattern uses US terms.
| Round | Instructions | Stitches |
|---|---|---|
| Rnd 1 | Chain 15. Starting from the second chain from the hook: inc, 12 sc, 4 sc in the same stitch, 12 sc, inc. | 32 sc |
| Rnd 2 | 2 inc, 12 sc, 4 inc, 12 sc, 2 inc. | 40 sc |
| Rnd 3 | (1 sc, inc) × 2 times, 12 sc, (1 sc, inc) × 4 times, 12 sc, (1 sc, inc) × 2 times. | 48 sc |
| Rnd 4 | (2 sc, inc) × 2 times, 12 sc, (2 sc, inc) × 4 times, 12 sc, (2 sc, inc) × 2 times. | 56 sc |
| Rnd 5 | (3 sc, inc) × 2 times, 12 sc, (3 sc, inc) × 4 times, 12 sc, (3 sc, inc) × 2 times. | 64 sc |
| Rnd 6–13 | 64 sc (8 rounds). | 64 sc |
| Rnd 14 | 1 dec, 28 sc, 2 dec, 28 sc, 1 dec. | 60 sc |
| Rnd 15 | 60 sc. | 60 sc |
| Rnd 16 | (8 sc, dec) × 6 times. | 54 sc |
| Rnd 17 | (7 sc, dec) × 6 times. | 48 sc |
| Rnd 18 | 48 sc. | 48 sc |
| Rnd 19 | (6 sc, dec) × 6 times. | 42 sc |
| Rnd 20 | 42 sc. | 42 sc |
| Rnd 21 | (5 sc, dec) × 6 times. | 36 sc |
| Fold | Fold the piece in half and crochet 9 sc through both layers, forming the back. | — |
| Rnd 22 | Crochet 18 sc around the remaining stitches (head). | 18 sc |
| Rnd 23–24 | 18 sc (2 rounds). | 18 sc |
| Rnd 25 | (1 sc, dec) × 6 times. | 12 sc |
| Eyes | Insert safety eyes between rounds 23–24, leaving 3 sc between them. | — |
| Rnd 26 | 6 dec. | — |
How to Crochet the Wings
Make 2.
| Round | Instructions | Stitches |
|---|---|---|
| Rnd 1 | 6 sc in MR. | 6 sc |
| Rnd 2 | Inc in each stitch around. | 12 sc |
| Rnd 3 | (1 sc, inc) × 6 times. | 18 sc |
| Rnd 4 | (2 sc, inc) × 6 times. | 24 sc |
| Fold | Fold the piece in half and crochet 12 sc through both layers. | — |
| Wing edging | Do not fasten off. Chain 2, (3 hdc in the same stitch, sl st) × 6 times. | — |
Leave a long tail for sewing. Sew the wings along the back, leaving 2–3 rounds of space below the top.
How to Add the Comb, Beak, and Wattles
Comb
Attach the coral yarn one row above the eyes, in the center. Chain 3, make 1 dc in the first chain. Skip one row on the head and make a sl st. Repeat this process 3 times.
Beak
Attach the orange yarn in the center between the eyes. Chain 2, make 1 sc in the first chain.
Wattles
Chain 2, make a sl st in the first chain. Chain 2 again, and make a sl st in the same stitch where the yarn was attached. Fasten off and weave in the ends.
Putting Your Crochet Hen Together
- Stuff the body firmly but not too tightly. You want her to hold her shape without feeling stiff.
- Attach the wings to the sides of the body, using the photos as a guide. They should sit slightly below the neck area.
- Add the comb on top of the head, centered above the eyes.
- Attach the beak between the eyes.
- Add the wattles just below the beak.
- Weave in all ends and hide them inside the body.
- Optional: Add a small ribbon or a tiny nest to display her.
Tips for a Neater Amigurumi Chicken Pattern
- Use plush yarn for softness. It gives the hen a velvety texture that’s hard to resist.
- Match your hook to the yarn. A 3.75 mm hook works well with Wolans Bunny Baby 18, but adjust if your tension is different.
- Count your stitches. The body rounds change frequently, so a stitch marker helps you keep track.
- Stuff as you go. It’s easier to shape the body before the opening gets too small.
- Fold evenly. When you fold the body in half to form the back, make sure both sides line up.
- Sew wings securely. They’re a focal point, so use a few extra stitches to keep them in place.
- Customize colors. Try a white hen with a red comb, a black hen with a bright orange beak, or a pastel hen for spring.
- Keep the comb perky. After attaching, you can gently shape the comb with your fingers to make it stand up.
FAQ About the Crochet Hen Pattern
It’s rated basic. If you know magic ring, single crochet, increase, decrease, and slip stitch, you can make this project.
She stands about 11 cm tall when made with the recommended yarn and hook.
The pattern uses Wolans Bunny Baby 18 plush yarn in the main color, plus small amounts of orange and coral for the beak and comb.
Before selling finished items, make sure you comply with applicable laws and the terms of any materials you use.
The comb is made by chaining 3, making a dc in the first chain, then slip stitching into the head. The wattles are made with chain 2 and slip stitches. Full instructions are in the pattern.
Use 7–8 mm safety eyes or half-beads. Insert them between rounds 23 and 24, leaving 3 sc between them.
Your Next Stitch
This crochet hen is one of those projects that proves you don’t need a complicated pattern to make something wonderful. She’s small, she’s soft, and she’s full of character. Whether you make her in classic farm colors or experiment with something bright and playful, you’ll end up with an 11 cm friend who looks like she just stepped out of a storybook.
So gather your plush yarn, pick your hook, and start with that first chain. If you get stuck on the comb or the wings, come back to this guide and work through it step by step. When your hen is finished, share a photo and show off your work. Your next project might be exactly what someone else needs to see.
Happy crocheting!
Looking for another handmade idea? Explore more patterns on Easy Crochet Patterns, and visit Yarnspirations for yarn information.
Similar Posts
Free Beginner Stitch and Angel Crochet: Numbered Photo Guide
Amigurumi photo guide Free Beginner Stitch and Angel Crochet: Numbered Photo Guide This written pattern and eight-part photo guide help you make a sweet Stitch or Angel amigurumi, from the little paws to the finished face. Start here: Keep the numbered photo sections open as you crochet. The large number is the pattern section; the…
Crochet Mesh Hairband: The 10-Minute Beginner Pattern That Needs No Ends Woven In
A free crochet mesh hairband pattern for beginners. Ten grams of yarn, one repeated row, a full sizing chart, and no ends to weave in.
How to Crochet an Easy Mesh Bandana With a Picot Border
Learn how to crochet an easy mesh bandana with an open chain-space stitch and a delicate picot border, sized for kids, adults, or pets.
Crochet Mesh Cardigan Pattern: Made to Measure, Any Size
A made-to-measure crochet mesh cardigan worked in chain and single crochet only, with the full gauge math, increase schedule, sleeves in rounds and eight step diagrams.
Crochet Heart Trinket Dish: The No-Magic-Ring Version That Sits Flat and Stands Up
A free crochet heart trinket dish pattern for beginners. No magic ring, one hook, one evening: a chain ring start, four shaping rules for the base, and back-loop-only rounds that turn it into a bowl.
Crochet Flower Keychain: Easy 5-Petal Pattern
A quick 5-petal crochet flower pattern worked from a magic ring in two rounds, finished as a keychain or appliqué.