Free Beginner Stitch and Angel Crochet: Numbered Photo Guide
Free Beginner Stitch and Angel Crochet: Numbered Photo Guide
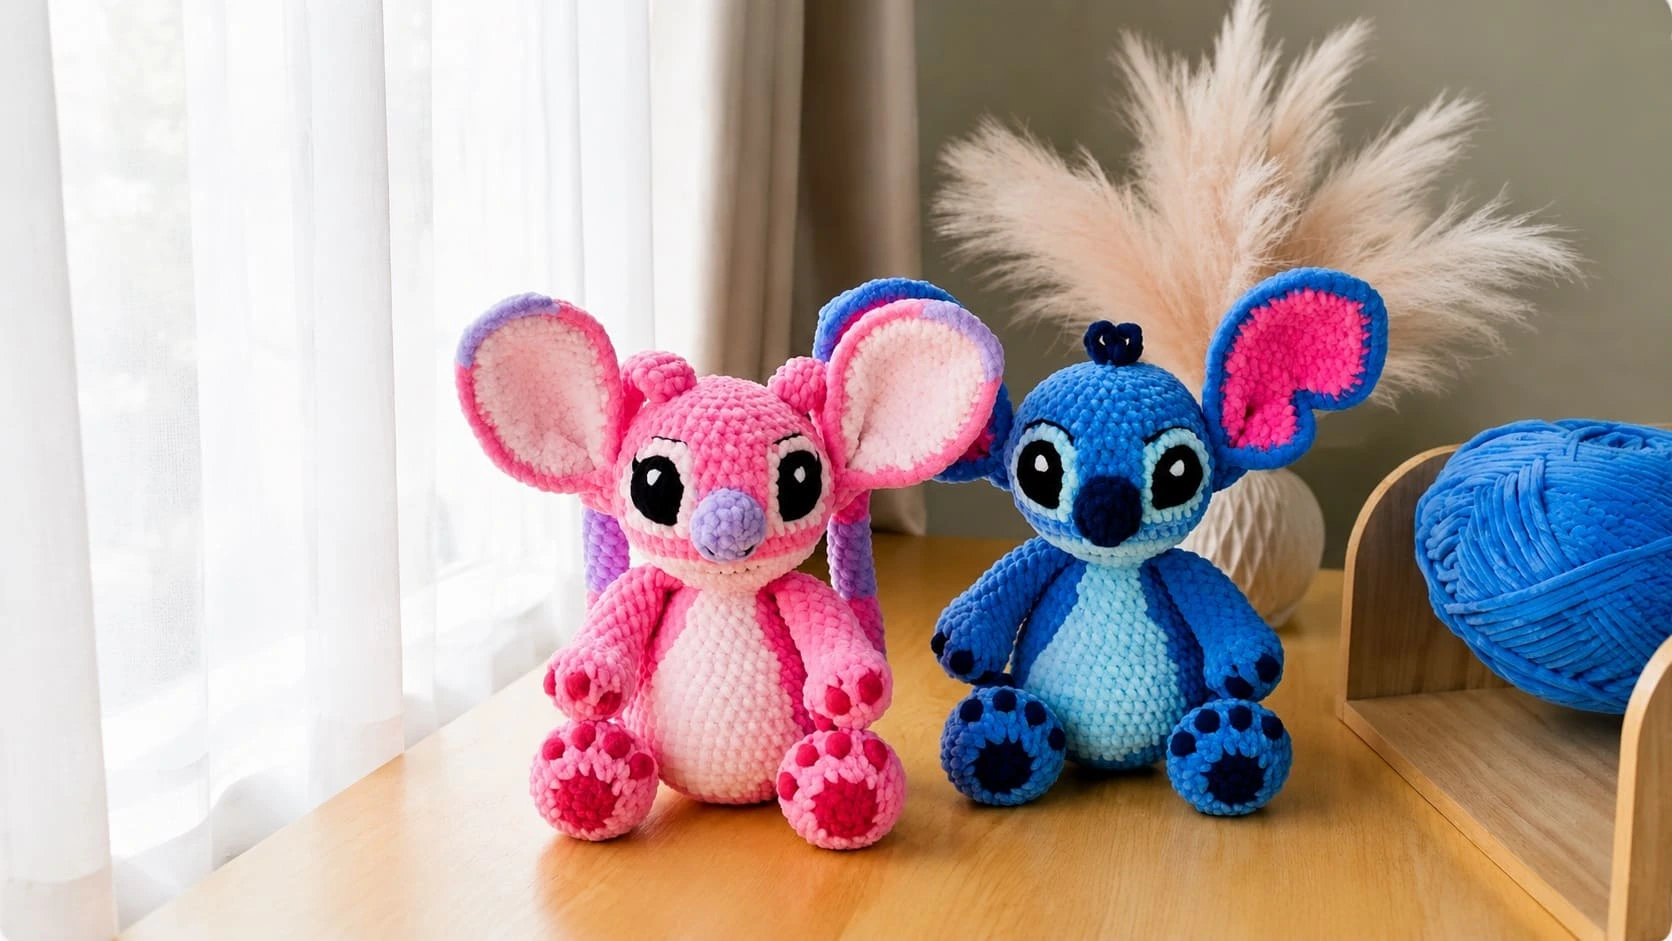
This written pattern and eight-part photo guide help you make a sweet Stitch or Angel amigurumi, from the little paws to the finished face.
Before you start
Work continuously in a spiral without turning chains, unless a section specifically tells you to work flat rows. The ears are the exception: make a turning chain at the end of each ear row and turn your work.
PDF pattern number reference
| Guide section | Original pattern reference |
|---|---|
| Pattern 1 – Arms | Rounds 1–17; make 2 |
| Pattern 2 – Legs | Rounds 1–17; make 2 |
| Patterns 3–4 – Body | Rounds 1–24 |
| Pattern 5 – Stitch ears | Rows 1–20; make the layered pairs |
| Pattern 6 – Ear finishing | Assembly and edging after Row 20 |
| Pattern 7 – Head | Rounds 25–45 |
| Pattern 8 – Eyes and face | Eyes: Rounds 1–5; nose: Rounds 1–3; then facial assembly |
These numbers make it easy to find the matching place in the original pattern while you use your photo guide.
| Materials and tools | Use in this pattern |
|---|---|
| Main and contrast yarn colours | Use navy blue and baby blue for Stitch; use the pink shades and lilac accents specified in the relevant Angel sections. |
| Black cotton yarn and 2.5 mm hook | Crochet both eyes. |
| White cotton thread | Embroider the eye highlights. |
| Fiberfill | Stuff the arms, legs, tail, body, head, and Angel antennae as directed. |
| Yarn needle and scissors | Sew the eyes, nose, ears, and tail; finish yarn ends. |
| Abbreviation | Meaning |
|---|---|
MR | Magic ring |
sc | Single crochet |
inc | Increase: 2 sc in one stitch |
dec | Decrease: crochet 2 sc together |
ch | Chain |
t-ch | Turning chain |
dc | Double crochet |
Bobble st | Crochet the indicated number of dc in one stitch with a common top |
sl st | Slip stitch |
xN | Repeat N times |
Crochet both arms
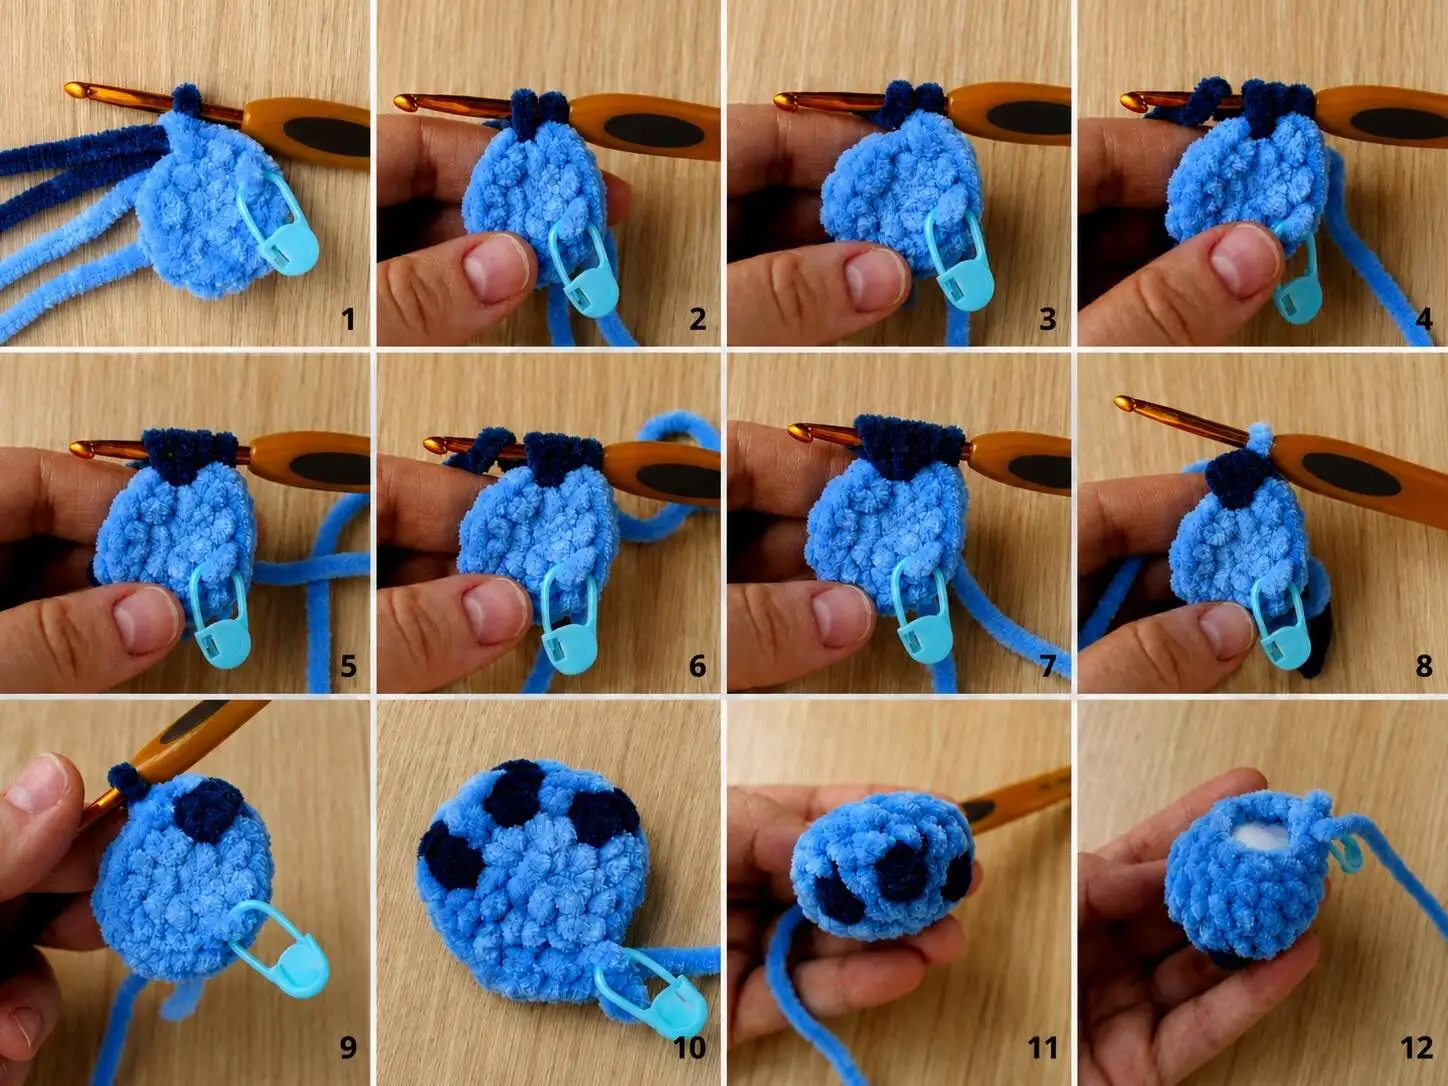
Start with the main colour. Change colours within the round wherever the instructions name navy blue or dark blue.
- 6 sc in a MR. (6)
- 6 inc. (12)
- In navy blue: 1 sc, 1 inc; then (in dark blue: 3-dc Bobble st, in navy blue: 1 inc) x3; then (1 sc, 1 inc) x2. (18)
- 18 sc for 2 rounds.
- 4 sc, 3 dec, 8 sc. (15)
- 1 sc, then (1 sc, 1 dec) x3, 5 sc. (12)
- Stuff with fiberfill, distributing the stuffing to the sides.
- 12 sc for 9 rounds.
- (2 sc, 1 dec) x3, plus 2 extra sc. (9)
- Stuff lightly up to Round 11. Fold the opening in half and crochet 4 sc through both sides. Cut the yarn.
Make a second matching arm.
Crochet both legs
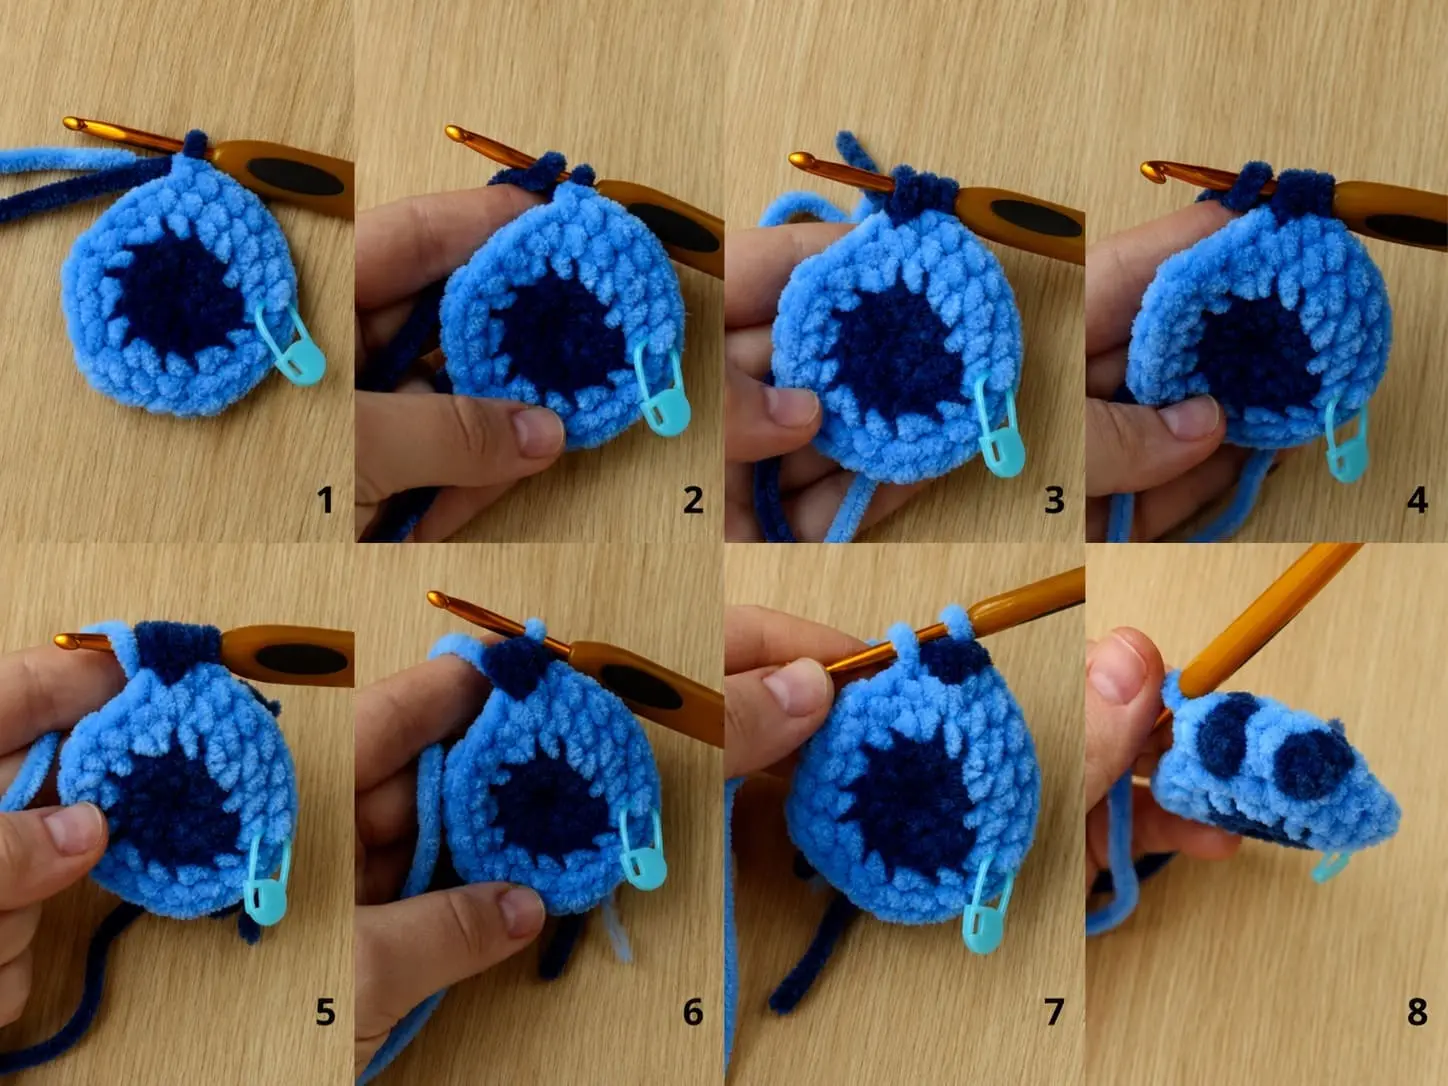
- With dark blue, make 6 sc in a MR. (6)
- 6 inc. (12)
- Change to the main colour and work in the back loops only: (1 sc, 1 inc) x6. (18)
- 1 sc, 1 inc, then (2 sc, 1 inc) x5, 1 sc. (24)
- 6 sc; then (in dark blue: 3-dc Bobble st, in the main colour: 1 inc) x3; make 1 more dark-blue 3-dc Bobble st, then 11 sc. (27)
- 27 sc for 2 rounds.
- 3 sc, then (1 sc, 1 dec) x6, 6 sc. (21)
- (5 sc, 1 dec) x3. (18)
- 2 sc, 1 dec, then (4 sc, 1 dec) x2, 2 sc. (15)
- Stuff the lower part of the leg. Push the stuffing to the sides and shape the leg.
- 15 sc for 6 rounds.
- For the first leg, work (3 sc, 1 dec) x3 plus 1 extra sc. For the second leg, work the same repeat plus 3 extra sc. (12)
- Stuff lightly up to Round 14. Fold the opening in half and crochet 6 sc through both sides. Cut the yarn.
Make two legs, keeping the additional stitches different as written so both legs align correctly when joined to the body.
Tail
Crochet this small piece before assembly. Sew it between Rounds 8 and 11 of the body.
- 6 sc in a MR. (6)
- 6 inc. (12)
- 12 sc for 2 rounds, then make a sl st.
- Stuff lightly with fiberfill and sew in place after the body is complete.
Crochet the body, join the limbs, and stuff
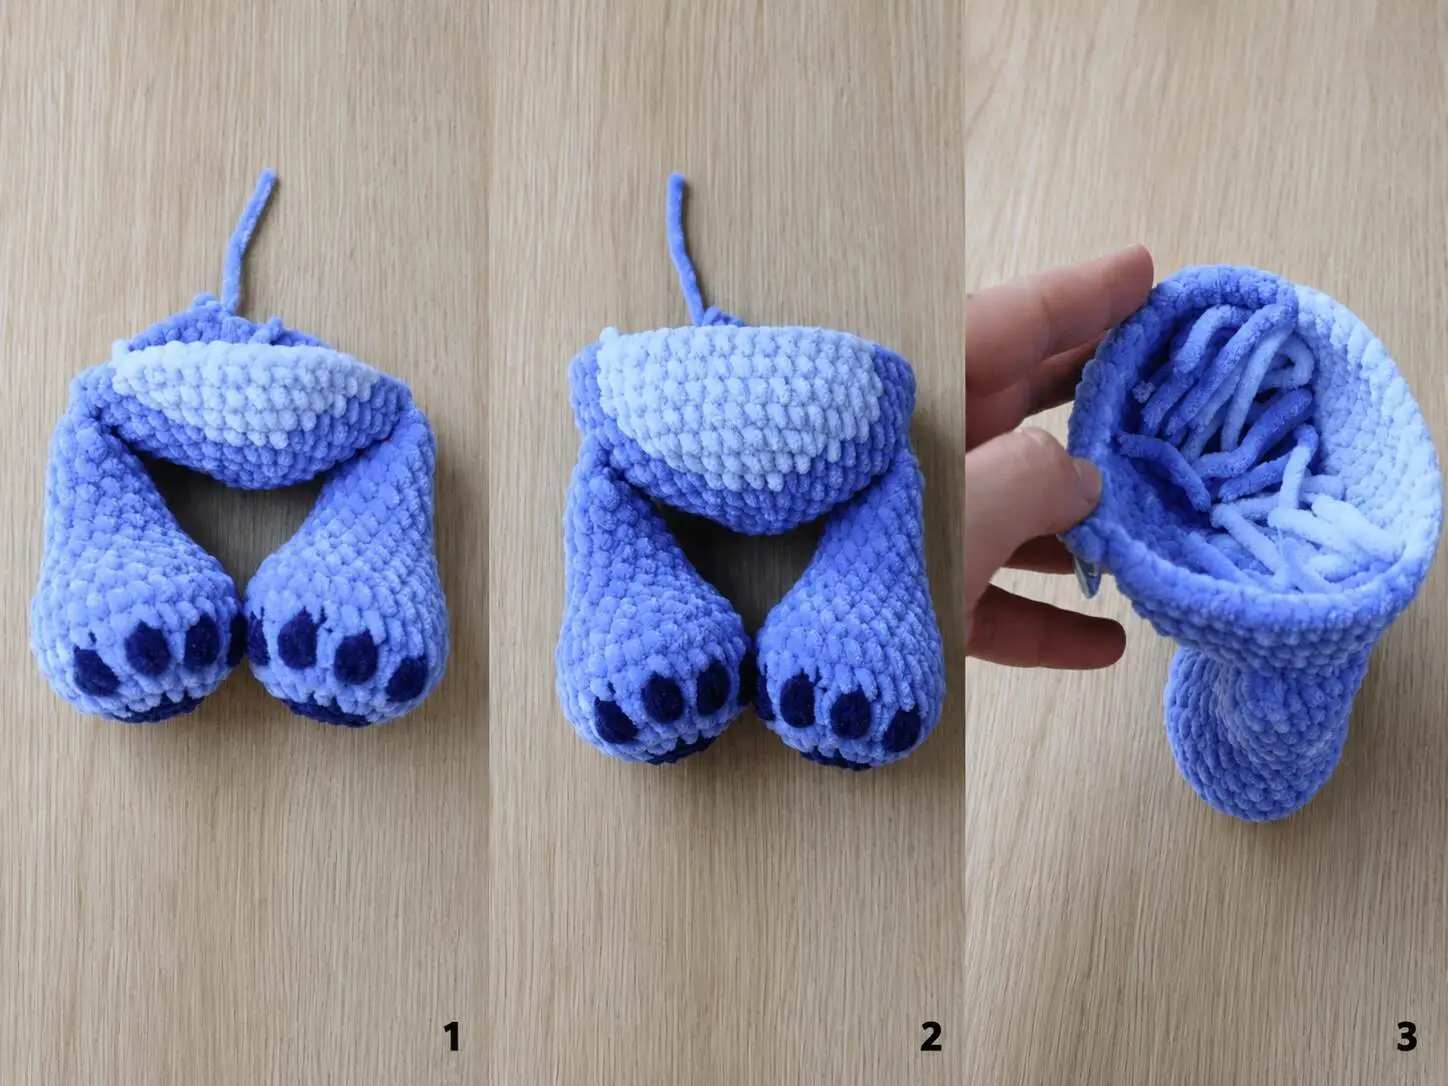
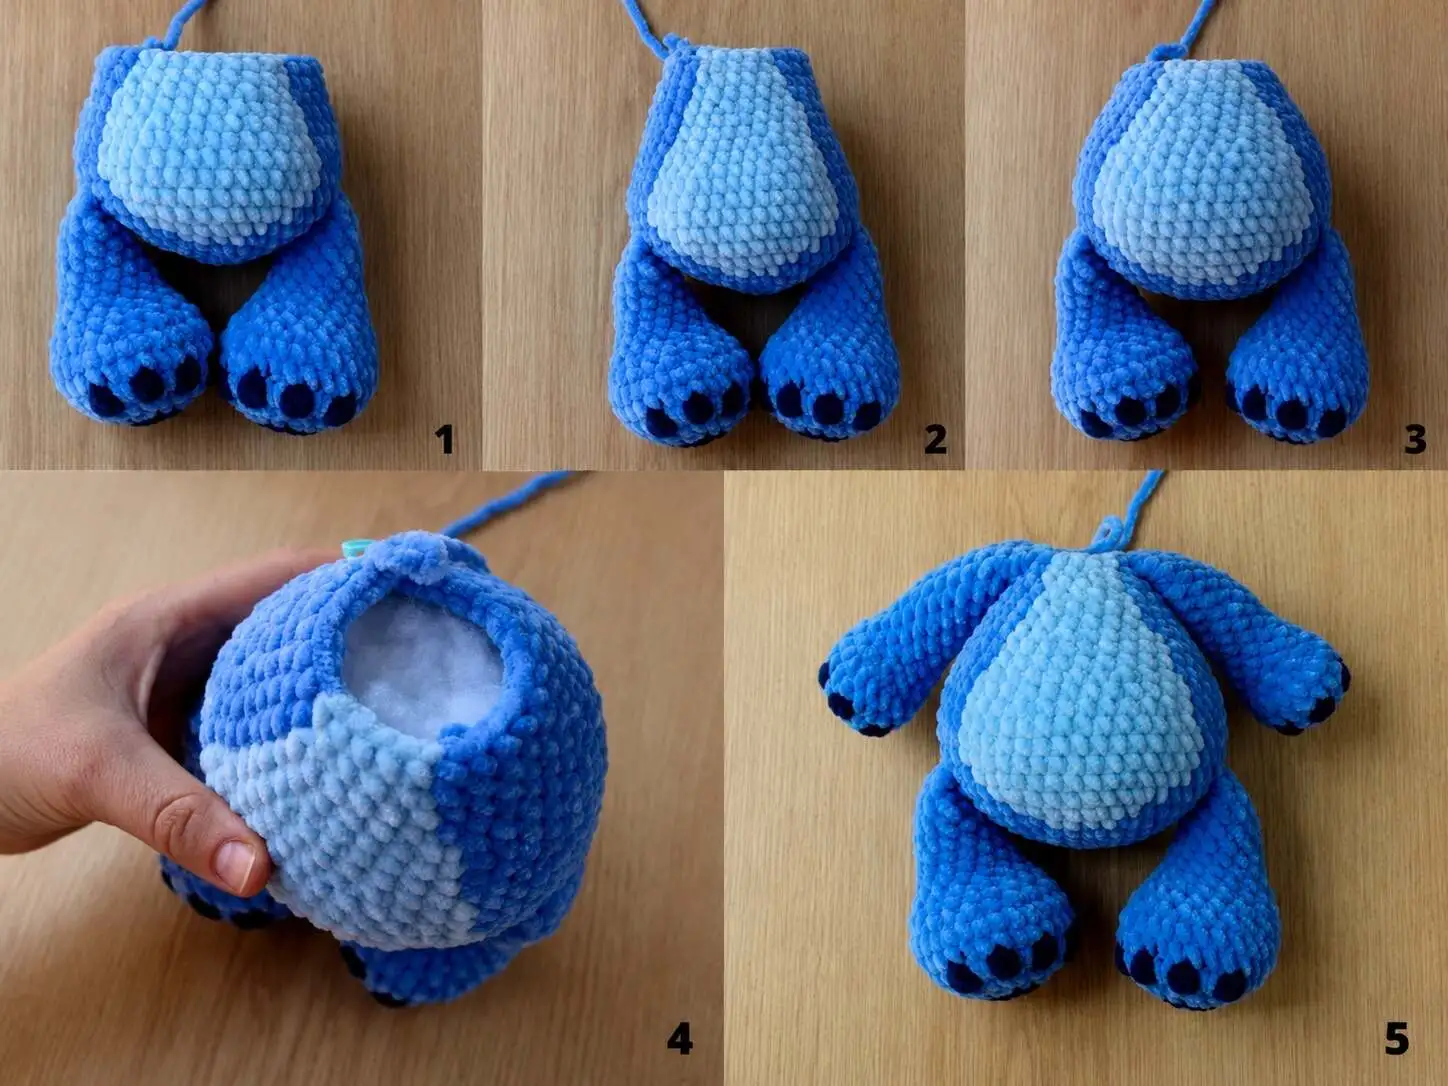
Start with the main colour. At Round 6, use the main colour and the additional tummy colour: baby blue for Stitch or pale pink for Angel.
- 6 sc in a MR. (6)
- 6 inc. (12)
- (1 sc, 1 inc) x6. (18)
- 1 sc, 1 inc, then (2 sc, 1 inc) x5, 1 sc. (24)
- (3 sc, 1 inc) x6. (30)
- Work the tummy: 2 sc, 1 inc, then (4 sc, 1 inc) x2, 4 sc, 1 inc, then (4 sc, 1 inc) x2, 2 sc. (36)
- (5 sc, 1 inc) x2, 3 sc, 2 sc, 1 inc, 4 sc, 1 sc, 1 inc, then (5 sc, 1 inc) x2. (42)
- 3 sc, 1 inc, 6 sc, 1 inc, 5 sc, 1 sc, 1 inc, 6 sc, 1 inc, 1 sc, 5 sc, 1 inc, 6 sc, 1 inc, 3 sc. (48)
- 9 sc, 6 sc with the first leg, 2 sc, 14 sc, 2 sc, 6 sc with the second leg, 9 sc. (48)
- 17 sc, 15 sc, 16 sc for 2 rounds. (48)
- 18 sc, 14 sc, 16 sc. (48)
- 3 sc, 1 dec, 6 sc, 1 dec, 5 sc, 1 sc, 1 dec, 6 sc, 1 dec, 3 sc, 3 sc, 1 dec, 6 sc, 1 dec, 3 sc. (42)
- 16 sc, 12 sc, 14 sc. (42)
- (5 sc, 1 dec) x2, 3 sc, 2 sc, 1 dec, 5 sc, 1 dec, then (5 sc, 1 dec) x2. (36)
- 15 sc, 9 sc, 12 sc for 2 rounds. (36)
- 2 sc, 1 dec, then (4 sc, 1 dec) x2, 4 sc, 1 dec, 2 sc, 2 sc, 1 dec, 4 sc, 1 dec, 2 sc. (30)
- 14 sc, 6 sc, 10 sc for 2 rounds. (30)
- (3 sc, 1 dec) x3, 3 sc, 1 dec, 1 sc, 2 sc, 1 dec, 3 sc, 1 dec. (24)
- Stuff the lower body with fiberfill. Work 12 sc, 5 sc, 7 sc. (24)
- 1 sc, 1 dec, then (2 sc, 1 dec) x2, 1 sc, 1 sc, 1 dec, 2 sc, 1 dec, 2 sc, 1 dec, 1 sc, plus 1 extra sc. (18)
- 4 sc, 4 sc with the first arm, 4 sc, 1 sc, 4 sc with the second arm, 1 sc, plus 3 extra sc. Do not cut the yarn. Stuff the body fully and continue directly into the head.
Crochet, layer, and finish the ears
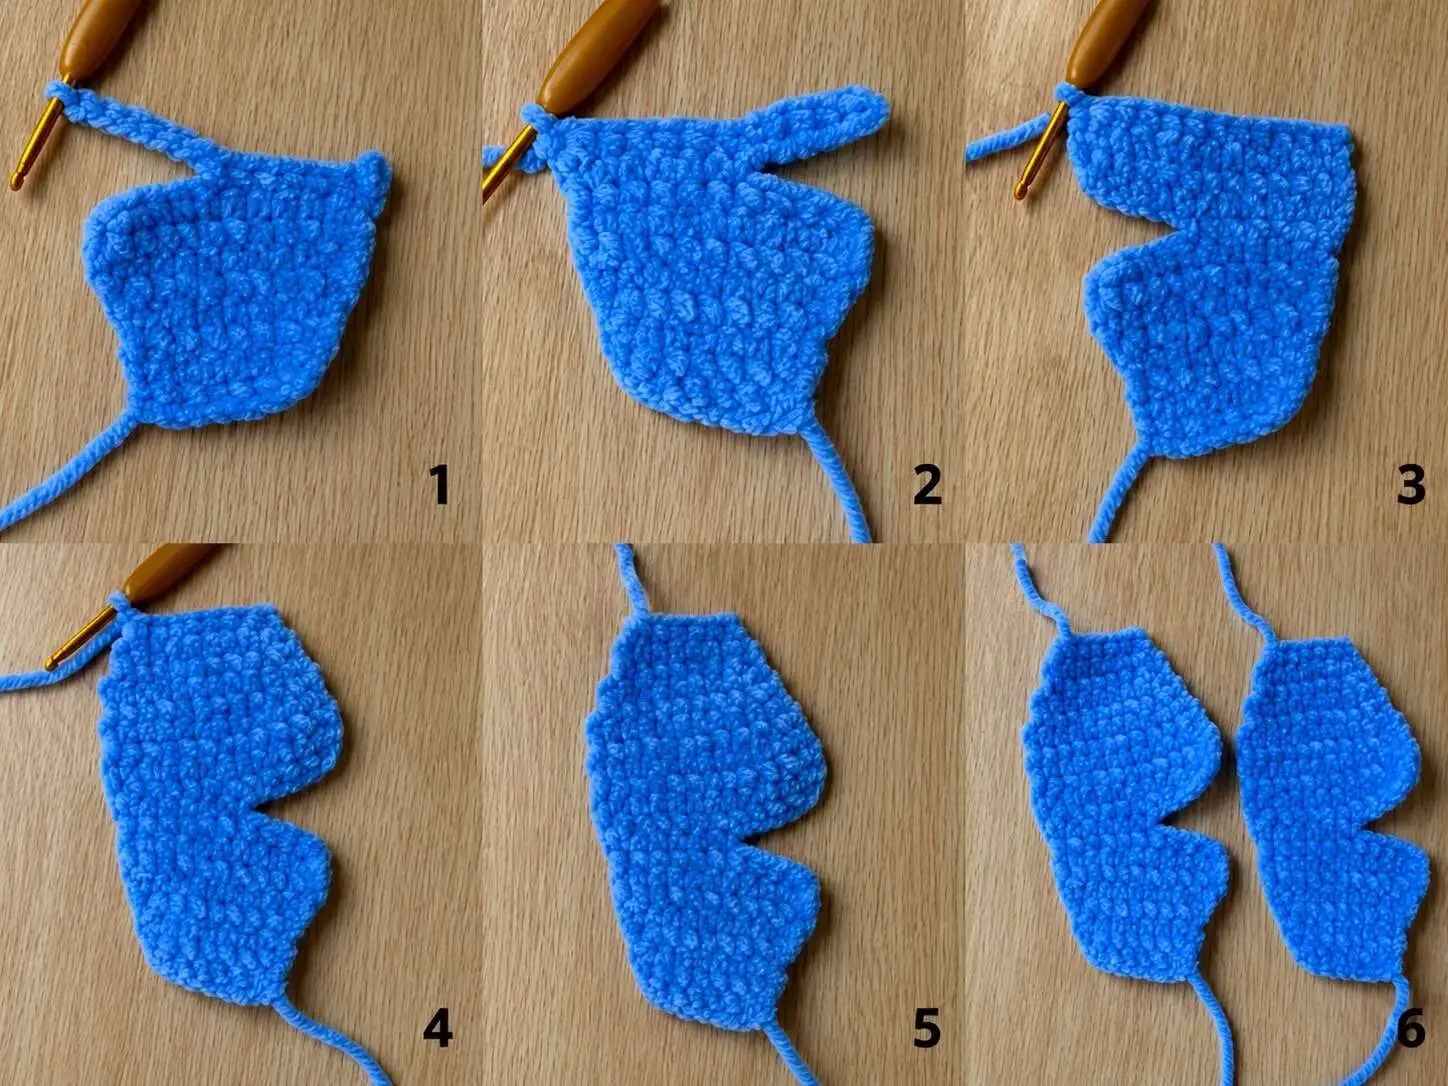
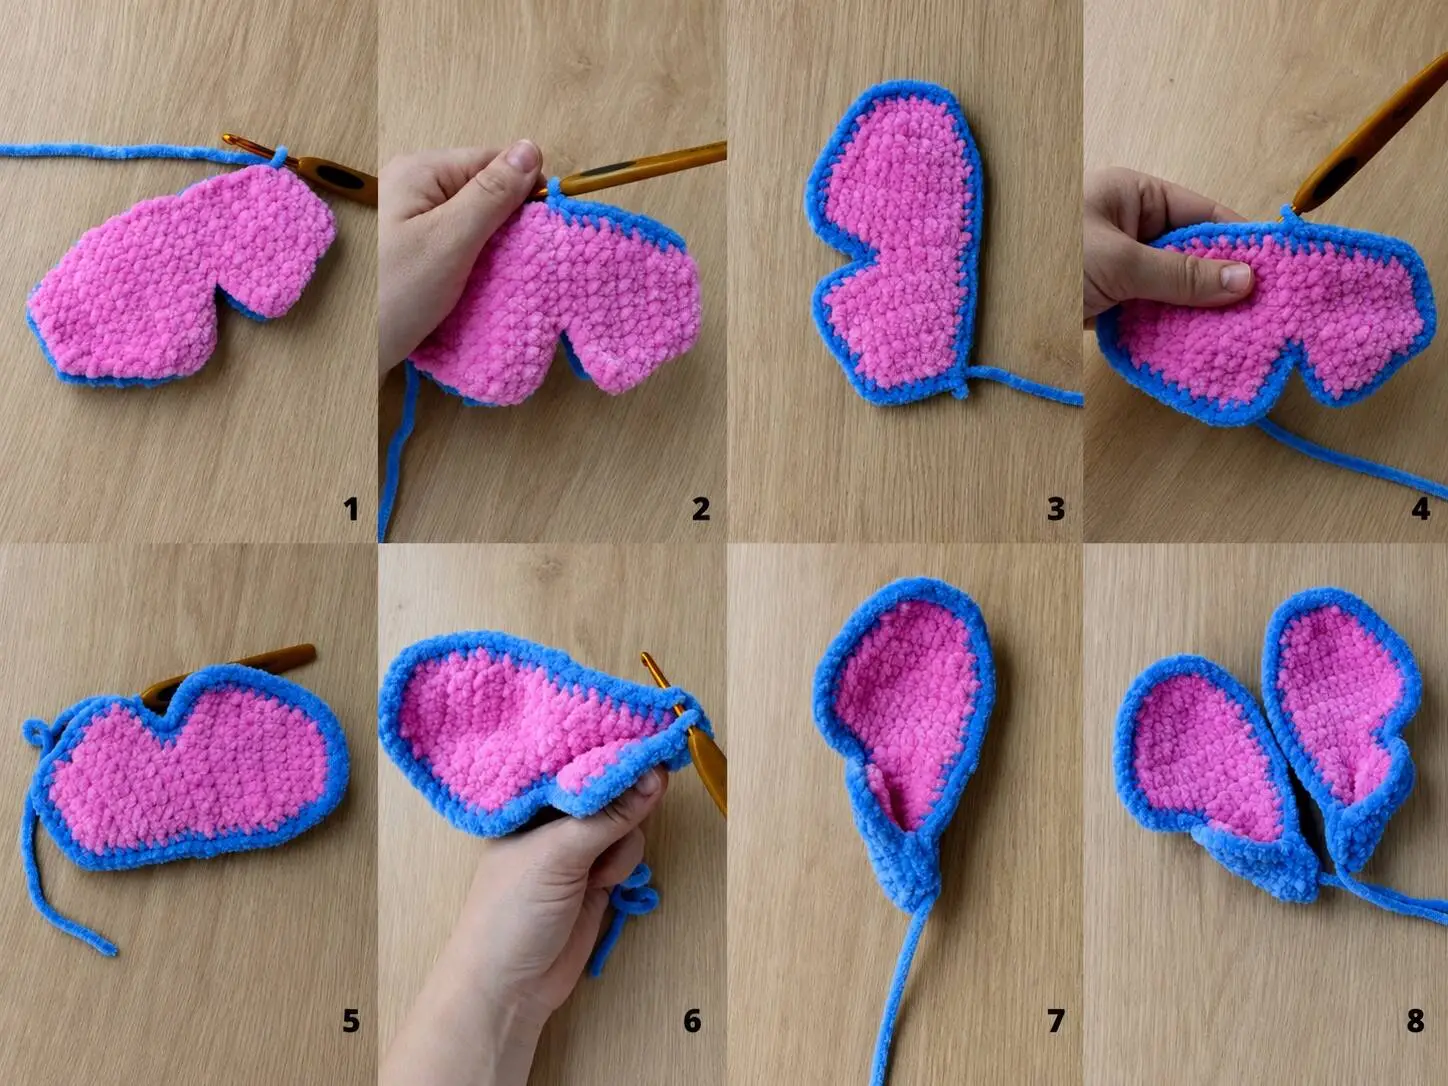
For every ear panel, work in rows. Make the stated turning chain at the end of each row, then turn.
Stitch ears (make 2 layered ears)
Make 2 navy-blue pieces and 2 pink pieces. Work the following 20 rows for every piece.
- Ch 8; from the second ch from hook, 7 sc, 1 t-ch.
- 7 sc, 2 t-ch.
- 8 sc, 2 t-ch.
- 9 sc, 2 t-ch.
- 10 sc, 2 t-ch.
- 11 sc, 1 t-ch.
- 11 sc. Start the next row from the first stitch on the hook.
- 1 dec, 9 sc, 2 t-ch.
- 7 sc, ch 6.
- 12 sc, 1 t-ch for 4 rows.
- 1 dec, 10 sc, 1 t-ch.
- 11 sc, 1 t-ch.
- 1 dec, 7 sc, 1 dec, 1 t-ch.
- 9 sc, 1 t-ch.
- 1 dec, 5 sc, 1 dec, 1 t-ch.
- 7 sc, 1 t-ch.
- 1 dec, 3 sc, 1 dec. Cut the yarn.
Place a pink panel on top of a navy-blue panel and tie the ends together. Make sure the slit on one ear is on the left and the slit on the other ear is on the right. Attach navy yarn, work sc around the outer edge, then sl st around it; make 1 dec at the corner of the slit. Fold the lower part in half and crochet 4–5 sl st.
Angel ears (make 2 layered ears)
Make 2 bright-pink pieces and 2 pale-pink pieces. Work the following 20 rows for every piece.
- Ch 8; from the second ch from hook, 7 sc, 1 t-ch.
- 7 sc, 2 t-ch.
- 8 sc, 2 t-ch.
- 9 sc, 2 t-ch.
- 10 sc, 2 t-ch.
- 11 sc, 1 t-ch for 2 rows.
- 11 sc, 2 t-ch.
- 12 sc, 1 t-ch for 5 rows.
- 1 dec, 10 sc, 1 t-ch.
- 11 sc, 1 t-ch.
- 1 dec, 7 sc, 1 dec, 1 t-ch.
- 9 sc, 1 t-ch.
- 1 dec, 5 sc, 1 dec, 1 t-ch.
- 7 sc, 1 t-ch.
- 1 dec, 3 sc, 1 dec. Cut the yarn.
Place the pale-pink panel on the bright-pink panel and tie the ends together. Attach bright-pink yarn and work sc around the edge, crocheting the top of the ear in lilac. Work around once more with sl st. Fold the lower part in half and crochet 4–5 sl st.
Shape, stuff, and close the head
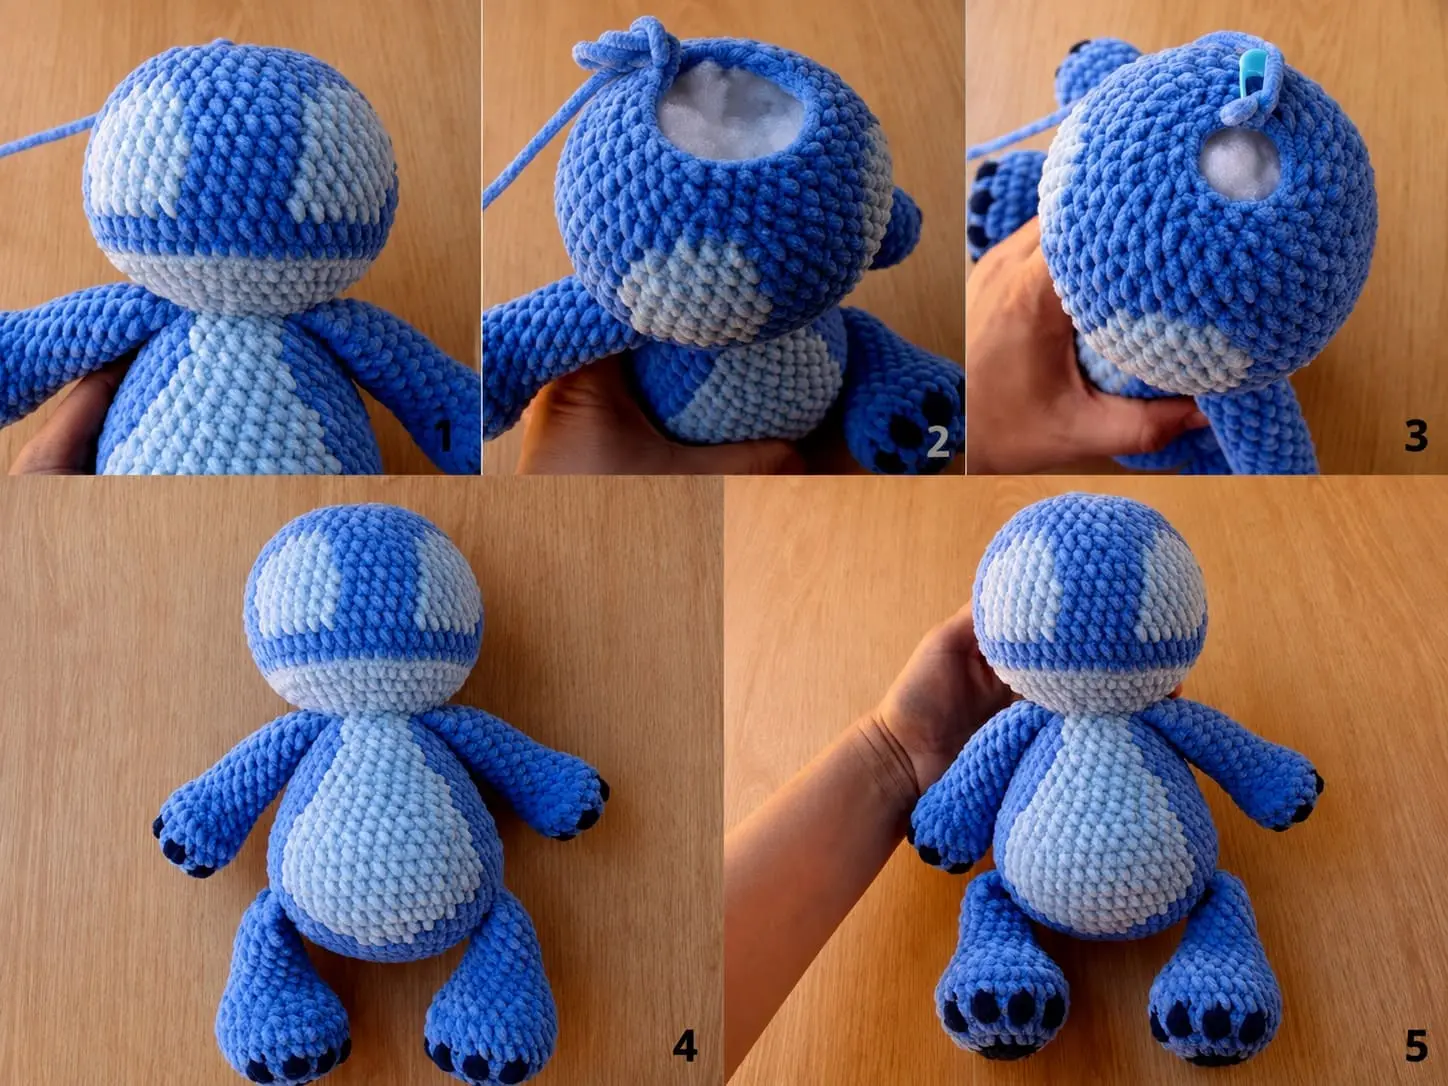
- 1 sc, 1 inc, 2 sc, 1 inc, then (2 sc, 1 inc) x2, then (2 sc, 1 inc) x2, 1 sc. (24)
- 3 sc, 1 inc, then (3 sc, 1 inc) x3, then (3 sc, 1 inc) x2. (30)
- 2 sc, 1 inc, 1 sc, 3 sc, 1 inc, then (4 sc, 1 inc) x2, 3 sc, 1 sc, 1 inc, 4 sc, 1 inc, 2 sc. (36)
- 5 sc, 1 inc, then (5 sc, 1 inc) x3, 1 sc, 4 sc, 1 inc, 5 sc, 1 inc. (42)
- 3 sc, 1 inc, 1 sc, 5 sc, 1 inc, then (6 sc, 1 inc) x2, 4 sc, 2 sc, 1 inc, 6 sc, 1 inc, 3 sc. (48)
- 48 sc, working in back loops only above the baby-blue stitches. (48)
- 48 sc. (48)
- 12 sc, 6 sc, 5 sc, 6 sc, 19 sc for 2 rounds. (48)
- 11 sc, 7 sc, 5 sc, 7 sc, 18 sc for 2 rounds. (48)
- 11 sc, 7 sc, 6 sc, 6 sc, 18 sc. (48)
- 3 sc, 1 dec, 6 sc, 1 dec, 5 sc, 1 sc, 1 dec, 3 sc, 3 sc, 1 dec, 1 sc, 5 sc, 1 dec, 6 sc, 1 dec, 3 sc. (42)
- 11 sc, 4 sc, 7 sc, 3 sc, 17 sc. (42)
- Stuff the neck and lower head. From here, crochet only with the main colour.
- (5 sc, 1 dec) x6. (36)
- 2 sc, 1 dec, then (4 sc, 1 dec) x5, 2 sc. (30)
- 30 sc.
- (3 sc, 1 dec) x6. (24)
- 1 sc, 1 dec, then (2 sc, 1 dec) x5, 1 sc. (18)
- (1 sc, 1 dec) x6. (12)
- 6 dec. (6)
- Pull the yarn through the front loops to close the opening neatly.
Position the eyes and finish the face
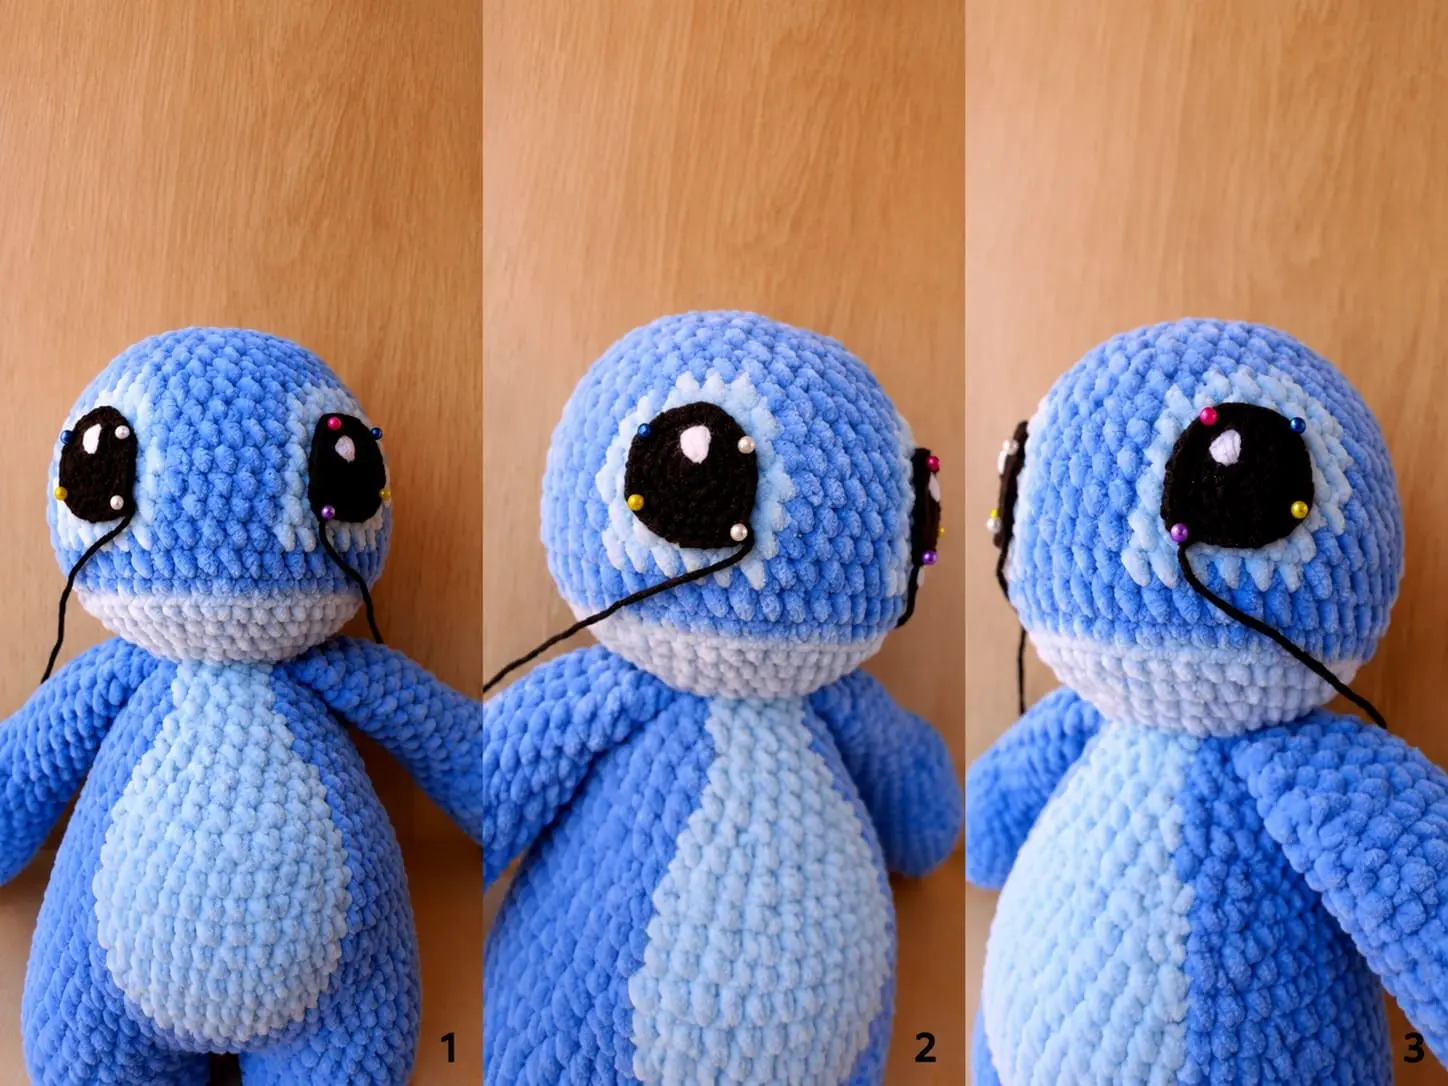
Eyes (make 2)
Use black cotton yarn and a 2.5 mm hook.
- 6 sc in a MR. (6)
- 6 inc. (12)
- (1 sc, 1 inc) x6. (18)
- 1 inc, 4 sc, then (1 inc, 2 sc) x2, 1 inc, 5 sc, 1 inc. (23)
- 1 inc, 6 sc, then (1 inc, 3 sc) x2, 1 inc, 6 sc, 1 inc, then make a sl st. (28)
- Embroider white highlights, then sew each eye to the light facial area of the head.
Nose
Use dark-blue yarn for Stitch or lilac yarn for Angel.
- 6 sc in a MR. (6)
- 6 inc. (12)
- 1 inc, 4 sc, 2 inc, 4 sc, 1 inc, then make a sl st. (16)
- Sew the nose above the baby-blue yarn, between the eyes.
Angel antennae (make 2)
For Angel only, stuff very lightly as you work.
- 8 sc in a MR. (8)
- 8 sc for 8 rounds.
- Change to lilac and work 8 sc in back loops only.
- 8 sc for 7 rounds.
- Change to the main colour and work 8 sc in back loops only.
- 8 sc for 23 rounds.
- Fold in half and crochet 3 sc through both sides.
Final finishing checklist
- Sew both ears at the same height and check the alignment from the front.
- Sew the tail between Rounds 8 and 11 of the body, then weave in every yarn end securely.
- For Stitch, add the forelock. For Angel, add the antennae and eyelashes.
- Gently reshape the stuffing so the tummy, face, paws, and ears look even.
- Photograph the finished plush from the front, side, and back, then add the numbered process photos in their matching guide sections.
Stitch and Angel crochet FAQ
Why are the legs finished with different numbers of extra stitches?
The first and second leg use different extra stitches so they line up correctly when they are crocheted into the body at Round 9. Keep this distinction even if both legs otherwise look identical.
How do I keep the tummy and face centred?
Pause after each colour-change round and look at the body from the front. Before stuffing, make sure the light tummy and facial area remain in the middle; small shifts are easiest to correct before the next round.
Why do the Stitch ears need opposite-facing slits?
The ear panels are mirror images. Position the slit on the left for one finished ear and on the right for the other before you edge and fold them.
When should I add stuffing?
Stuff the arms and legs gradually, stuff the lower body before it narrows, and fill the head in stages. Small amounts give you a smooth shape without stretching the stitches.