
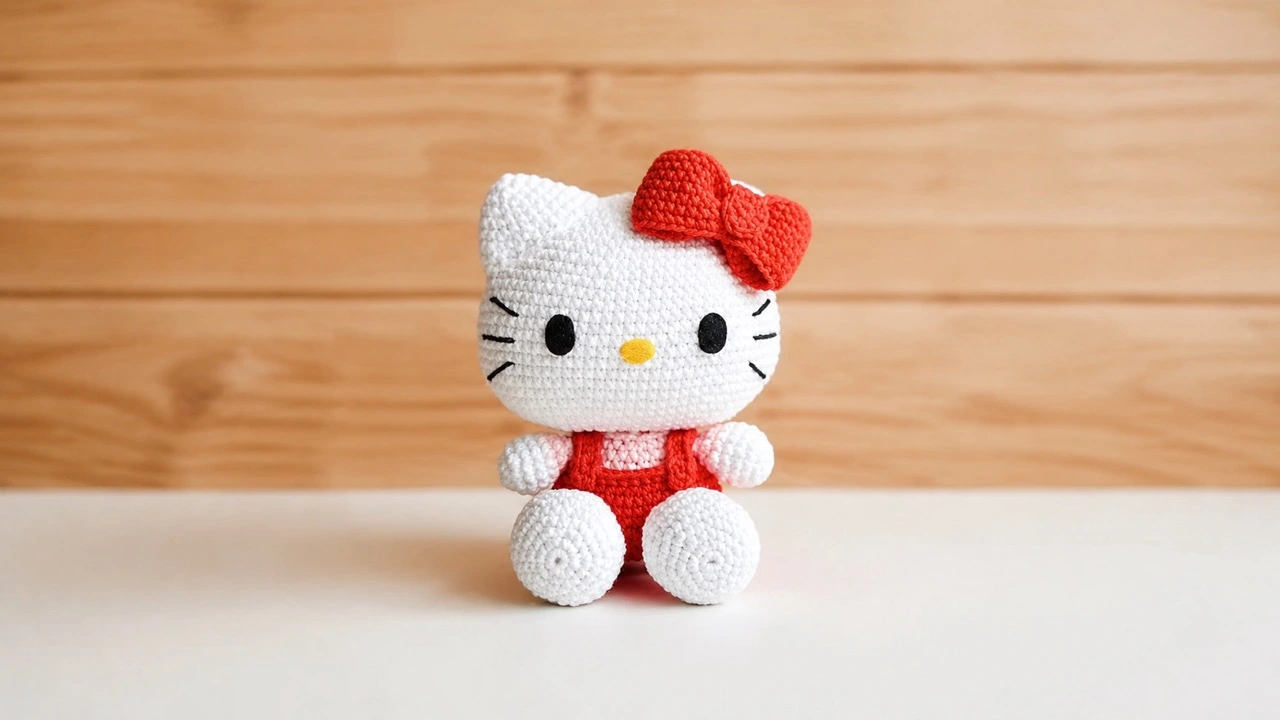
Free Beginner Crochet Crochet Hello Kitty Amigurumi Pattern: Step-by-Step Doll Tutorial
Free Beginner Crochet Hello Kitty Amigurumi Pattern
This Crochet Hello Kitty amigurumi pattern helps you make a sweet, seated Hello Kitty doll with a white crocheted head, red bow, pink outfit, and clear photo guides for the ears, arms, and bow.
Before you begin
This is a compact project, but it is made from several separate components. A calm, organised start will make the finishing stage much easier. Wind small yarn balls before you begin, keep a stitch marker in the first stitch of each spiral round, and leave every sewing tail longer than you think you need. The head is your best reference piece, so finish it before deciding on the final placement of the ears, face, and bow. Keep the three photo panels open as you make each matching part.
- Count every round before moving on; correcting one missed increase is much easier early.
- Pin the ears, arms, legs, tail, and bow before sewing anything permanently.
- Stuff in small amounts and smooth the filling with your fingers as you work.
There is a special kind of satisfaction in making a character from a simple length of yarn. You begin with a small magic ring, keep adding patient little stitches, and gradually see a familiar face take shape in your hands. This Crochet Hello Kitty amigurumi pattern gives you everything you need to make a soft, cheerful doll with her classic white head, red bow, pink outfit, and sweet felt features.
You will make the doll in separate pieces, then assemble them into a finished character that is approximately 15 cm tall. Take your time with the face and finishing; those small details make the completed amigurumi feel polished and full of personality.
Materials and Tools
For this Crochet Hello Kitty amigurumi pattern, the recommended 2.0 mm hook and fine yarn create the tight fabric that makes amigurumi look smooth and prevents the stuffing from showing through. If your stitches feel loose, use a slightly smaller hook rather than overfilling the pieces.
| Material | Details | Why you need it |
|---|---|---|
| Crochet hook | 2.0 mm | Creates firm, even amigurumi stitches |
| Yarn | 2 mm thick white, red, pink, and black yarn | Makes the doll, outfit, bow, and embroidered details |
| Wool needle | 1 | Sews the pieces together and hides yarn tails |
| Silicone stuffing | As needed | Shapes the head, body, limbs, and tail |
| Black felt | Small piece | Cuts the two oval eyes |
| Yellow felt | Small piece | Cuts the oval nose |
| Scissors | 1 pair | Cuts yarn and felt |
| Stitch marker | 1 | Marks the first stitch of each spiral round |
| Pins | Several | Holds parts in place before you sew |
| Liquid silicone | As needed | Secures the felt pieces and bow |
A note about yarn and finished size
This Crochet Hello Kitty amigurumi pattern is designed with 2 mm-thick yarn. Changing the yarn weight will change the size of the finished doll and can also alter the position of the facial features. Keep the same yarn weight for every part if you want the head, ears, body, and limbs to stay in proportion.
For more help with choosing yarn, link to your amigurumi yarn guide here.
Crochet Abbreviations
All instructions use standard crochet abbreviations. Keep this table nearby while you work, particularly if this is one of your first character projects.
| Abbreviation | Meaning |
|---|---|
| MR | Magic Ring |
| Ch | Chain |
| sc | Single crochet |
| dec | Decrease |
| inc | Increase |
| sl st | Slip stitch |
| hdc | Half double crochet |
| dc | Double crochet |
| BLO | Back Loop Only |
| FLO | Front Loop Only |
How to read the rounds
The doll is crocheted in a spiral unless a section says otherwise. Use a stitch marker in the first stitch of every round, moving it upward as you work. The number in parentheses at the end of a round is your total stitch count for that round.
When a stitch sequence appears inside parentheses, repeat it the stated number of times. For example, (6 sc, 1 inc) 6 times means you work six single crochets and one increase, then repeat that sequence six times in total.
Helpful skills before you start
You will be more comfortable with this project if you can make a magic ring, crochet in a continuous round, increase, decrease, change colour, and sew crochet pieces together. If you would like a refresher, add links to your magic ring tutorial, invisible decrease guide, and amigurumi assembly guide.
Crochet Hello Kitty Amigurumi Pattern
Work slowly and count as you go. The head is the largest piece, so making it first gives you a useful reference point for the ears, felt features, and outfit.
Head
In white: Make 14 chains. Start in the second chain from the hook and crochet on both sides of the starting chain.
- 1 inc, 11 sc, 2 inc, 11 sc, 1 inc (30)
- 2 inc, 11 sc, 4 inc, 11 sc, 2 inc (38)
- 2 sc, 1 inc, 13 sc, 1 inc, 4 sc, 1 inc, 13 sc, 1 inc, 2 sc (42)
- (6 sc, 1 inc) 6 times (48)
- 2 inc, 20 sc, 3 inc, 22 sc, 1 inc (54)
- (8 sc, 1 inc) 6 times (60)
- 2 inc, 26 sc, 3 inc, 28 sc, 1 inc (66)
- (10 sc, 1 inc) 6 times (72)
- Rounds 9–18: 72 sc
- (10 sc, 1 dec) 6 times (66)
- 2 dec, 28 sc, 3 dec, 26 sc, 1 dec (60)
- (8 sc, 1 dec) 6 times (54)
- 2 dec, 22 sc, 3 dec, 20 sc, 1 dec (48)
- 48 sc
- (6 sc, 1 dec) 6 times (42)
- (5 sc, 1 dec) 6 times (36)
- (4 sc, 1 dec) 6 times (30). Stuff the head.
- (3 sc, 1 dec) 6 times (24)
- (2 sc, 1 dec) 6 times (18)
- (1 sc, 1 dec) 6 times (12)
- 6 dec (6). Fasten off and close.
In this Crochet Hello Kitty amigurumi pattern, the beginning of the head is the lower edge that you will sew to the body. Stuff the head firmly but gently, smoothing the filling as you go so the shape stays rounded.
Ears
Make two ears in white. Leave a long yarn tail on each ear for sewing.
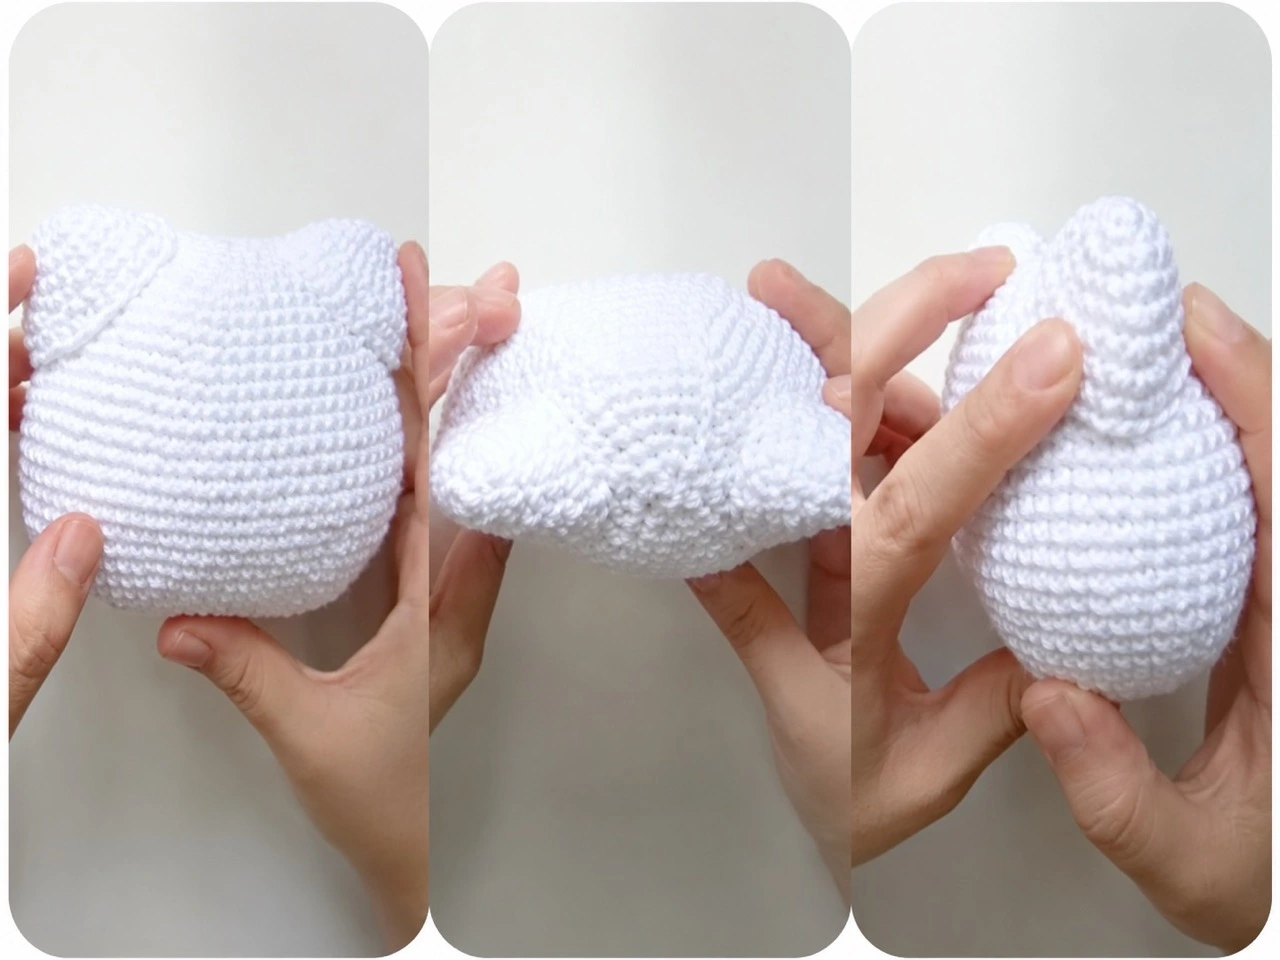
Use the photo guide to check the ear height and angle before sewing the ears permanently.
- 6 sc in MR
- 6 inc (12)
- (1 sc, 1 inc) 6 times (18)
- (5 sc, 1 inc) 3 times (21)
- (6 sc, 1 inc) 3 times (24)
- (5 sc, 1 inc) 4 times (28)
- (1 inc, 13 sc) 2 times (30). Fasten off and leave yarn to sew to the head.
Lightly stuff the ears before attaching them. Pin them in place first and look at the head straight on; this is the easiest way to make sure they sit at the same height.
Body
In red: Make 14 chains. Start in the second chain from the hook and crochet on both sides of the starting chain.
- 1 inc, 11 sc, 2 inc, 11 sc, 1 inc (30)
- 2 inc, 11 sc, 4 inc, 11 sc, 2 inc (38)
- (2 inc, 17 sc) 2 times (42)
- Rounds 4–9: 42 sc
- (5 sc, 1 dec) 6 times (36). Change to pink.
- In BLO: (4 sc, 1 dec) 6 times (30)
- (3 sc, 1 dec) 6 times (24)
- 24 sc
- (4 sc, 1 dec) 4 times (20). Fasten off and leave a long tail to sew the body to the head.
Hook the red yarn into the free loops of the BLO round and make sc all the way around to hide the colour change. Stuff the body before you sew it to the head.
Arms
Make two arms. Work in white first, then change to pink for the top of the arms.
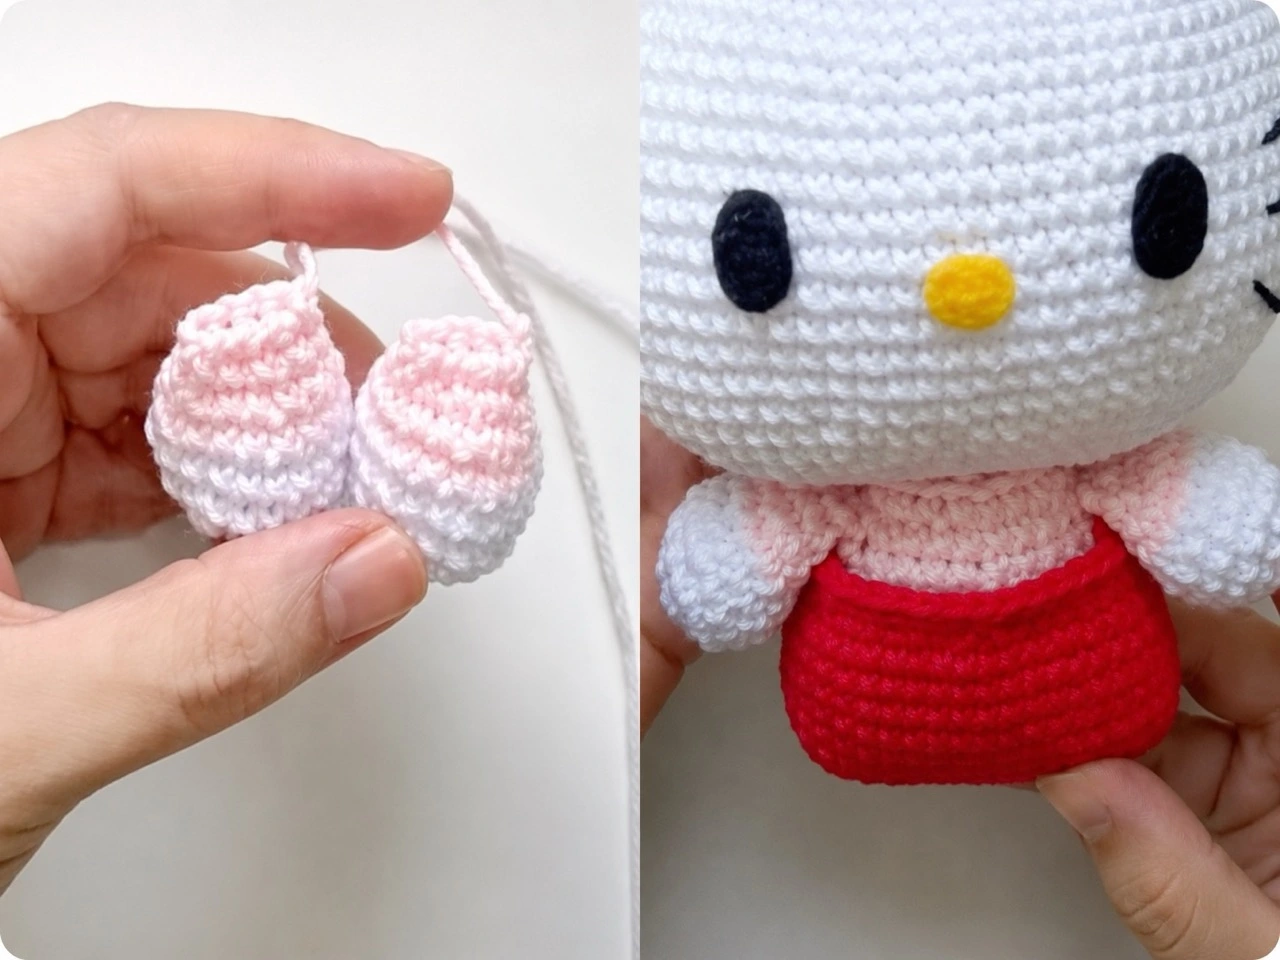
The arm photo guide shows the finished shape and the recommended placement below the head seam.
- 6 sc in MR
- 6 inc (12)
- (1 sc, 1 inc) 6 times (18)
- Rounds 4–5: 18 sc. Change to pink.
- (4 sc, 1 dec) 3 times (15)
- (3 sc, 1 dec) 3 times (12)
- (1 sc, 1 dec) 4 times (8). Stuff the white part only.
Flatten the opening and make 4 sc through both layers. Fasten off and leave a tail for sewing. Attach both arms two rounds below the head seam.
Suspenders
Make two suspenders in red.
- Make 17 chains and start in the third chain from the hook.
- 15 hdc. Fasten off and cut the yarn.
Glue or sew the suspenders across the shoulders once the body is attached to the head.
Legs
Make two legs in white. Leave a long tail for sewing each one to the lower body.
- 6 sc in MR
- 6 inc (12)
- (1 sc, 1 inc) 6 times (18)
- (2 sc, 1 inc) 6 times (24)
- (3 sc, 1 inc) 6 times (30)
- Rounds 6–9: 30 sc
- (3 sc, 1 dec) 6 times (24)
- (2 sc, 1 dec) 6 times (18)
- (1 sc, 1 dec) 6 times (12). Fasten off and leave a tail to sew.
Stuff the legs, then sew them to the lower body in a position that helps the doll sit upright.
Tail
Work the tail in white. It adds a cute finishing touch and provides useful support when the doll is sitting.
- 6 sc in MR
- 6 inc (12)
- (1 sc, 1 inc) 6 times (18)
- Rounds 4–6: 18 sc
- (1 sc, 1 dec) 6 times (12)
- (1 sc, 1 dec) 4 times (8). Fasten off and leave a tail to sew.
Stuff the tail lightly. Sew it to the back of the body so it supports the finished doll without pushing it too far forward.
Bow
Make the bow in red. This Crochet Hello Kitty amigurumi pattern uses joined circles here rather than a spiral.
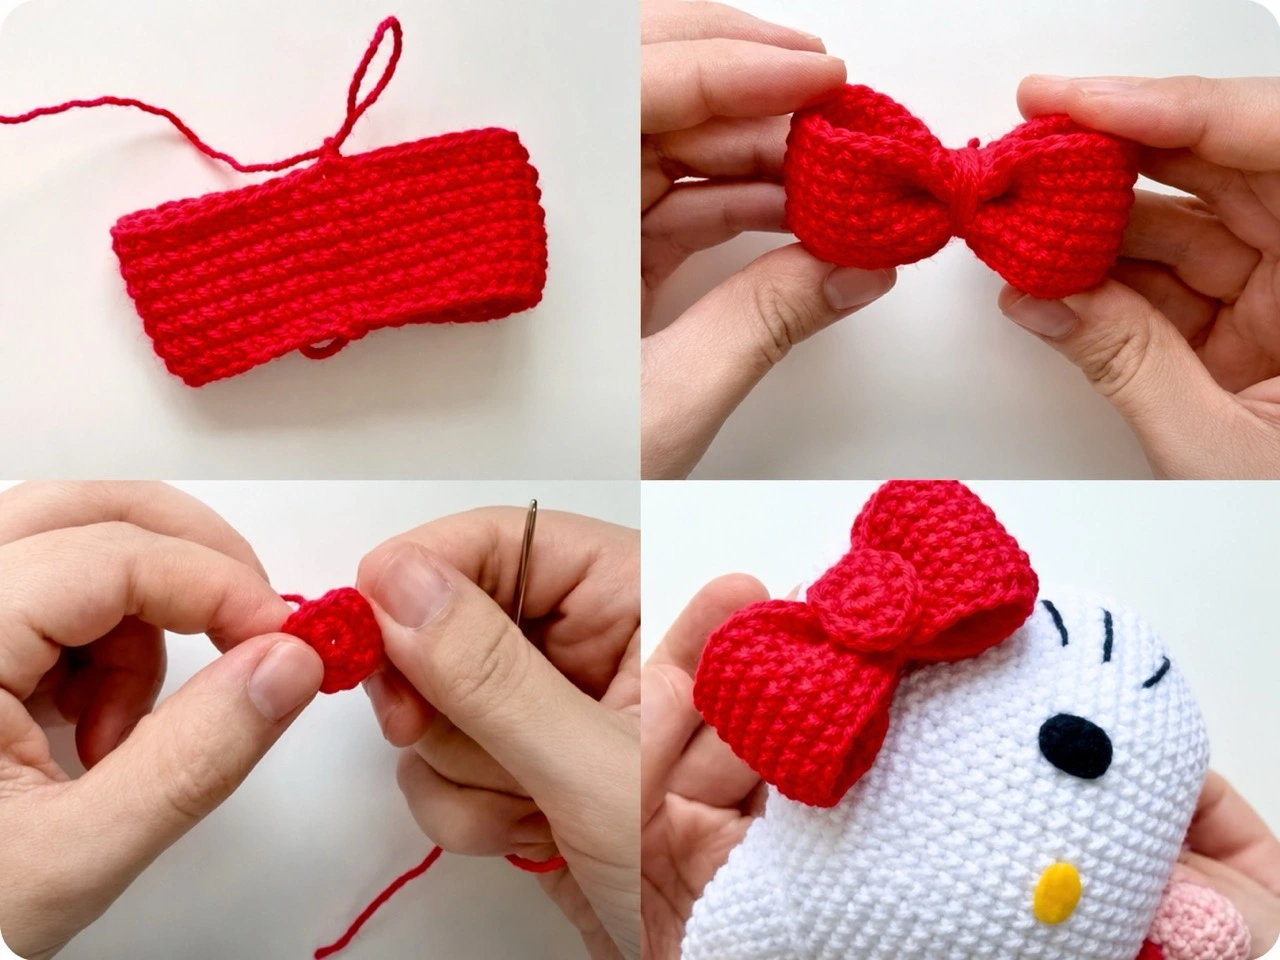
Follow the bow photo guide to shape the centre neatly and position the finished bow on the head.
- Make 38 chains.
- Close in the first chain with a sl st, chain 1, and make the first round of 38 sc in that same stitch. Continue in circles, not a spiral.
- Rounds 1–7: 38 sc. Fasten off and leave a long tail.
Wrap the long tail firmly around the middle of the crocheted strip several times to form the two bow loops. Secure the yarn.
Centre piece: Make a magic ring of 6 sc, then make 6 inc. Close with an invisible closure and glue the piece over the centre of the bow.
Assembly and Finishing
In this Crochet Hello Kitty amigurumi pattern, assembly is where the separate pieces become a recognisable character. Lay all pieces on a flat surface first, then use pins to test the position of the ears, arms, legs, tail, and bow before sewing.
Eyes, nose, and whiskers
Cut two black felt ovals for the eyes and one yellow felt oval for the nose.
| Feature | Size and placement |
|---|---|
| Eyes | Black ovals, 13 mm high × 10 mm wide |
| Nose | Yellow oval, 11 mm wide × 8 mm high |
| Eye placement | Glue from round 13 of the head upward, with 11 visible stitches between the eyes |
| Nose placement | Centre it slightly below and between the eyes |
| Whiskers | Embroider 3 or 4 stitches back from each eye; each whisker spans 4 stitches |
Final assembly checklist
- Sew the lightly stuffed ears to the top of the head.
- Glue the eyes and nose in position, then add the whiskers.
- Sew the stuffed body to the lower opening of the head.
- Attach the arms two rounds below the head seam.
- Sew the legs to the bottom of the body so the doll can sit.
- Attach the tail as a rear support.
- Glue or sew the suspenders to the shoulders.
- Attach the bow securely to the head.
Finishing tips for a polished result
Check the doll from the front, side, and back before you tie off the last yarn tails. If the ears look uneven, the arms twist, or the face feels off-centre, it is worth adjusting them now. A few extra minutes spent on placement will make the finished amigurumi look much more balanced.
If you are making the doll for a very young child, consider embroidering the facial features rather than attaching felt with adhesive. Alongside your amigurumi finishing and safety guide, review the U.S. Consumer Product Safety Commission’s toy-safety guidance before giving a handmade toy to a young child.
Crochet Hello Kitty Amigurumi Pattern FAQ
Is this Crochet Hello Kitty amigurumi pattern suitable for beginners?
You can make this project as a confident beginner if you know how to work a magic ring, single crochet, increase, decrease, and sew pieces together. The individual stitches are simple; the most careful work comes during assembly and face placement.
What size will the finished doll be?
With the stated 2.0 mm hook and 2 mm-thick yarn, the finished doll is about 15 cm tall and 12 cm wide. Your individual tension and yarn choice can make it slightly larger or smaller.
Why is my stuffing showing through the crochet fabric?
Your tension may be too loose or your hook may be too large for the yarn. Try a smaller hook size and add stuffing gradually. You want the pieces to feel full without stretching the stitches apart.
Can you make the Crochet Hello Kitty amigurumi pattern in different colours?
Yes. You can change the bow, dress, and suspender colours while keeping the same yarn weight. If you use a thicker yarn, remember that the facial features and component placement may need to be larger too.
How do you keep the doll sitting upright?
Place the legs low on the body and sew the tail so it acts as a small support at the back. Test the sitting position before you fasten the stitches permanently.
One Comment
Comments are closed.