Free Charmander Crochet Pattern: Beginner Amigurumi Guide
Free Charmander Crochet Pattern
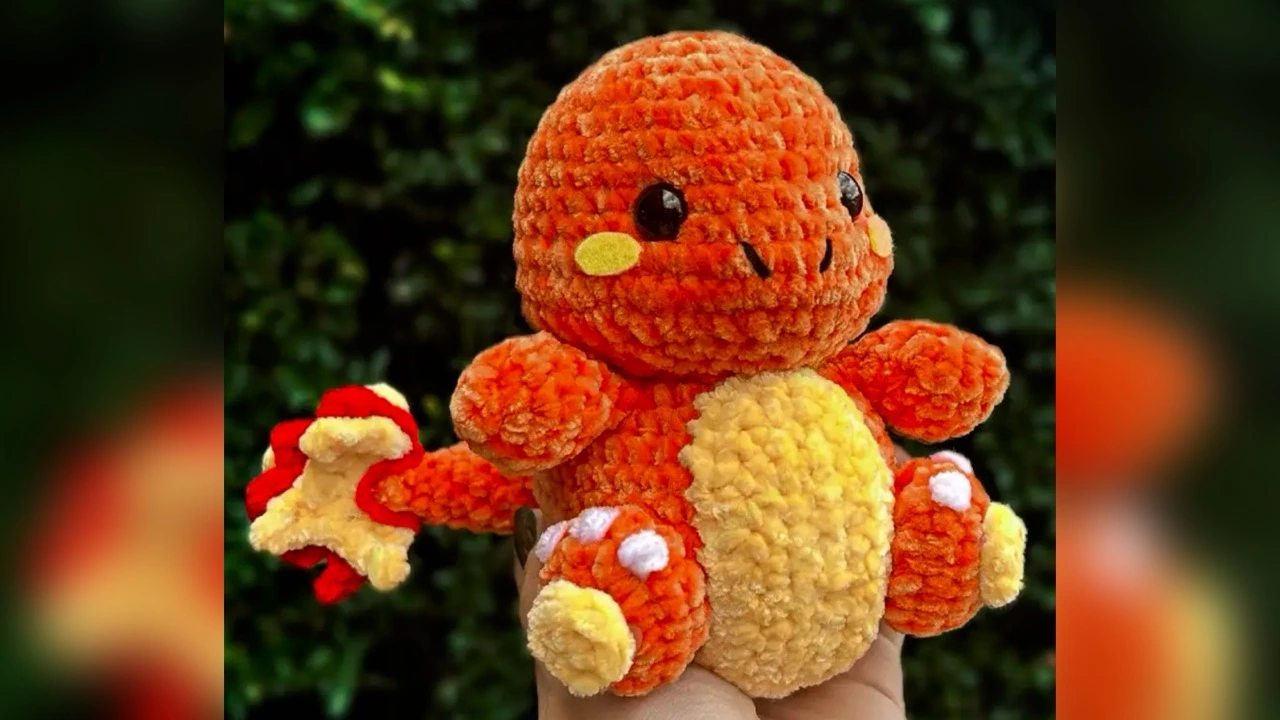
Looking for a free crochet pattern that goes beyond your first swatch? This free Charmander crochet pattern lets you make a fire-type Pokémon companion with clear, round-by-round amigurumi instructions. The build starts at the head, continues through the body, and ends with small limbs, a curved tail, flame details, and an optional Pikachu hat.
Charmander crochet pattern: beginner skills you will use
This free Charmander crochet pattern is a confident-beginner project if you already know how to make a magic ring, single crochet, increases, decreases, and sew small pieces together. It is not a first-ever crochet project, but it is a useful next step for learning clean shaping and assembly.
If you are collecting amigurumi crochet patterns for your next project, this guide helps you practise accurate stitch counts, light stuffing, and tidy finishing. For another small toy project, explore our mini cat amigurumi pattern.
Materials
For a polished finish, this Charmander crochet pattern works best with a firm, even fabric and careful stuffing.
| What you need | Notes |
|---|---|
| Orange, yellow, red, white and brown yarn | Use a yarn weight and hook combination that creates a firm fabric without visible gaps. |
| Hook | A 5 mm hook is a useful starting point for worsted-weight yarn. |
| Polyester fibre fill | Add small amounts gradually to keep the shape smooth and huggable. |
| 6–8 mm safety eyes or felt eyes | Use embroidered or felt eyes for a plush intended for a very young child. |
| Scissors, yarn needle, stitch markers, pink felt and fabric-safe glue | Pins are helpful for checking symmetry before sewing pieces in place. |
Abbreviations
| Abbreviation | Meaning |
|---|---|
| MR | Magic ring |
| sc | Single crochet |
| inc | Increase: work 2 single crochet stitches in the same stitch |
| dec | Decrease: combine 2 stitches into 1 |
| sl st | Slip stitch |
| HDC | Half double crochet |
| BLO | Back loop only |
Head and body — use orange yarn
Begin at the top of the head and continue directly into the body. Insert the eyes between R9 and R10 with 6 stitches between them, checking the face from the front before securing.
- R17 sc in a MR. [7]
- R2Inc around. [14]
- R3(sc, inc) × 7. [21]
- R4(2 sc, inc) × 7. [28]
- R5(3 sc, inc) × 7. [35]
- R6–R10sc around for 5 rounds. [35]
- R118 sc, 6 inc, 2 sc, 4 inc, 2 sc, 6 inc, 7 sc. [51]
- R12sc around. [51]
- R138 sc, 6 dec, 2 sc, 4 dec, 2 sc, 6 dec, 7 sc. [35]
- R14(3 sc, dec) × 7. [28]
- R15(2 sc, dec) × 7. [21]
- R16(sc, dec) × 7. [14]
- R17Inc around. [28]
- R18(sc, inc) × 14. [42]
- R19–R22sc around for 4 rounds. [42]
- R23(5 sc, inc) × 7. [49]
- R24sc around. [49]
- R25(5 sc, dec) × 7. [42]
- R26(4 sc, dec) × 7. [35]
- R27(3 sc, dec) × 7. [28]
- R28sc around. [28]
- R29(2 sc, dec) × 7. [21]
- R30(sc, dec) × 7. [14]
- R31Dec around. [7]
- R32Dec around, sl st to fasten off, then sew the opening closed.
Arms — make 2 with orange yarn
- R14 sc in a MR. [4]
- R2Inc around. [8]
- R3(sc, inc) × 4. [12]
- R4sc around. [12]
- R5(sc, dec) × 4. [8]
- R6–R7sc around for 2 rounds. [8]
Stuff lightly, fold the opening flat, and work single crochet through both sides to close it. Fasten off and leave a long tail for sewing.
Legs — make 2 with orange yarn
- R1Ch 5. [5]
- R2Skip the first stitch, 3 sc, inc in the last stitch; turn to the other side of the chain, 3 sc, inc. [10]
- R3Inc around. [20]
- R4sc around. [20]
- R5Dec around. [10]
Stuff evenly and leave a sewing tail. After attaching both legs, embroider 3 small white toe lines on each foot.
Tail — use orange yarn
Stuff the tail firmly enough to hold a gentle curve, but do not overstuff it.
- R14 sc in a MR. [4]
- R2sc around. [4]
- R3(sc, inc) × 2. [6]
- R4sc around. [6]
- R5(2 sc, inc) × 2. [8]
- R6sc around. [8]
- R7(3 sc, inc) × 2. [10]
- R8sc around. [10]
- R9(4 sc, inc) × 2. [12]
- R10sc around. [12]
- R11(5 sc, inc) × 2. [14]
- R12sc around. [14]
- R13(6 sc, inc) × 2. [16]
- R14sc around. [16]
Tail base and flames
With yellow yarn, make 5 sc in a MR for each small yellow tail-base circle. For the flame pieces, make 2 yellow flames from a foundation chain of 7, shaping the points with chains of 2, 3 and 2. Make 1 red flame from a foundation chain of 8, shaping the points with chains of 2, 3, 4, 3 and 2. Place the red flame between the two yellow flames, then sew the cluster to the end of the tail.
Optional Pikachu hat
Hat base — use yellow yarn
- R17 sc in a MR. [7]
- R2Inc around. [14]
- R3(sc, inc) × 7. [21]
- R4(2 sc, inc) × 7. [28]
- R5(3 sc, inc) × 7. [35]
- R6–R9sc around for 4 rounds. [35]
- R10In BLO: sl st, then repeat (sc, HDC, sc) around to create the brim.
Hat ears — make 2
- R1With brown yarn, 6 sc in a MR. [6]
- R2Inc around. [12]
- R3sc around; change to yellow in the last stitch. [12]
- R4–R5sc around in BLO for 2 rounds. [12]
- R6sc around. [12]
- R7(4 sc, dec) × 2. [10]
- R8sc around. [10]
Assembly and finishing
- Place the eyes between R9 and R10 with 6 stitches between them before securing.
- Use black yarn to stitch 2 short nostril lines around the R11 face area, then add pink felt cheeks below the eyes.
- Pin the arms just below the head, around R17–R21, before sewing. Attach the legs at the base, keeping them parallel so Charmander sits evenly.
- Centre the tail on the back of the body between R19 and R26, then attach the flame cluster at its tip.
- Attach the optional hat ears to the yellow hat base. Decide whether you want the hat removable before adding it to the plush.
- Weave in every yarn end, reshape the filling, and check each seam before gifting or displaying your finished Charmander.
Frequently asked questions
Is this a beginner crochet pattern?
This free Charmander crochet pattern suits confident beginners who can already make a magic ring, single crochet, increases, decreases, and sew small pieces together. If this is your first amigurumi, practise those skills first; the project has several components and detailed assembly.
How do I avoid holes in the fabric?
Use a smaller hook or slightly firmer tension. The stitches should be dense enough that fibre fill does not show through.
Can I make a shiny version?
Yes. Use yellow yarn in place of orange for a shiny-inspired finish, while keeping the shaping and construction the same.
Can I make it for a child?
For very young children, embroider or use felt for the eyes and make sure all attached pieces are securely sewn.
Pokémon and Charmander are trademarks of The Pokémon Company. This post is not affiliated with or endorsed by The Pokémon Company.