Free Crochet Step-by-Step Hanging Skeleton Pattern for Beginners
Free Crochet Hanging Skeleton Pattern: Step-by-Step for Beginners
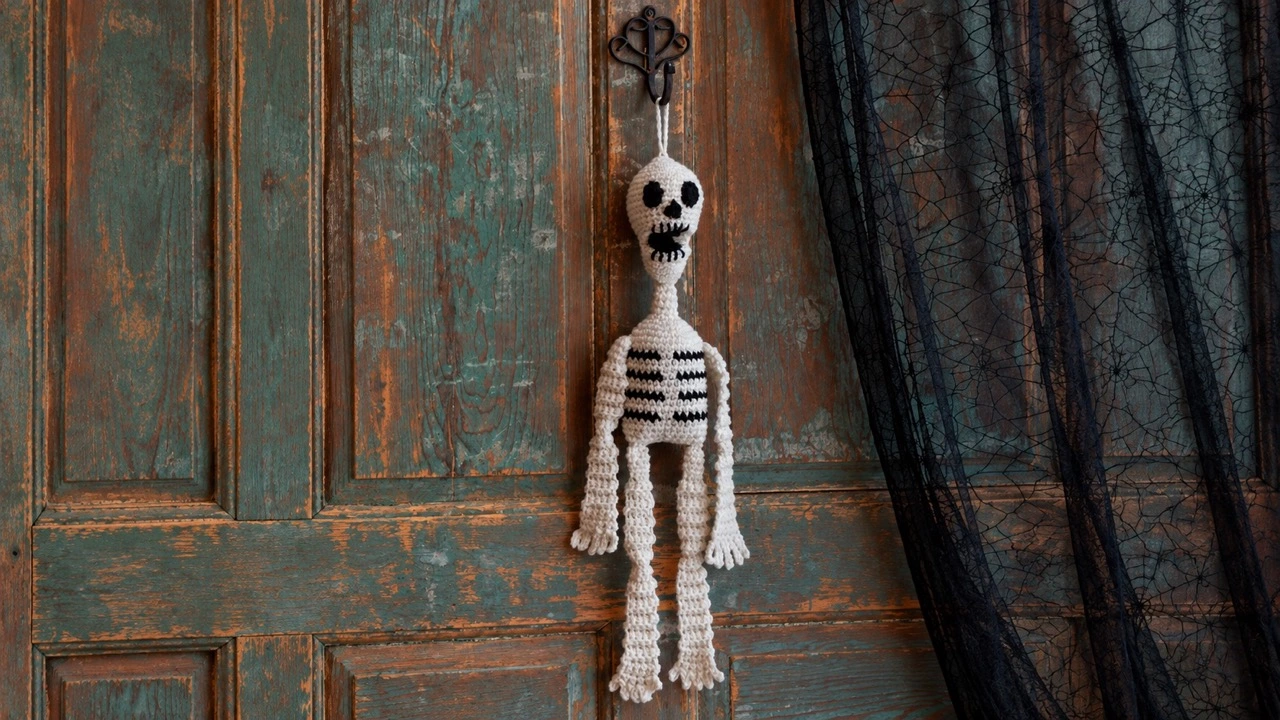
There’s something wonderfully spooky about a handmade skeleton swinging gently on your front door. It greets trick-or-treaters, adds a touch of handmade charm to your Halloween decor, and gives you a project that’s big enough to feel impressive but easy enough to finish in a few evenings.
This Free Crochet Step-by-Step Hanging Skeleton uses Red Heart With Love yarn and simple single crochet shaping to create a 22-inch skeleton with a skull, jaw, ribcage, arms, legs, fingers, and toes. Whether you hang him on a door, a wall, or a porch hook, he’s the kind of Halloween decoration that makes people smile before they even ring the bell.
Below is a complete guide to the pattern. You’ll find the materials, abbreviations, step-by-step rounds for the skull, jaw, mouth, body, arms, and legs, plus assembly notes, finishing touches, tips, and answers to common questions.
This crochet hanging skeleton pattern is a beginner-friendly way to make a memorable Halloween door decoration. For another approachable make, explore our crochet bunny in overalls pattern.
Jump to a Section
- Why This Crochet Hanging Skeleton Pattern Stands Out
- What You Need Before You Start
- Abbreviations and Special Stitches
- How to Crochet the Skeleton Skull
- How to Crochet the Jaw, Mouth, Eyes, and Nose
- How to Crochet the Skeleton Body
- How to Crochet the Arms and Fingers
- How to Crochet the Legs and Toes
- Putting Your Crochet Hanging Skeleton Together
- Finishing Touches for Your Halloween Skeleton
- Tips for a Neater Crochet Hanging Skeleton Pattern
- FAQ About the Crochet Hanging Skeleton Pattern
Why This Crochet Hanging Skeleton Pattern Stands Out
| Detail | What to Expect |
|---|---|
| Skill level | Easy |
| Finished size | About 22 inches (56 cm) long |
| Yarn | Red Heart With Love — 1 skein each in Eggshell (A) and Black (B) |
| Hook | 5 mm (US H-8) |
| Construction | Skull, jaw, mouth pieces, eyes, nose, body, arms, and legs are made separately and sewn together. |
| Details | The ribcage is created with color changes, and the fingers and toes are shaped with chains and slip stitches. |
| Display | A hanging loop at the top makes it ready for a door or wall. |
| Gauge | 16 sc = 4 in (10 cm); 14 rows = 4 in (10 cm) in single crochet. |
What You Need Before You Start
Gather your supplies first. The pattern uses two colors and simple tools.
Yarn and Hook
| Item | Details |
|---|---|
| Yarn | Red Heart With Love: 1 skein each 1101 Eggshell (A) and 1012 Black (B) |
| Crochet hook | 5 mm (US H-8) Susan Bates crochet hook, or size needed to obtain gauge |
| Other tools | Fiberfil for stuffing, stitch markers, and a yarn needle |
Gauge
Notes
- Pieces are worked in continuous rounds. Place a stitch marker for the beginning of each round.
- When changing colors, work the last step of the last stitch of the previous color with the new color.
- Carry colors not in use loosely on top of the row, working stitches over the carried yarn to hide it.
Abbreviations and Special Stitches
| Abbreviation | Meaning |
|---|---|
| A, B, C | Color A, B, C |
| ch | chain |
| cm | centimeters |
| mm | millimeters |
| sc | single crochet |
| st(s) | stitch(es) |
| tog | together |
| [ ] | Work directions in brackets the number of times specified |
| sc2tog | [Draw up a loop in next st] twice, yarn over and draw through all 3 loops on hook. |
How to Crochet the Skeleton Skull
Start at the top of the skull with A.
- Round 1: Ch 2. Work 6 sc in 2nd ch from hook — 6 sts. Place stitch marker for beginning of round.
- Round 2: Working in continuous rounds, work 2 sc in each st around — 12 sts.
- Round 3: [Sc in next st, 2 sc in next st] 6 times — 18 sts.
- Round 4: [Sc in next 2 sts, 2 sc in next st] 6 times — 24 sts.
- Round 5: [Sc in next 3 sts, 2 sc in next st] 6 times — 30 sts.
- Round 6: [Sc in next 4 sts, 2 sc in next st] 6 times — 36 sts.
- Rounds 7–12: Sc in each st around.
- Round 13: [Sc2tog, sc in next 4 sts] 6 times — 30 sts.
- Round 14: Repeat Round 7 (sc in each st around).
- Round 15: [Sc in next 2 sts, sc2tog, sc in next st] 6 times — 24 sts.
How to Crochet the Jaw, Mouth, Eyes, and Nose
Jaw
With A, ch 2.
- Round 1: Work 6 sc in 2nd ch from hook — 6 sts. Place stitch marker.
- Round 2: Work 2 sc in each st around — 12 sts.
- Round 3: [Sc in next st, 2 sc in next st] 6 times — 18 sts.
- Round 4: [Sc in next 2 sts, 2 sc in next st] 6 times — 24 sts.
Fasten off.
Mouth (Make 2)
With B, ch 2.
- Round 1: Work 6 sc in 2nd ch from hook — 6 sts. Place stitch marker.
- Round 2: Work 2 sc in each st around — 12 sts.
- Round 3: [Sc in next st, 2 sc in next st] 6 times — 18 sts.
- Round 4: [Sc in next 2 sts, 2 sc in next st] 6 times — 24 sts.
Fasten off.
Skull Eyes (Make 2)
With B, ch 2. Round 1: Work 6 sc in 2nd ch from hook — 6 sts. Fasten off.
Skull Nose
With B, ch 2. Round 1: Work 2 sc in 2nd ch from hook — 2 sts. Round 2: Sc in first sc, 2 sc in next st — 3 sts. Fasten off.
How to Crochet the Skeleton Body
Start at the neck with A.
- Round 1: Ch 2. Work 6 sc in 2nd ch from hook — 6 sts. Place stitch marker.
- Round 2: [Sc in next st, 2 sc in next st] 3 times — 9 sts.
- Rounds 3–5: Sc in each st around.
- Round 6: [Sc in next 2 sts, 2 sc in next st] 3 times — 12 sts.
- Round 7: [Sc in next st, 2 sc in next st] 6 times — 18 sts.
- Round 8: [Sc in next 2 sts, 2 sc in next st] 6 times — 24 sts.
- Round 9: [Sc in next 3 sts, 2 sc in next st] 6 times — 30 sts.
- Round 10: Sc in each st around.
- Round 11: Sc in first st, change to B, sc in next 13 sts, change to A, sc in next 2 sts, change to B, sc in next 13 sts, change to A, sc in last st of round. Cut B.
- Rounds 12–13: With A, sc in each st around.
- Round 14: Repeat Round 11.
- Rounds 15–16: Repeat Round 12.
- Round 17: Repeat Round 11.
- Rounds 18–19: Repeat Round 12.
- Round 20: Repeat Round 11.
- Rounds 21–22: Repeat Round 12.
- Round 23: [Sc in next 2 sts, sc2tog, sc in next st] 6 times — 24 sts.
- Round 24: Repeat Round 10 (sc in each st around).
Fasten off.
How to Crochet the Arms and Fingers
Make 2. Start at the shoulder with A.
- Round 1: Ch 2. Work 6 sc in 2nd ch from hook — 6 sts. Place stitch marker.
- Rounds 2–4: Sc in each st around.
- Row 5: Ch 1, working in back loops only, sc in next 5 sts, turn — 5 sts.
- Rows 6–24: Repeat Row 5.
- Rows 25–27: Ch 1, sc in each st across; turn.
Shape Fingers
Row 28: Ch 5, slip st in 2nd ch from hook, slip st in next 3 ch, slip st in first sc of Row 27, [sc in next sc, ch 5, slip st in 2nd ch from hook, slip st in next 3 ch, slip st in sc just worked] 4 times.
How to Crochet the Legs and Toes
Make 2. Work as for Arm through Row 24.
- Rows 25–26: Repeat Row 5.
- Rows 27–29: Repeat Row 25.
Shape Toes
Row 30: Ch 3, slip st in 2nd ch from hook, slip st in next ch, slip st in first sc of Row 29, [sc in next sc, ch 3, slip st in 2nd ch from hook, slip st in next ch, slip st in sc just worked] 4 times.
Putting Your Crochet Hanging Skeleton Together
Once all the pieces are crocheted, assembly brings your skeleton to life.
- Stuff the skull and jaw with fiberfill.
- Sew one mouth piece to the last round of the skull.
- Sew the second mouth piece to the last round of the jaw.
- With the mouth pieces together, place the skull on top of the jaw.
- Sew 12 back stitches together to join the skull and jaw. Leave the front edge unsewn so the mouth stays slightly open.
- Sew the eyes and nose to the front of the skull.
- With B and straight stitches, sew teeth along the edges of the mouth and the skull and jaw.
- Add fiberfill to the body. Sew the bottom seam closed.
- Sew the skull to the neck.
- Make a 3 in (8 cm) chain. Fold it in half and sew the ends to the top of the head for a hanging loop.
- Sew the arms to either side of the skeleton body.
- Sew the legs to the bottom of the body.
- Weave in all ends.
Finishing Touches for Your Halloween Skeleton
- Shape the fingers and toes. Gently pull them into place so they look like bony digits.
- Fluff the fiberfill. Make sure the skull and body are evenly stuffed.
- Trim any loose fuzz. A clean finish makes the skeleton look sharper.
- Hang it up. Use the loop at the top to display him on a door, wall, or porch hook.
- Add a little pose. You can bend the arms and legs slightly for a more dynamic look.
Tips for a Neater Crochet Hanging Skeleton Pattern
- Check your gauge. The finished size depends on matching the gauge.
- Use a stitch marker. Continuous rounds can be hard to track without one.
- Carry colors neatly. Work over the unused yarn to hide it and keep the inside tidy.
- Stuff lightly. The skeleton should hold its shape without looking bulky.
- Pin before sewing. Placement matters, especially for the arms and legs.
- Sew teeth evenly. Straight stitches in black create the classic skeleton grin.
- Make the hanging loop sturdy. A folded chain sewn securely will hold the weight.
- Block if needed. A gentle steam can help the pieces lie flat before assembly.
FAQ About the Crochet Hanging Skeleton Pattern
Your Next Stitch
This crochet hanging skeleton pattern is one of those Halloween projects that feels both playful and practical. He’s big enough to make a statement, detailed enough to show off your skills, and simple enough to finish before October arrives. Whether you hang him on your front door, add him to a Halloween tree, or give him to a friend who loves spooky decor, you’ll end up with a 22-inch skeleton who’s ready to greet the season.
So gather your Eggshell and Black yarn, pick up your 5 mm hook, and start with that first chain. If you get stuck on the fingers or the assembly, come back to this guide and work through it step by step. And when your skeleton is finished, share him — post a photo, tag your crafty friends, and show off your work. Your next project might be exactly what someone else needs to see.
Happy crocheting!
Your handmade hanging skeleton is ready to bring a little spooky charm to the season.