Free Crochet Pattern Panda Amigurumi Limbs and a Striped Sweater
Free Crochet Pattern Panda Amigurumi Sweater
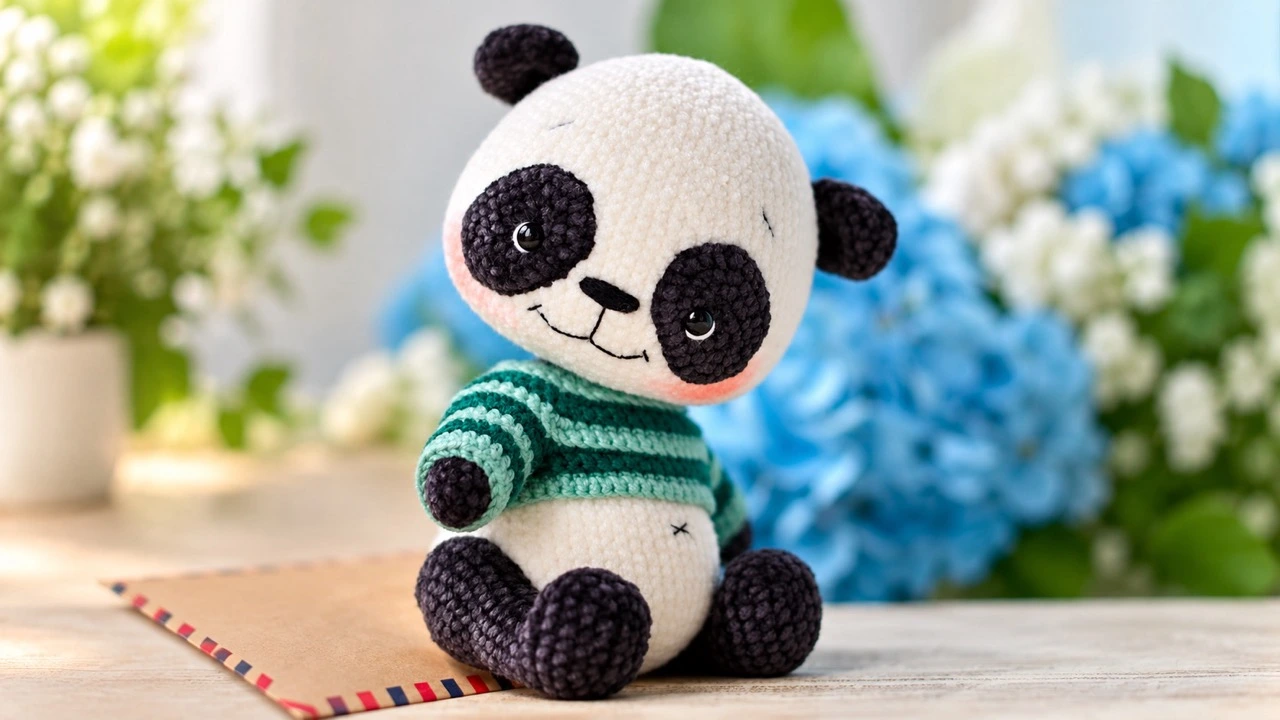
You know the feeling. You spot a tiny handmade panda online, and something in you wants to make one too. Not just any panda — one with soft cheeks, a stitched smile, movable arms, and a little green sweater that looks like it came from a miniature wardrobe. That’s exactly what this crochet pattern panda gives you. It’s rated three stars out of five, finishes around 16 cm tall, and uses simple amigurumi shaping with a few smart extras: jointed legs, embroidered facial details, and a striped sweater you crochet row by row.
Below you’ll find a complete walk-through with the material list, stitch notes, head and body rounds, limb instructions, sweater rows, assembly steps, and answers to common questions.
Jump to a Section
- Why This Crochet Pattern Panda Stands Out
- What You Need Before You Start
- Stitch Terms You’ll See
- How to Crochet the Panda Head
- Eye Spots, Ears, and Face Details
- How to Crochet the Panda Limbs and Body
- How to Crochet the Panda Sweater
- Putting Your Crochet Pattern Panda Together
- Helpful Tips for a Neater Crochet Pattern Panda
- FAQ About the Crochet Pattern Panda
- Your Next Stitch
Why This Crochet Pattern Panda Stands Out
Plenty of panda patterns exist. This one earns attention because it mixes beginner-friendly shaping with details that make the finished toy feel special.
- Difficulty: ★★★☆☆ — a good fit if you already know single crochet, increases, decreases, and working in rounds.
- Finished size: about 16 cm when you use the listed yarn and a 2 mm hook.
- Poseable limbs: plastic joints or cotter pins let the arms and legs move.
- Removable-style sweater: you crochet it separately in mint and dark green stripes.
- Hand-embroidered face: eye spots, nose, mouth, eyebrows, and eye whites give the panda its expression.
- Optional wire frame: you can add a thin wire so the head and body hold their shape.
What You Need Before You Start
Gather everything first. Stopping mid-round to hunt for a tool breaks your rhythm.
Yarn and Hook
- Fine/4ply yarn Katia Velvet Fine — 50 g / 160 m, 100% polyester
- 200 cream
- 211 black
- Fine/4ply yarn YarnArt Baby Cotton — 50 g / 165 m, 50% cotton, 50% acrylic
- 444 dark green
- 439 mint green
- Hook size: 2 mm
Eyes, Joints, and Small Tools
- Polyester toy filling (fiberfill)
- Scissors
- Sewing pins
- Eyes with a loop, 6–7 mm (2 pieces)
- Wire for the frame, optional: 0.9 mm diameter, 20 cm
- DMC embroidery floss in black and white
- Plastic joints: 25 mm for hind legs (2 pieces), 15 mm for forelegs (2 pieces)
- Cotter pins: 25 mm disks (4 pieces), 15 mm disks (4 pieces), T-shaped cotter pins 20×2 (4 pieces)
- Round nose pliers
- Blush or dry peach pastel for tinting
- Buttons, 5 mm (3 pieces)
The finished toy measures about 16 cm when you use these materials.
Stitch Terms You’ll See
Before you make the first magic ring, scan these abbreviations. They appear throughout the pattern.
For a broader refresher, see the Craft Yarn Council’s guide to reading crochet patterns.
- MR — magic ring
- sc — single crochet
- hdc — half double crochet
- hdcinc — half double crochet increase (2 hdc in one stitch)
- hdc2tog — crochet 2 hdc together
- dc — double crochet
- dcinc — double crochet increase (2 dc in one stitch)
- Bobble st — unfinished dc stitches in one stitch with a common top
- inc — increase (2 sc in one stitch)
- dec — decrease (2 sc together)
- 3sc inc — crochet 3 sc in one stitch
- sc3tog — crochet 3 sc together
- ch — chain
- t-ch — turning chain
- sl st — slip stitch
- BLO — back loops only
- (…) — number in brackets means the stitch count for that round
- (…)*N — repeat the instruction in brackets N times
The Shift Stitch, Explained
When you crochet in rounds, the beginning marker tends to drift to the right. To line it up again, you crochet one extra sc at the end of the round and move the marker by one stitch. The second stitch becomes the first, and the first becomes the last. This is the shift stitch or extra stitch. Do not count it in your stitch total. It keeps your rounds stacked neatly and your panda’s shape symmetrical.
How to Crochet the Panda Head
Use cream yarn. The head is the largest piece, so take your time and stuff it firmly but gradually.
Rounds 1–10: Building the Top of the Head
- 16sc in a MR (6)
- 26inc (12)
- 3(1sc, inc)*6 (18)
- 41sc, inc, (2sc, inc)*5, 1sc (24)
- 5(3sc, inc)*6 (30)
- 62sc, inc, (4sc, inc)*5, 2sc (36)
- 7(5sc, inc)*6 (42)
- 83sc, inc, (6sc, inc)*5, 3sc (48)
- 9(7sc, inc)*6 (54)
- 104sc, inc, (8sc, inc)*5, 4sc (60)
Rounds 11–27: Widening the Face
- 11(9sc, inc)*6 (66)
- 12–1366sc (2 rounds)
- 14(21sc, inc)*3 (69)
- 15–1669sc (2 rounds)
- 1711sc, inc, (22sc, inc)*2, 11sc (72)
- 18–1972sc (2 rounds)
- 20(23sc, inc)*3 (75)
- 2175sc (75)
- 2212sc, inc, (24sc, inc)*2, 12sc (78)
- 23–2778sc (5 rounds)
Rounds 28–36: Closing the Head
- 28(11sc, dec)*6 (72)
- 295sc, dec, (10sc, dec)*5, 5sc (66)
- 30(9sc, dec)*6 (60)
- 314sc, dec, (8sc, dec)*5, 4sc (54)
- 32(7sc, dec)*6 (48)
- 332sc, dec, (4sc, dec)*7, 2sc (40)
- 34(3sc, dec)*8 (32)
- 35(2sc, dec)*8 (24)
- 36(1sc, dec)*8 (16)
Cut the yarn, fasten off, and leave a long end for sewing the head to the body.
Eye Spots, Ears, and Face Details
Eye Spots (Make 2)
Use black yarn. Ch6, then start on the second chain from the hook.
- 14sc, 3sc in the last chain, on the other side of the chain: 3sc, inc (12)
- 2inc, 3sc, 3inc, 3sc, 2inc (18)
- 31sc, inc, 3sc, (1sc, inc)*3, 3sc, (1sc, inc)*2 (24)
- 42sc, inc, 3sc, (2sc, inc)*3, 3sc, (2sc, inc)*2 (30)
Cut the yarn, fasten off, and leave an end for sewing.
Ears (Make 2)
Use black yarn.
- 16sc in a MR (6)
- 26inc (12)
- 3(2sc, inc)*4 (16)
- 4–716sc (4 rounds)
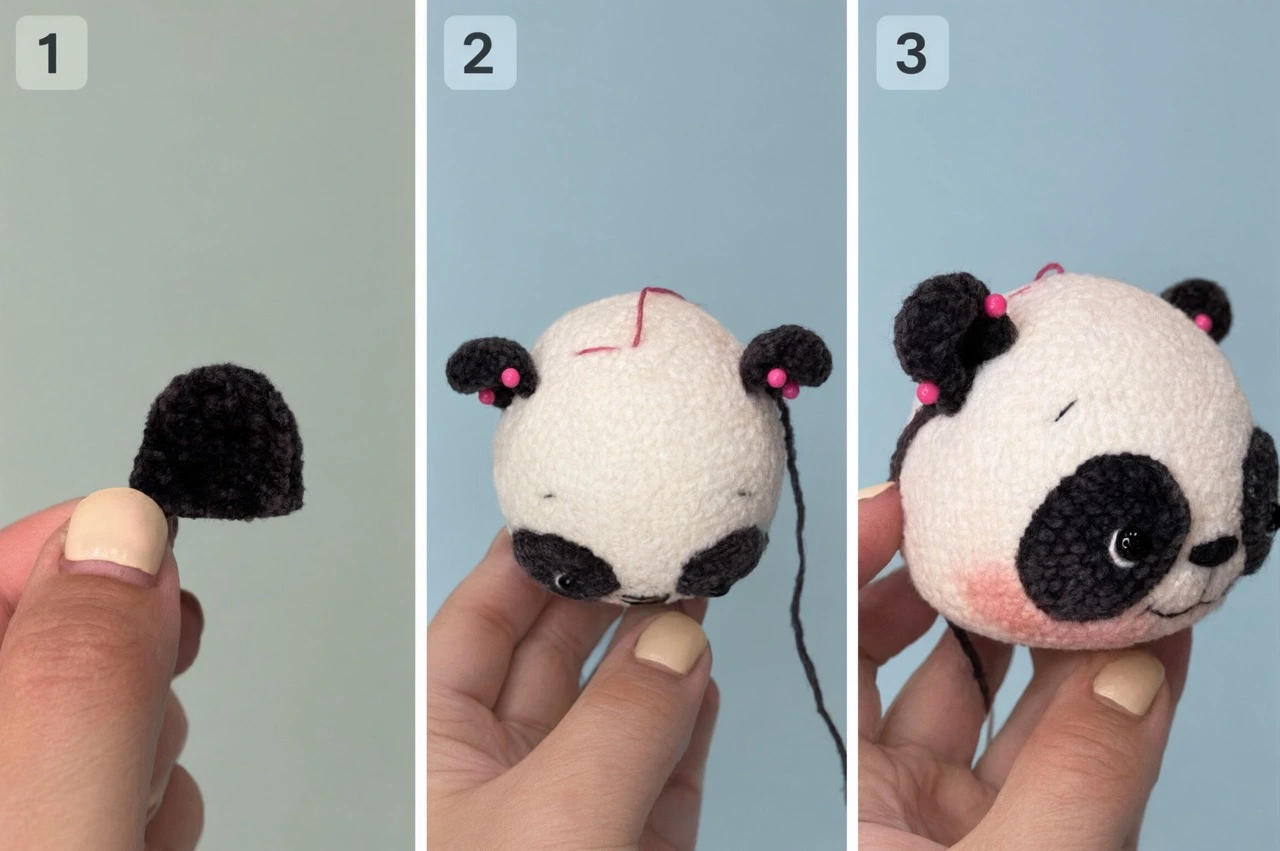
Fold the ear in half and crochet 8sc through both sides. Cut the yarn, fasten off, and leave an end for sewing. Pin the ears to the head in an arc, not a straight line, and sew.
Face Assembly and Embroidery
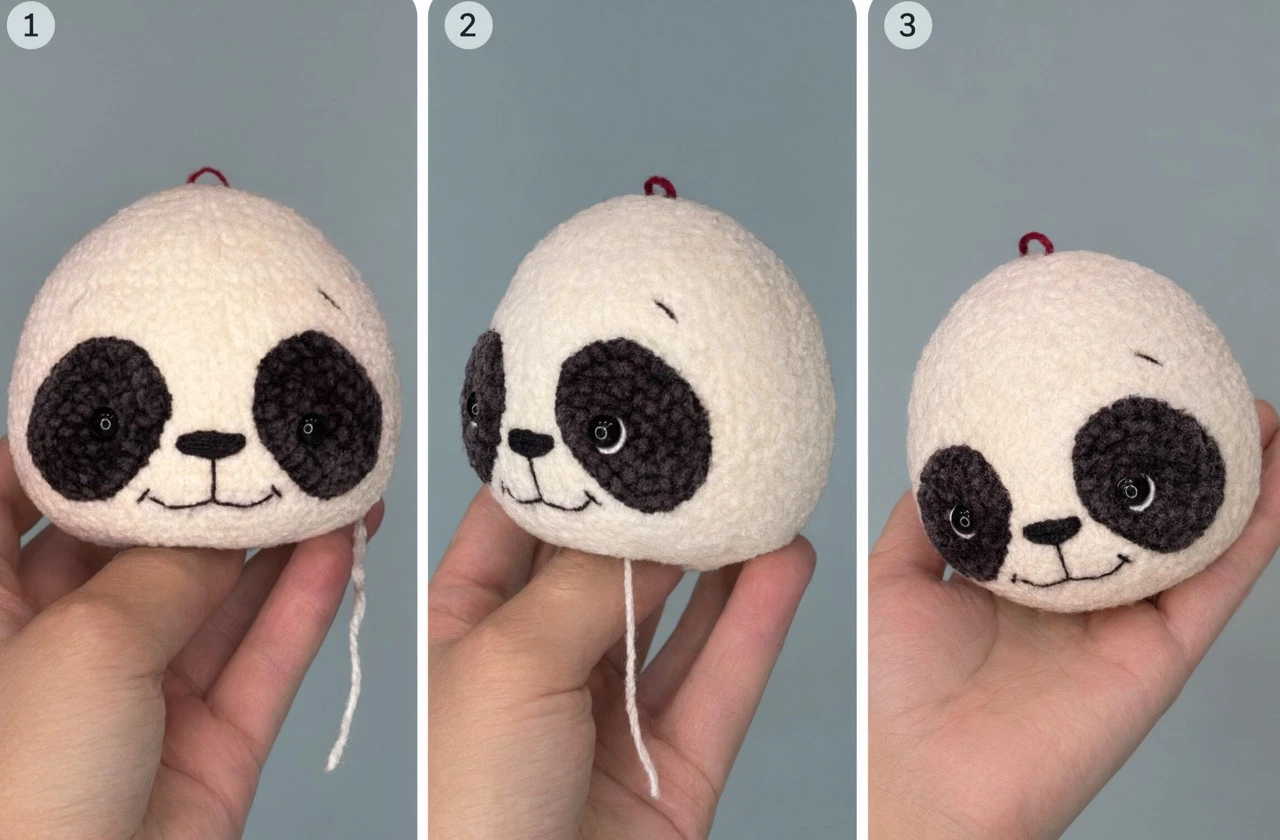
- Pin the eye spots to the head and sew them down.
- With black embroidery floss (2 strands), stitch the eyebrows and mouth.
- With black floss (full thread), stitch the nose using 4–5 stitches.
- Mark the eye placement with sewing pins.
- Take a 6–7 mm eye with a loop. Thread the floss through the loop, put both threads on a needle, and insert it at the marked point. Bring it out through the back of the head. Repeat for the second eye. Bring both eye threads out at the same point behind the head. Pull gently, tie a knot, and hide the ends inside the head.
- With white embroidery floss (full thread), add the eye whites.
- Tint the cheeks with blush or dry peach pastel.
How to Crochet the Panda Limbs and Body
Forelegs (Make 2)
Use black yarn. The marker should sit behind the leg, in the middle. Add shift stitches if needed.
- 16sc in a MR (6)
- 2(1sc, inc)*3 (9)
- 3(2sc, inc)*3 (12)
- 4–612sc (3 rounds)
- 76sc, inc, 5sc (13)
- 813sc (13)
- 96sc, inc, 6sc (14)
- 1014sc (14)
- 117sc, inc, 6sc (15)
- 127sc, inc, 7sc (16)
- 1316sc (16)
Stuff the lower part firmly. Keep the upper part lightly stuffed. Check that the marker is at the back center of the leg.
Left Foreleg Joint Openings
For plastic joints:
- 14. 11sc, ch2, skip 2sc, 3sc (16)
- 15. 11sc, 2sc on the chain, 3sc (16)
For cotter pins:
- 14–15. 16sc (2 rounds)
Right Foreleg Joint Openings
For plastic joints:
- 14. 3sc, ch2, skip 2sc, 11sc (16)
- 15. 3sc, 2sc on the chain, 11sc (16)
For cotter pins:
- 14–15. 16sc (2 rounds)
Fold the leg in half and pick a disk or joint that fills the inside. A 15 mm disk works well. If you use a cotter pin, move 2 rounds down from the marker and count 4sc left for the right foreleg or 4sc right for the left foreleg. Insert the disk and cotter pin at that point.
Finish Both Forelegs
- 16(2sc, dec)*4 (12)
- 176dec (6)
Cut the yarn. Pull the hole closed and hide the ends.
Hind Legs (Make 2)
Use black yarn. Ch5, then start on the second chain from the hook.
- 13sc, 4sc in the last chain, on the other side of the chain: 2sc, inc (11)
- 2inc, 2sc, 3sc inc, 2sc, 3sc inc, 2sc, 2inc (18)
- 31sc, inc, 3sc, 3sc inc, 4sc, 3sc inc, 3sc, (1sc, inc)*2 (25)
- 425sc (25)
- 524sc — short round. Move the marker so it sits behind the leg, centered on the heel. Use the foundation chain as a guide. Add shift stitches if needed.
- 68sl st, 9sc, 8sl st (25)
- 75sc, (1sc, dec)*5, 5sc (20)
- 85sc, 5dec, 5sc (15)
- 96sc, sc3tog, 6sc (13)
- 106sc, inc, 6sc (14)
- 1114sc (14)
- 127sc, inc, 6sc (15)
- 1315sc (15)
- 147sc, inc, 7sc (16)
- 15(7sc, inc)*2 (18)
- 16(8sc, inc)*2 (20)
- 1720sc (20)
Stuff the foot tightly. Leave the upper leg lightly stuffed. Make sure the marker is at the back center.
Left Hind Leg Joint Openings
For plastic joints:
- 18. 12sc, ch2, skip 2sc, 6sc (20)
- 19. 12sc, 2sc on the chain, 6sc (20)
For cotter pins:
- 18–19. 20sc (2 rounds)
Right Hind Leg Joint Openings
For plastic joints:
- 18. 6sc, ch2, skip 2sc, 12sc (20)
- 19. 6sc, 2sc on the chain, 12sc (20)
For cotter pins:
- 18–19. 20sc (2 rounds)
A 25 mm disk or joint fits the hind leg well. For cotter pins, move 2 rounds down from the marker. Count 7sc left for the right hind leg or 7sc right for the left hind leg. Insert the disk and pin.
Finish Both Hind Legs
- 20–2120sc (2 rounds)
- 22(8sc, dec)*2 (18)
- 23(1sc, dec)*6 (12)
- 246dec (6)
Cut the yarn. Close the hole and hide the ends.
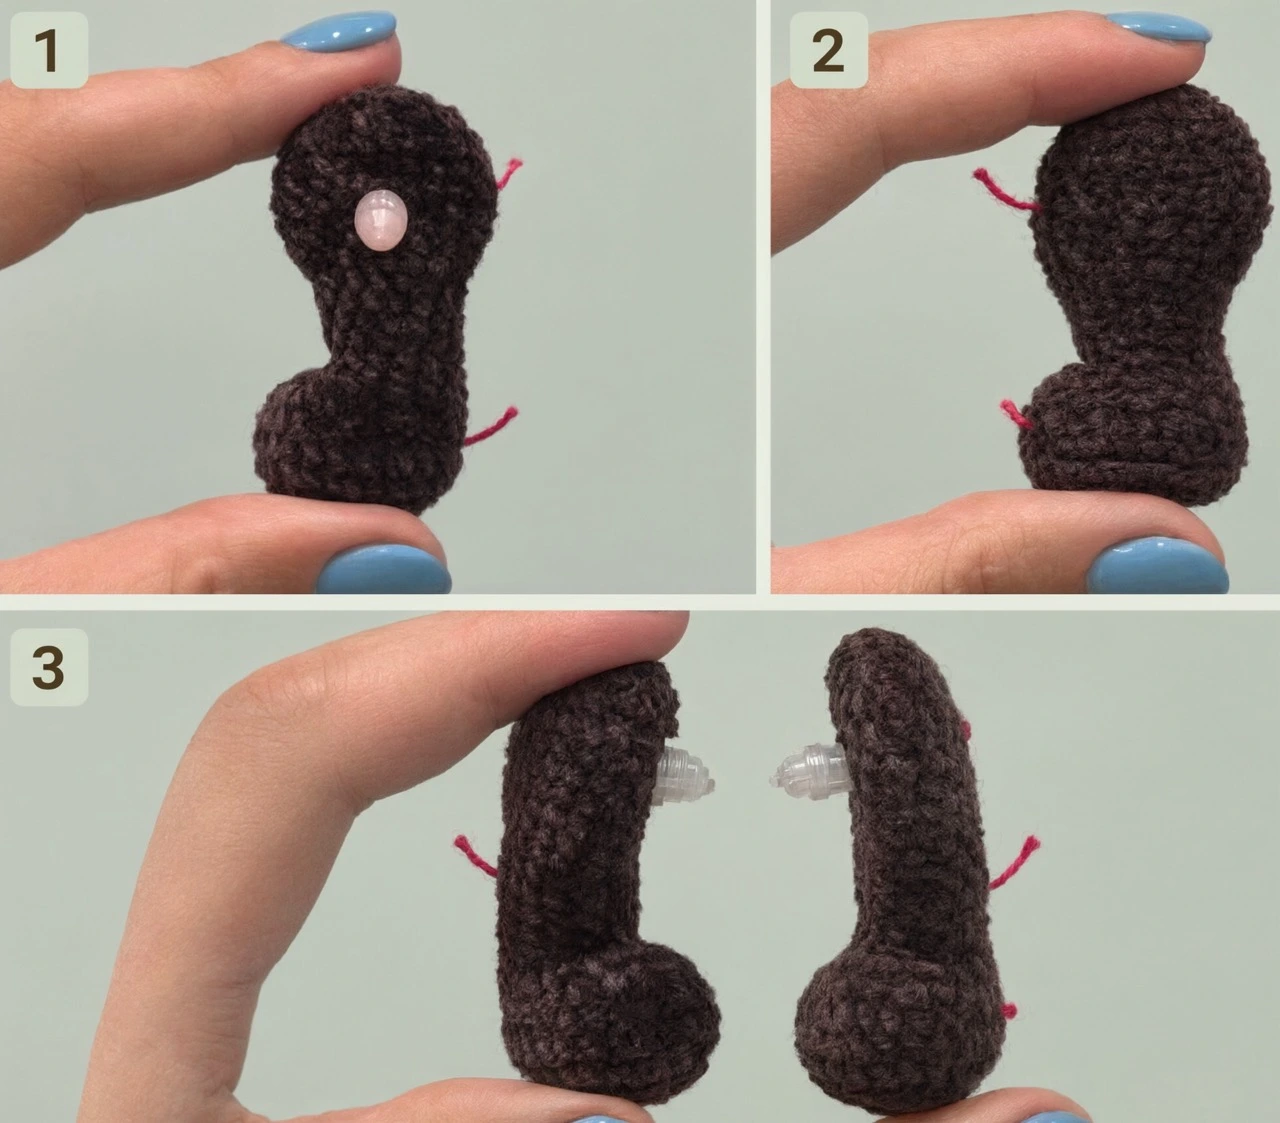
Body
Use cream yarn.
- 17sc in a MR (7)
- 27inc (14)
- 3(1sc, inc)*7 (21)
- 41sc, inc, (2sc, inc)*6, 1sc (28)
- 5(3sc, inc)*7 (35)
- 62sc, inc, (4sc, inc)*6, 2sc (42)
- 7(5sc, inc)*7 (49)
- 83sc, inc, (6sc, inc)*6, 3sc (56)
- 9–1056sc (2 rounds)
Round 11: Hind Leg Openings
For plastic joints:
- 1112sc, ch2, skip 2sc, 28sc, ch2, skip 2sc, 12sc (56)
- 1212sc, 2sc on the chain, 28sc, 2sc on the chain, 12sc (56)
For cotter pins:
- 1156sc — mark the space between stitches 13 and 14, and between 43 and 44, with contrasting thread (56)
- 1256sc (56)
- 13–1656sc (4 rounds)
- 1713sc, dec, 26sc, dec, 13sc (54)
- 1854sc (54)
Insert the hind leg joints or cotter pins into the marked points or chain holes. Secure or snap them in place.
- 1918sc, dec, 3sc, dec, 4sc, dec, 3sc, dec, 18sc (50)
- 2050sc (50)
- 2122sc, dec, 2sc, dec, 22sc (48)
- 227sc, dec, (14sc, dec)*2, 7sc (45)
Change to black yarn. Cut the cream yarn.
Round 23: Foreleg Openings
For plastic joints:
- 2310sc, ch2, skip 2sc, 21sc, ch2, skip 2sc, 10sc (45)
- 2410sc, 2sc on the chain, 1sc, dec, 13sc, dec, 3sc, 2sc on the chain, 8sc, dec (42)
For cotter pins:
- 2345sc — mark the space between stitches 11 and 12, and between 34 and 35 (45)
- 24(13sc, dec)*3 (42)
- 25–2642sc (2 rounds)
- 276sc, dec, (12sc, dec)*2, 6sc (39)
- 28(11sc, dec)*2 (36)
Insert the foreleg joints or cotter pins into the marked points or chain holes. Secure them.
Stuff the body gradually as you go.
- 292sc, dec, (4sc, dec)*5, 2sc (30)
- 30(3sc, dec)*6 (24)
- 31(2sc, dec)*6 (18)
- 32(7sc, dec)*2 (16)
Cut the yarn, fasten off, and hide the ends inside. If you want a wire frame, fold a 1 mm wire in half, wrap the bend with insulating tape, and push one half into the body and the other into the head. Sew the head to the body.
Tail
Use black yarn.
- 16sc in a MR (6)
- 26inc (12)
- 312sc (12)
- 4(1sc, dec)*4 (8)
Cut the yarn, fasten off, and leave an end for sewing. Pin the tail to the back and sew it on. Add a small amount of fiberfill as you sew.
How to Crochet the Panda Sweater
Use mint green yarn to start. Work in rows and try the sweater on your panda as you go. If it feels too big or too small, switch to a smaller or larger hook.
Sweater Body Rows
Ch37, then start on the second chain from the hook.
- 136sc (36), t-ch, turn
- 24sc, inc, (8sc, inc)*3, 4sc (40), t-ch, turn
- Change to dark green
- 3BLO: (6sc, 3sc inc)*2, 6sc, inc, 5sc, (3sc inc, 6sc)*2 (49), t-ch, turn
- 43sc, inc, 41sc, inc, 3sc (51), t-ch, turn
- Change to mint green
- 5BLO: (8sc, 3sc inc)*2, 15sc, (3sc inc, 8sc)*2 (59), t-ch, turn
- 63sc, inc, 51sc, inc, 3sc (61)
- Change to dark green
- 7BLO: (10sc, 3sc inc)*2, 17sc, (3sc inc, 10sc)*2 (69), t-ch, turn
- 811sc, ch6, skip 14sc, 9sc, inc, 9sc, ch6, skip 14sc, 11sc (54), t-ch, turn
- Change to mint green
- 9BLO: 11sc, (3sc, inc, 2sc) on the chain, 20sc, (2sc, inc, 3sc) on the chain, 11sc (56), t-ch, turn
- 1056sc (56)
Repeat these rows until you reach the neckline shown in your pattern photos. Cut the yarn and hide the ends. Sew the buttons on the opposite side of the sweater.
The right side of the sweater is the side with the unused front loops from the odd rows.
Sleeves
Attach dark green yarn to the first unused front loop of row 7. Hold the sweater with the front facing you.
- 114sc, 6sc on the chain of row 8 (20)
- Change to mint green
- 2BLO: 20sc (20)
- 320sc (20)
- Change to dark green
- 4BLO: 20sc (20)
- 520sc (20)
- Change to mint green
- 6BLO: 20sc (20)
- 720sc (20)
Cut the yarn, fasten off, and weave in the ends. Crochet the second sleeve the same way.
Putting Your Crochet Pattern Panda Together
You’re in the home stretch now. This is where your panda stops looking like a pile of parts and starts looking like a friend.
- Put the sweater on the panda.
- Move 0.5–1 cm down from the sweater and embroider the navel with a cross stitch using black embroidery floss (2 strands).
- Sew the head to the body if you haven’t already.
- Check that the ears, eye spots, eyes, tail, and limbs are secure.
- Tint the cheeks with blush or peach pastel.
- Tuck any loose yarn tails inside the body.
Once everything is sewn and shaped, give your panda a gentle squeeze. The head should feel firm, the limbs should move if you added joints, and the sweater should sit comfortably without pulling.
Helpful Tips for a Neater Crochet Pattern Panda
- Use a stitch marker. Move it every round, and use the shift stitch to keep your beginning line straight.
- Stuff as you go. Small pieces are harder to stuff neatly after they’re closed.
- Mark joint spots first. Contrasting thread saves you from guessing where the cotter pin or plastic joint should go.
- Keep the face symmetrical. Pin the eye spots and eyes before sewing. Step back and check the placement from a distance.
- Try the sweater on early. Hook size changes can make a big difference in how the sweater fits.
- Work BLO rows carefully. They create the striped texture and help the sweater hold its shape.
- Don’t overstuff the upper limbs. Light stuffing helps them sit naturally against the body.
- Hide ends inside the body. It keeps the finished panda clean and soft.
FAQ About the Crochet Pattern Panda
What skill level is this crochet pattern panda?
It’s rated ★★★☆☆, or intermediate. You’ll need to know magic rings, single crochet, increases, decreases, color changes, and back-loop-only stitches.
How big is the finished crochet pattern panda?
When you use the recommended 2 mm hook and fine/4ply yarn, the panda measures about 16 cm tall.
Can I make this crochet pattern panda without plastic joints?
Yes. The pattern includes cotter pin options, and you can also sew the limbs directly to the body if you want a simpler toy.
What yarn works best for a soft crochet pattern panda?
Katia Velvet Fine in cream and black works well for the body, while YarnArt Baby Cotton in dark green and mint green suits the sweater. Those yarns give a soft finish and clear stitch definition.
How do I embroider the face on a crochet pattern panda?
Use DMC embroidery floss. Two strands work well for the eyebrows and mouth. Full thread is better for the nose and eye whites. Attach the eye spots first, then mark the eye placement with pins before stitching.
Where can I find assembly tips for this crochet pattern panda?
Use the placement notes in this guide to check proportion and assembly as you work.
Your Next Stitch
Making a crochet pattern panda is one of those projects that stays with you. You start with a magic ring, a few increases, and a pile of black and cream yarn. By the end, you have a small friend with a stitched smile, a striped sweater, and limbs that actually move. Whether you keep it for yourself or give it to someone who needs a little handmade comfort, the time you put in shows.
Looking for another project after this one? Browse more easy crochet patterns on Cutestylee.
So grab your hook, pick your yarn, and start with round one. If you get stuck on the joints or the face, come back to this guide and work through it step by step. And when your panda is finished, share it — post a photo, tag a friend, or leave a comment about which part gave you the most trouble. Your next project might be someone else’s inspiration.