Crochet Dragon Pattern: Make a Giant Snuggle Dragon Amigurumi With Big Ears, Wings, and a Flared Tail
Crochet Dragon Pattern: Make a Giant Snuggle Dragon Amigurumi With Big Ears, Wings, and a Flared Tail
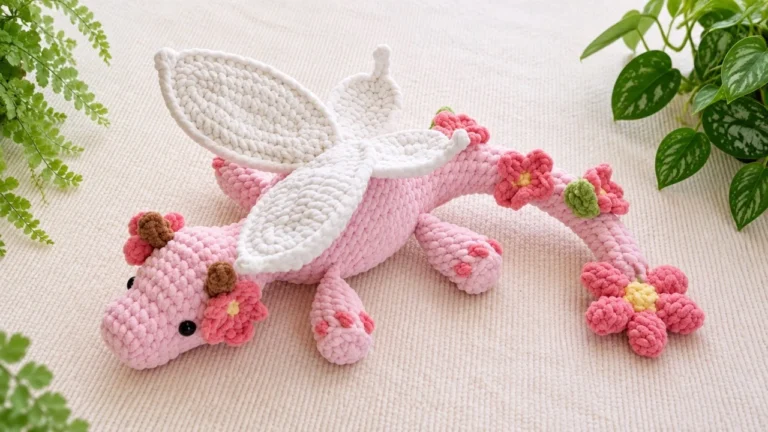
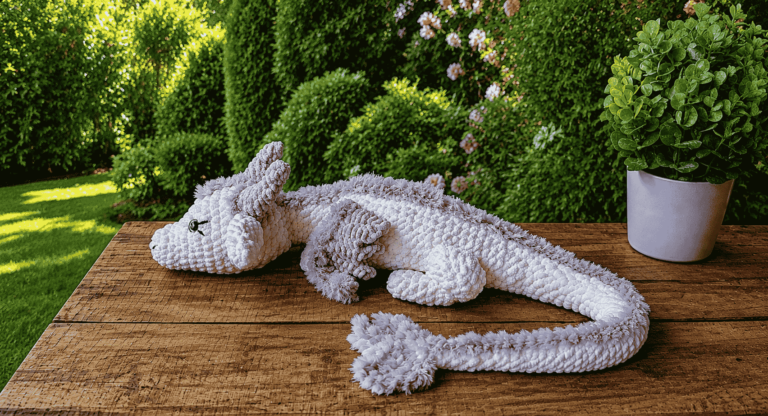
Have you ever wanted to make a dragon so big and soft that it feels like a hug you can carry around? That’s exactly what this crochet dragon pattern delivers. this oversized snuggle dragon uses Bernat Blanket yarn, a 5.0–6 mm hook, and simple stitches that a determined beginner can handle. The finished dragon has layered ears, a long body, four weighted paws, wings, and a flared tail.
Below you’ll find the supplies, stitch terms, rounds for every piece, assembly notes, finishing touches, tips, and FAQs for this giant snuggle dragon.
Why This Crochet Dragon Pattern Stands Out
Plenty of amigurumi dragons exist, but this one is built for snuggling. It’s a large, plush companion made with blanket yarn rather than a tiny shelf piece.
What You Need Before You Start
Your yarn choice makes a big difference to the finished size and softness.
| Item | Details |
|---|---|
| Hook | 5.0 mm, 5.5 mm, or 6 mm—your preference. |
| Yarn | Bernat Blanket yarn, 2 skeins. |
| Stuffing | Fiber fill. |
| Eyes | 30 mm safety eyes. |
| Tools | Yarn needle, scissors, and optional stitch marker. |
Notes on Gauge and Size
The pattern does not specify a gauge because the dragon is meant to be large and soft. Hook size and tension change the final size: a larger hook makes a looser, bigger dragon, while a smaller hook makes a tighter, slightly smaller one.
Stitch Terms You’ll See
| Term | Meaning |
|---|---|
| CH | chain |
| SC | single crochet |
| INC | increase |
| DEC | decrease |
| MR | magic ring |
| BLO | back loop only |
| HDC | half double crochet |
| HDC-INC | half double crochet increase |
| INC the RND | 2 sc in each stitch of the entire round |
| TW | turn work |
How to Crochet the Dragon Body
Work in rounds. This long piece becomes the dragon’s torso and tail.
| Round | Instructions | Count |
|---|---|---|
| R1 | Ch 2, 4 sc into the 2nd chain from the hook. | 4 |
| R2 | 4 sc. | 4 |
| R3–R7 | 4 hdc around (5 rounds). | 4 |
| R8 | hdc-inc, 3 hdc. | 5 |
| R9–R13 | 5 hdc around (5 rounds). | 5 |
| R14 | hdc-inc, 4 hdc. | 6 |
| R15–R19 | 6 hdc around (5 rounds). | 6 |
| R20 | hdc-inc, 5 hdc. | 7 |
| R21–R25 | 7 hdc around (5 rounds). | 7 |
| R26 | hdc-inc, 6 hdc. | 8 |
| R27–R31 | 8 hdc around (5 rounds). | 8 |
| R32 | (hdc-inc, 3 hdc) ×2. | 10 |
| R33–R35 | 10 hdc around (3 rounds). | 10 |
| R36 | (hdc-inc, 4 hdc) ×2. | 12 |
| R37–R39 | 12 hdc around (3 rounds). | 12 |
| R40 | (hdc-inc, 3 hdc) ×3. | 15 |
| R41–R42 | 15 hdc around (2 rounds). | 15 |
| R43 | (hdc-inc, 4 hdc) ×3. | 18 |
| R44–R45 | 18 hdc around (2 rounds). | 18 |
| R46 | (2 hdc, hdc-inc) ×6. | 24 |
| R47 | 24 hdc around. | 24 |
| R48 | (3 hdc, hdc-inc) ×6. | 30 |
| R49 | (4 hdc, hdc-inc) ×6. | 36 |
| R50–R64 | 36 hdc around (15 rounds). | 36 |
| R65 | (4 hdc, hdc-dec) ×6. | 30 |
| R66 | 30 hdc around. | 30 |
| R67 | (3 hdc, hdc-dec) ×6. | 24 |
| R68–R69 | 24 hdc around (2 rounds). | 24 |
| R70 | (2 hdc, hdc-dec) ×6. | 18 |
How to Crochet the Dragon Head
Work in rounds.
| Round | Instructions | Count |
|---|---|---|
| R1 | Ch 2, 8 sc into the 2nd chain from the hook. | 8 |
| R2 | Inc the Rnd. | 16 |
| R3 | (1 sc, inc) ×8. | 24 |
| R4 | (3 sc, inc) ×6. | 30 |
| R5 | (4 sc, inc) ×6. | 36 |
| R6 | 36 sc around. | 36 |
| R7 | (5 sc, inc) ×6. | 42 |
| R8–R9 | 42 sc around (2 rounds). | 42 |
| R10 | (2 sc, inc) ×6, 24 sc. | 48 |
| R11 | (inc, 3 sc) ×5, 24 sc, inc, 3 sc. | 54 |
| R12 | (7 sc, dec) ×6. | 48 |
| R13 | (6 sc, dec) ×6. | 42 |
| R14 | (5 sc, dec) ×6. | 36 |
| R15 | (4 sc, dec) ×6. | 30 |
| R16 | (3 sc, dec) ×6. | 24 |
| R17 | (2 sc, dec) ×6. | 18 |
| R18 | (1 sc, dec) ×6. | 12 |
How to Crochet the Ears
Big Ears — Make 2
R1: Ch 2, 6 sc into the 2nd chain from the hook [6]. R2: Inc the Rnd [12]. R3: (3 sc, inc) ×3 [15]. R4: (4 sc, inc) ×3 [18]. R5–R6: 18 sc around (2 rounds). R7: 4 dec, 10 sc [14]. R8–R9: 14 sc around (2 rounds). Fold in half and sl st closed; fasten off and leave a sewing tail.
Medium Ears — Make 2
R1: Ch 2, 6 sc into the 2nd chain from the hook [6]. R2: Inc the Rnd [12]. R3–R6: 12 sc around (4 rounds). Fold in half and sl st closed; fasten off and leave a sewing tail.
Small Ears — Optional, Make 2
R1: Ch 2, 6 sc into the 2nd chain from the hook [6]. R2: (2 sc, inc) ×3 [9]. R3–R6: 9 sc around (4 rounds). Fold in half and sl st closed; fasten off and leave a sewing tail.
How to Crochet the Legs
Make 4. Work in rounds.
| Round | Instructions | Count |
|---|---|---|
| R1 | Ch 2, 6 sc into the 2nd chain from the hook. | 6 |
| R2 | Inc the Rnd. | 12 |
| R3 | Inc the Rnd. | 24 |
| R4 | BLO whole round: (sc, bob) ×4, 16 sc. | 24 |
| R5–R6 | 24 hdc around (2 rounds). | 24 |
| R7 | (2 hdc, hdc-dec) ×6. | 18 |
| R8–R9 | 18 hdc around (2 rounds). | 18 |
| R10 | (1 hdc, hdc-dec) ×6. | 12 |
| R11–R13 | 12 hdc around (3 rounds). | 12 |
| Close | 3 sl st, fold in half, then sl st closed. | — |
How to Crochet the Tail Pieces
Work in rows. Make 2. For a Toothless-inspired version, use one black and one red.
| Row | Instructions |
|---|---|
| 1 | Ch 10; start in the second chain from the hook, 8 sc, inc, ch 1, TW. |
| 2 | sl st, 5 sc, 2 dec, ch 1, TW. |
| 3 | 7 sc, sl st, ch 1, TW. |
| 4 | sl st, 3 sc, 2 dec, ch 1, TW. |
| 5 | 5 sc, sl st, ch 1. |
| Finish | Rotate and make 2 dec toward the beginning tail. Fasten off with a sl st and leave a sewing tail. |
How to Crochet the Wings
Work in rows. Make 2. On rows 3, 5, 7, 9, 11, and 13, work a sl st into the second chain from the hook.
| Row | Instructions |
|---|---|
| 1 | Ch 10; start in the second chain from the hook, sl st, sc, 6 hdc, hdc-inc, ch 1, TW. |
| 2 | 8 sc, ch 2, TW. |
| 3 | sl st, sc, 6 hdc, hdc-inc, ch 1, TW. |
| 4 | 9 sc, ch 2, TW. |
| 5 | sl st, sc, 7 hdc, hdc-inc, ch 1, TW. |
| 6 | 9 sc, ch 3, TW. |
| 7 | sl st, sc, 8 hdc, hdc-inc, ch 1, TW. |
| 8 | 6 sc, ch 2, TW. |
| 9 | sl st, sc, 4 hdc, hdc-inc, ch 1, TW. |
| 10 | 5 sc, ch 2, TW. |
| 11 | sl st, sc, 3 hdc, hdc-inc, ch 1, TW. |
| 12 | 4 sc, ch 2, TW. |
| 13 | sl st, sc, 2 hdc, hdc-inc, ch 1; rotate to the top, sc across, ch 1, TW. |
| 14 | tc, dc, 3 hdc, sc back to the end. |
Putting Your Snuggle Dragon Together
- Sew the big ears to the head from about rounds 2–7, leaving 3–4 stitches at the center. Let them lean back.
- Add medium ears slightly behind and below the big ears; place the optional small ears just behind and below the medium pair.
- Attach head to body. Sew the body onto the bottom of the head; the sample places it at about round 13 at the back.
- Sew on the feet. Place two around round 65 and two around round 54; the middle pair sits slightly farther apart.
- Attach wings. Sew them around round 68 on the opposite side of the legs, about 2–3 stitches apart and centered.
- Add tail pieces. Sew the smaller side of each to the tail so the wider ends flare out.
Finishing Touches for Your Crochet Dragon
- Clean off any extra fuzz.
- Pop out the toes on the feet.
- Tie the tail into a knot.
Tips for a Neater Snuggle Dragon Crochet Pattern
- Choose your hook wisely. A 5.0 mm hook makes a tighter fabric; 6 mm makes a softer, looser drape.
- Stuff firmly but not rock hard. Keep the dragon huggable while helping it hold shape.
- Use a stitch marker. The long body makes it easy to lose track of rounds.
- Sew with matching yarn. It hides seams better.
- Pin before sewing. Ear and wing placement changes the whole expression.
- Keep the toes up. Double-check orientation before closing legs.
- Try color. Black and white are classic, but pink, purple, blue, and rainbow versions all work beautifully.
FAQ About the Crochet Dragon Pattern
It uses basic stitches—single crochet, half double crochet, increases, and decreases. The main challenge is the large size and assembly.
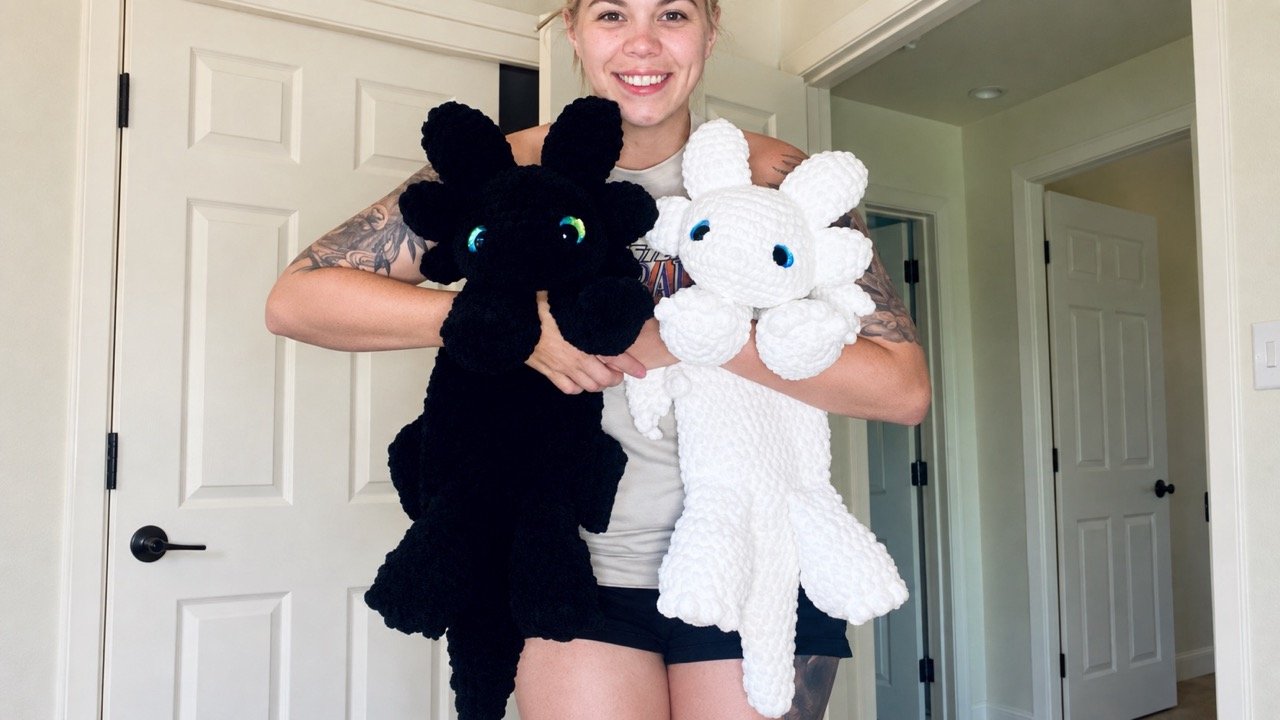
The pattern does not give an exact measurement. With Bernat Blanket yarn and a 5.0–6 mm hook, it becomes a large snuggle dragon that can be almost as big as a child.
Use 2 skeins of Bernat Blanket yarn and 30 mm safety eyes.
Yes. Use black Bernat Blanket yarn and make one black and one red tail piece.
This article is based on the “How to Snaggle your Dragon” pattern by Mahem Crochet. Find more from Millie on Instagram and through her shop.
Your Next Stitch
This crochet dragon pattern is a lovely journey: start with a small chain, build the long body, shape the head, then add ears, legs, wings, and flared tail pieces. By the final knot, you’ll have a dragon that is big enough to hug and handmade enough to become a family favorite.
Gather your Bernat Blanket yarn, pick your hook, and start with that first chain. Work through the assembly step by step, then share your finished snuggle dragon and tag us.
Happy crocheting!
Looking for another handmade idea? Explore more patterns on Easy Crochet Patterns, and visit Yarnspirations for yarn information.