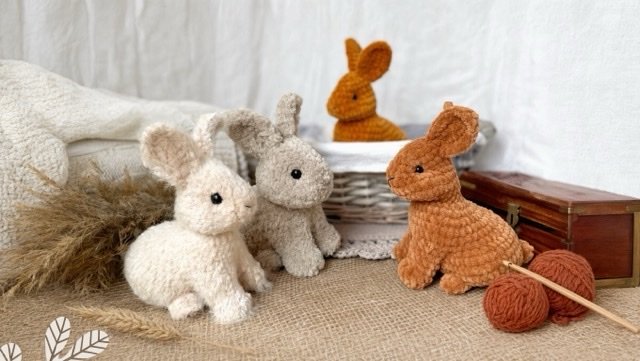
Free Crochet Pattern Baby Rabbit: Complete Plush Bunny Guide
Crochet Pattern Baby Rabbit: Complete Plush Bunny Guide
Make a sweet little rabbit with a seamless head-and-body construction, cuddly proportions, and just a few pieces to sew.
There is a special kind of joy in watching a small ball of yarn become a character with a sweet face and its own personality. This crochet baby rabbit is compact enough for little hands, thoughtful handmade gifts, and craft-fair makes. Work patiently, count every round, and enjoy seeing your bunny take shape.
Pattern credit and use: This design is by Natalia Sapunova (@lynatoys). The finished toy may be sold, but the written pattern and images must not be copied, redistributed, or sold without permission. Please credit @lynatoys when sharing finished makes.
Materials and Tools
Your yarn choice changes the rabbit’s texture and how you hold the work. Use a smaller hook if needed to keep stuffing from showing through.
For a quick yarn-weight comparison, refer to the Craft Yarn Council’s yarn weight system. If you enjoy character makes, try our crochet Hello Kitty amigurumi pattern next.
Yarn options
| Yarn type | Recommended options | Result and amount |
|---|---|---|
| Velvet yarn | Wolans Bunny Baby No. 28, Himalaya Dolphin Baby, or YarnArt Dolce | Smooth, plush finish; about 0.5 skein per rabbit |
| Faux fur yarn | Himalaya Koala No. 730 | Extra fluffy finish; about 0.6 skein per rabbit |
| Alternative yarns | Sport weight, Gazzal Baby Cotton, YarnArt Jeans, NAKO Paris, or Kamtex Cotton Grass | Choose the hook and working side to suit the yarn texture |
| Tool | Specification | Why you need it |
|---|---|---|
| Crochet hook | 3.5 mm | Creates firm amigurumi fabric |
| Safety eyes | 6 mm for velvet; 10 mm for faux fur | Larger eyes show through fluff |
| Fiberfill | About 10 g | Gives the rabbit a soft, even shape |
| Stitch markers, pins, scissors and yarn needle | As needed | Tracks rounds and makes assembly easier |
Before You Begin
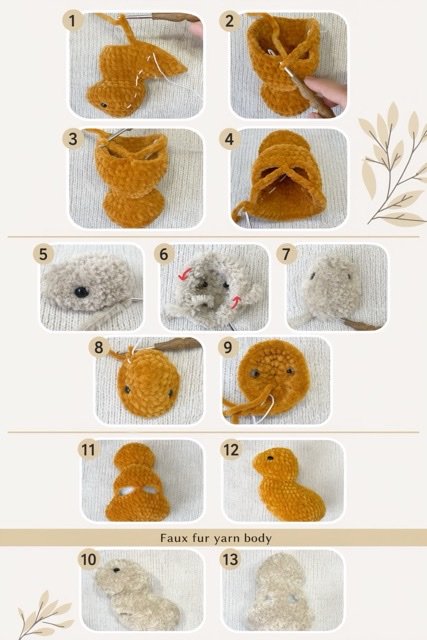
The head and body are crocheted as one continuous piece. The forelegs are worked directly into openings left in the body; only the ears, tail, and hind legs are sewn on. All main rounds are worked in a spiral, so do not join each round with a slip stitch.
- Use a stitch marker in the first stitch and move it up each round.
- Velvet yarn: work with the right side facing out.
- Faux fur yarn: work with the wrong side facing out so the fluffy side becomes the exterior.
- Pin every part in place before sewing, then check the rabbit from the front and side.
Crochet Abbreviations
| Abbreviation | Meaning |
|---|---|
| MR | Magic Ring |
| sc | Single crochet |
| inc | Increase: 2 sc in the same stitch |
| dec | Decrease: work 2 stitches together |
| ch | Chain |
| sl st | Slip stitch |
| dc inc | Double-crochet increase |
Crochet Pattern Baby Rabbit Instructions
Head and body
Start in the second chain from the hook and work around both sides of the starting chain.
- 3 sc, 3 sc in last chain, 3 sc, 3 sc in first chain (12)
- 3 sc, 3 inc, 3 sc, 3 inc (18)
- 4 sc, 4 inc, 10 sc (22)
- 6 sc, inc, 2 sc, inc, 12 sc (24). Mark stitches 5 and 15 for the eyes.
- 24 sc (24)
- 5 inc, 8 sc, 5 inc, 6 sc (34). Install safety eyes in the marked stitches.
- Rounds 7–8: 34 sc (2 rounds)
- 4 sc, 10 dec, 7 sc, dec, 1 sc (23)
- 4 sc, 5 dec, 6 sc, dec, 1 sc (17). Stuff with fiberfill.
- 13 sc, 4 inc (21)
- inc, 3 sc, (inc, 1 sc) × 3, 3 sc, (inc, 1 sc) × 4 (29)
- inc, 16 sc, (inc, 2 sc) × 4 (34)
- inc, 23 sc, (inc, 3 sc) × 2, inc, 1 sc (38)
- 26 sc, (inc, 4 sc) × 2, inc, 1 sc (41)
- 29 sc, (inc, 3 sc) × 3 (44)
- 6 sc, (dec, 3 sc) × 3, 23 sc (41)
- 3 sc, sl st, ch 5, skip 7 stitches, sl st in next stitch, ch 5, skip 7 stitches, sl st in next stitch, 5 inc, 14 sc, 2 inc (44)
- 3 inc, 1 sc, 5 sc on the chain, 1 sc into the central body stitch, 5 sc on the chain, 29 sc (47)
- 11 sc, 2 dec, 32 sc (45)
- 45 sc (45)
- 11 sc, dec, 32 sc (44)
- 3 dec, 5 sc, dec, 4 sc, 5 dec, 13 sc, 2 dec (33)
- (dec, 4 sc) × 5, dec, 1 sc (27). Stuff with fiberfill.
- (3 sc, dec) × 5, 2 sc (22)
- (dec, 2 sc) × 5, dec (16)
- 8 dec (8). Cut yarn, leave a long tail, and tighten the opening.
Forelegs — make 2
For velvet, begin with the right foreleg, hold the rabbit upside down, and work clockwise. For faux fur, begin with the left foreleg, hold the rabbit bottom-down, and work counterclockwise.
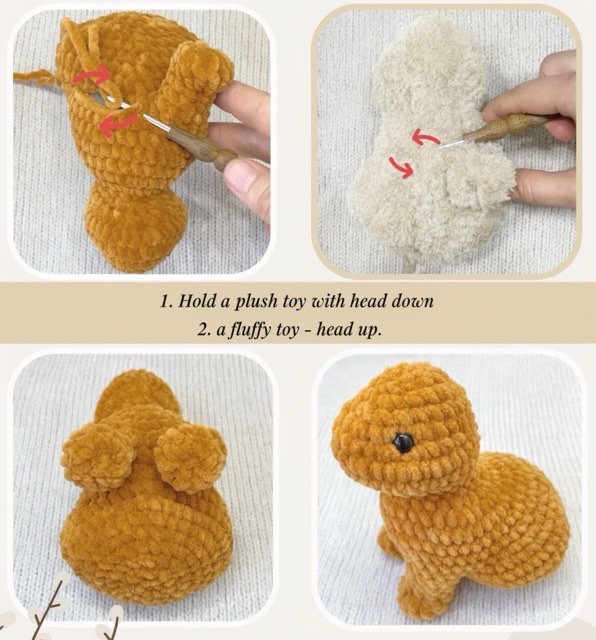
- 7 sc along the front and 5 sc along the back chain (12)
- 12 sc (12)
- (4 sc, dec) × 2 (10)
- 10 sc (10)
- 1 sc, 4 dc inc, 5 sc (14)
- 7 dec (7). Cut yarn and tighten the hole.
To avoid gaps at the joint, insert the hook through the corner so there are three loops on the hook, then crochet them together. This is not counted as a decrease.
Hind legs — make 2
- 6 sc in MR (6)
- 6 sc (6)
- 5 sc, sl st (6). Cut yarn and leave a long sewing tail.
Tail
- 6 sc in MR (6)
- 5 sc, sl st (6). Cut yarn and leave a long sewing tail.
Ears — make 2
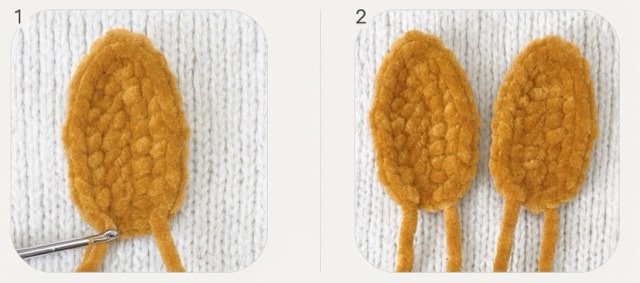
- Start in the second chain from the hook: 6 sc, 3 sc in last chain, lay the starting tail along the row, 6 sc, 3 sc in first chain (18)
- inc, 2 sc, inc, 3 sc, 3 sc in one stitch, 3 sc, inc, 2 sc, inc, sl st (22)
Do not crochet two stitches to the end. Cut yarn, leaving a long tail for sewing. Bring the beginning tail to the opposite corner by sewing through the ear.
Assembly and Finishing
Eyes and nose
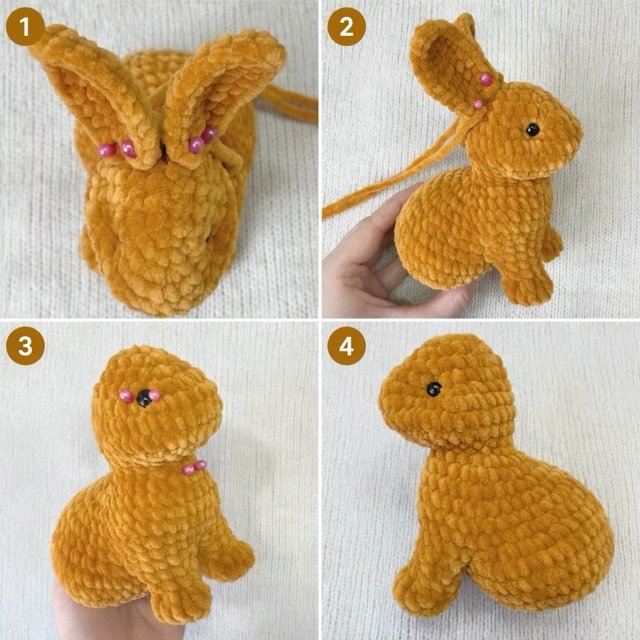
Install safety eyes between rounds 5 and 6 at the marked stitches. For faux fur, use 10 mm eyes so they are visible. For the embroidered nose, mark upper points between rounds 5–6, a middle point one round lower, and a lower point two rounds below that.
Attach the ears, legs, and tail
| Part | Placement |
|---|---|
| Ears | Pin first. Attach the upper edge at round 1 and the lower edge at round 3, with each ear angled slightly forward at the top. |
| Hind legs | Sew the lower part to round 21 and upper part to round 22 so the rabbit stands steadily. |
| Tail | Sew the lower edge to round 26 and upper edge to round 24. |
Bring thread ends into one stitch, tie securely, and hide the ends inside the head or body. If making the toy for babies or toddlers, embroider the eyes rather than using safety eyes.
Working with Faux Fur and Combable Yarn
Faux fur hides the loops, but it creates a wonderfully soft finished rabbit. Push the fibres aside to find the chain loops and work from inside the piece. If you started on the wrong side, simply turn the work inside out.
- For combable yarns, crochet every piece with the wrong side out.
- Before assembly, comb each piece thoroughly with a Velcro strip or slicker brush.
- Take extra time at corners and foreleg openings, where the stitches can be hardest to see.
Troubleshooting
| Problem | Helpful fix |
|---|---|
| Rounds shift off-centre | Move the round marker forward or backward a few stitches. |
| Gaps at leg joints | Work through the corner loops as described in the foreleg instructions. |
| Forelegs splay outward | Use less stuffing and shape the leg toward the front while closing it. |
| Eyes disappear in fluff | Use 10 mm eyes or embroider a clear outline. |
| Yarn runs short | Keep yarn tails practical; one velvet skein can make two rabbits. |
Personalise your rabbit
Try classic white, warm brown, pastel pink, or a two-tone look. For a larger rabbit, use thicker yarn with a larger hook; for a mini version, use sport-weight yarn with a smaller hook. Keep the same yarn weight for every part to preserve the proportions.
Crochet Baby Rabbit FAQ
Is this pattern suitable for beginners?
It is best for confident beginners or intermediate crocheters. The stitches are simple, but spiral shaping, the foreleg openings, and neat assembly benefit from careful counting.
How long does it take?
Experienced crocheters may finish in 4–6 hours. Beginners should allow 8–12 hours, especially with faux fur yarn.
How much yarn will I need?
Plan for about half a skein of velvet yarn or about 0.6 skein of faux fur yarn per rabbit.
Why is faux fur worked wrong-side out?
The fluffy side becomes the outside of the finished rabbit, hiding the structured stitch texture and making the toy feel softer.
Can I sell finished rabbits?
Yes. You may sell finished toys made from this design, but do not redistribute the written pattern. Credit @lynatoys when sharing your work.