
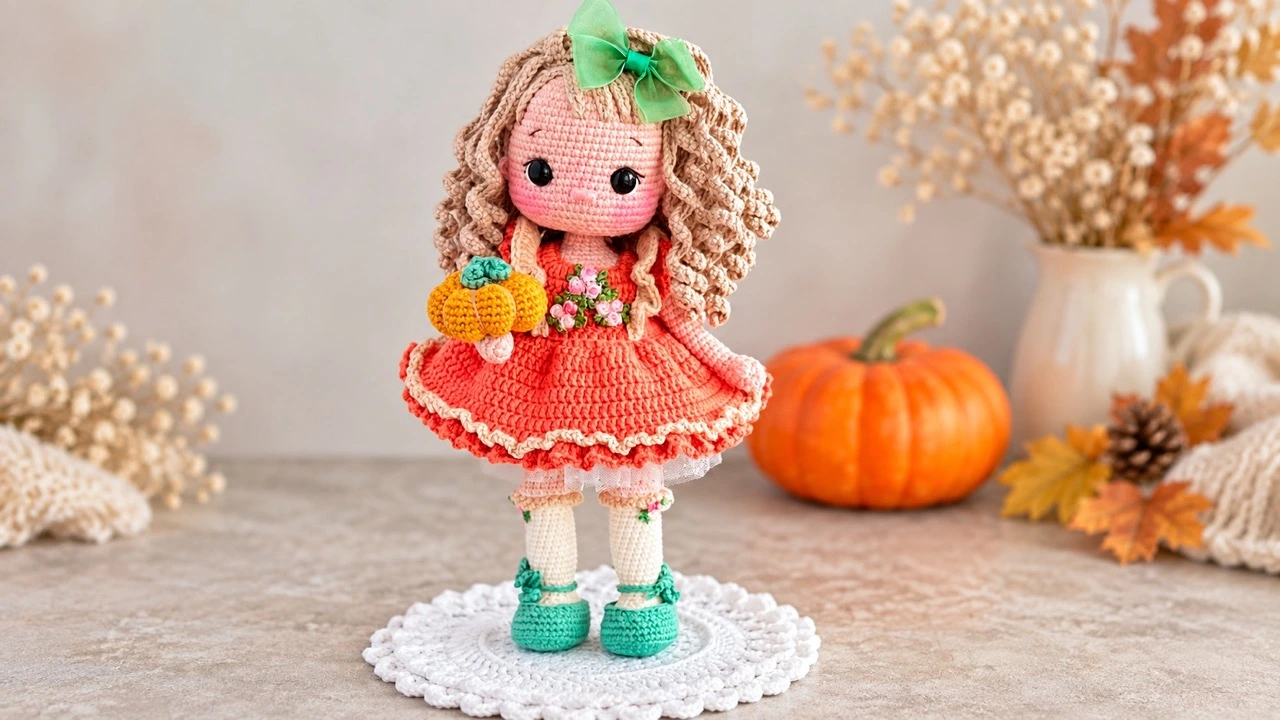
Crochet Pattern Pumpkin Doll: Make a 24 cm Autumn Amigurumi With a Ruffled Dress
Crochet Pattern Pumpkin Doll: Make a 24 cm Autumn Amigurumi With a Ruffled Dress
You know that feeling when the leaves start turning, the air gets crisp, and suddenly you want to make something that captures that cozy autumn mood? This crochet pattern pumpkin doll is exactly that. She stands about 24 cm tall, has wild curly hair, a soft orange dress with a tulle petticoat, and she carries her own little mustard-colored pumpkin. This intermediate-level pattern is a beautiful project for anyone who loves detailed amigurumi and wants to create a doll that feels like a storybook character come to life.
Below, you’ll find a complete guide to this crochet pattern pumpkin doll. We’ll go through the materials, the special stitches, the head and body construction, the dress, the hair, the pumpkin, and the final assembly. Whether you’re a seasoned amigurumi maker or looking for your next challenge, this breakdown will help you understand every stage before you pick up your hook.
Why This Crochet Pattern Pumpkin Doll Stands Out
Plenty of doll patterns exist, but this one earns a spot in your project queue for a few solid reasons.
- Difficulty: Intermediate. The pattern assumes you know basic crochet skills and doesn’t teach them from scratch.
- Finished size: About 24 cm when you use the recommended materials and hook size.
- Detailed construction: The body, head, hair, dress, shoes, and pumpkin are all separate pieces that come together in a satisfying assembly.
- Wire frame: You’ll add a wire armature for the arms and neck so the doll can hold poses.
- Handmade hair: The wig is built from dozens of crocheted strands, giving her that full, curly look.
- Layered outfit: The dress includes a ruffled skirt, flounces, and a tulle petticoat for extra volume.
- A tiny pumpkin: The doll carries a crocheted pumpkin with ribbed details and leaves, tying the whole autumn theme together.
Before sharing or selling finished items, make sure you comply with applicable laws and the terms of any materials or platforms you use.
What You Need Before You Start
Gather your supplies first. This project uses several yarn colors, some wire, and a few specialty items.
Yarn and Hook
- Alize Cotton Gold 100g/330m, color 401 (body color) — for the body.
- Alize Cotton Gold 100g/330m, color 62 (cream) — for knee socks and bodysuit.
- YarnArt Baby Cotton 50g/165m, color 404 (beige) — for knee sock edging, dress flounces, and pumpkin ribs.
- YarnArt Baby Cotton 50g/165m, color 403 (light beige) — for the hair wig.
- Gazzal Baby Cotton 50g/165m, color 3465 (orange) — for the dress.
- YarnArt Baby Cotton 50g/165m, color 439 (green) — for shoes and leaves.
- YarnArt Baby Cotton 50g/165m, color 433 (mustard) — for the pumpkin.
- Hook size: 1.75 mm.
Notions and Tools
- Polyester toy filling (fiberfill)
- Safety eyes, 10 mm
- Thick yarn needle
- Sewing pins
- Scissors
- Stitch marker
- Black, white, and brown threads for face embroidery
- Blush or dry pastel for toning
- Plastic cutting boards (for insoles)
- Wire: 6 mm diameter (11 cm) and 1.5 mm diameter (22 cm)
- Adhesive plaster
- Buttons, 9 mm (2 pieces)
- Artificial flowers
- Tulle
- Decorative bow
- Decorative pieces of your choice
The pattern specifies that the doll, hair wig (except strands), and shoes are crocheted in “semi-cross stitches,” while the dress, strands, and pumpkin use “checkmarks.” Crochet tightly so there are no holes.
Stitch Terms and Special Techniques
Before you dive in, get familiar with the abbreviations and the special stitches used in this crochet pattern pumpkin doll.
Need a quick refresher? The Craft Yarn Council crochet abbreviations reference is useful alongside the terms below.
- MR — magic ring
- ch — chain
- t-ch — turning chain
- sc — single crochet
- inc — increase (2 sc in one stitch)
- dec — decrease (2 sc together)
- sl st — slip stitch
- hdc — half double crochet
- hdcinc — half double crochet increase (2 hdc in one stitch)
- dc — double crochet
- dcinc — double crochet increase (2 dc in one stitch)
- tr — treble crochet
- trinc — treble crochet increase (2 tr in one stitch)
- Bobble st — unfinished dc stitches in one stitch with a common top
- (…) — number in brackets means the stitch count for that round or row
- (…)*N — repeat the instructions in brackets N times
The “Semi-X Shaped sc” (Mixed Stitch)
Insert the hook into the stitch of the previous row and place your hook over the yarn. Pull the yarn through. Then pull the yarn over one more time and finish the stitch through both loops on the hook. This creates a slightly different texture than a standard sc.
The “V-Shape” Stitch
Insert the hook into the stitch of the previous row and place your hook under the yarn. Pull the yarn over the hook from back to front. Pull the yarn over in the same way again and finish the stitch through both loops on the hook.
The 3-DC Bobble St
Yarn over, insert the hook into the stitch, grab the working yarn, and pull through (3 loops on hook). Yarn over and pull through 2 loops (2 loops left). Repeat this two more times in the same stitch. You’ll end up with 4 loops on the hook. Yarn over and pull through all 4 loops to close the bobble.
How to Crochet the Doll Body
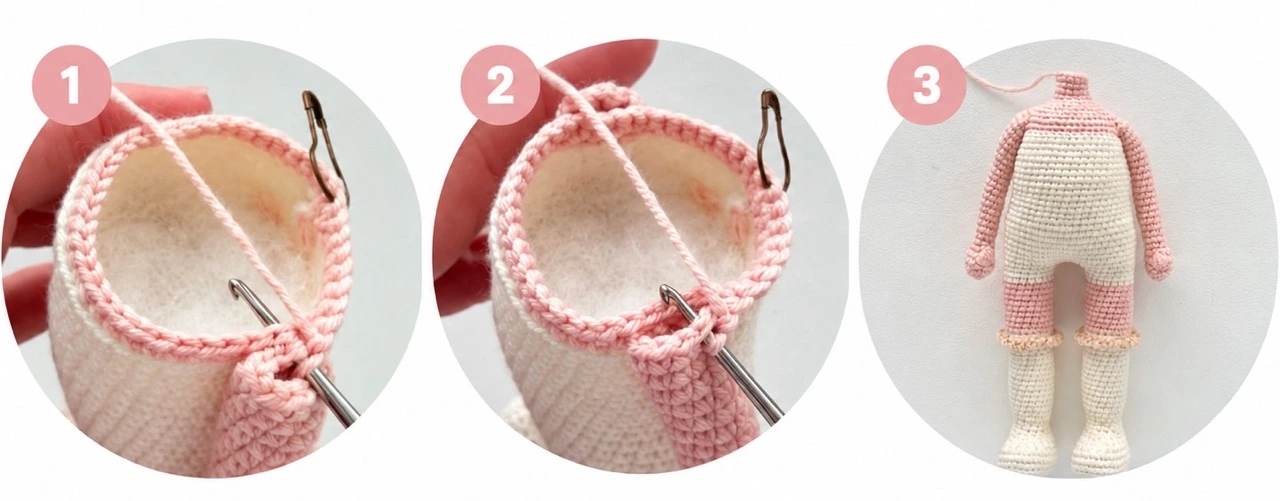
The body is made by crocheting the legs first, joining them, and then working upward. Stuff the legs and body tightly as you go.
Arms (Make 2)
Start in body color.
- 6sc in a MR (6)
- 6inc (12)
- 12sc (2 rounds)
- 3 dc Bobble st, 11sc (12)
- (dec, 3sc)*2, dec (9)
- 9sc
- inc, 8sc (10)
- 10sc (18 rounds)
Fasten off and cut the yarn. Hide the ends inside.
Right Leg
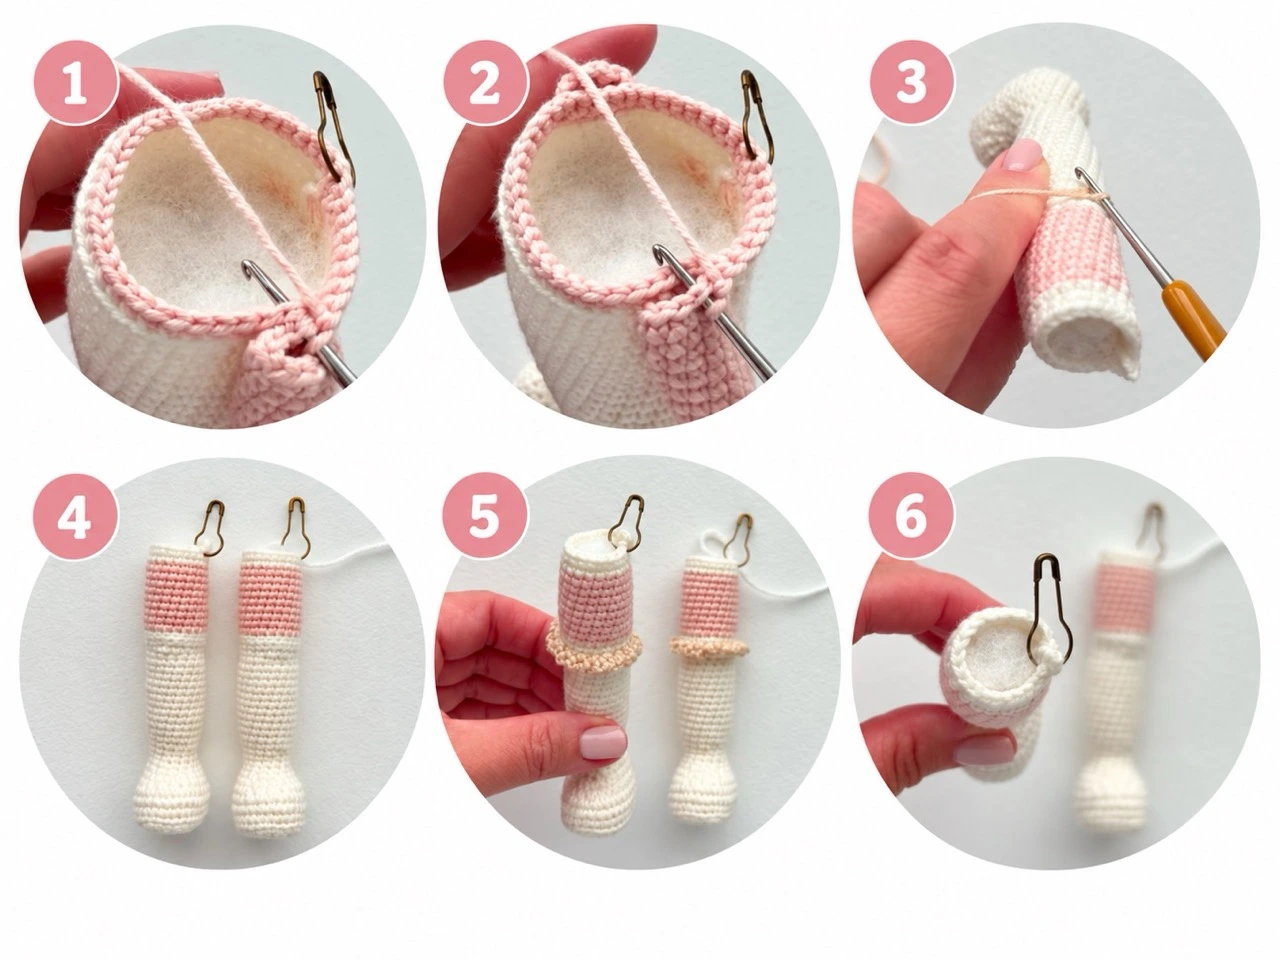
Start in cream color.
- Ch7, start on the second chain from the hook: 5sc, 3sc in the last chain, on the other side of the chain — 4sc, inc (14)
- inc, 4sc, 3inc, 4sc, 2inc (20)
- 1sc, inc, 4sc, (1sc, inc)*3, 4sc, (1sc, inc)*2 (26)
- 2sc, inc, 4sc, (2sc, inc)*3, 4sc, (2sc, inc)*2 (32)
Prepare insoles from soft plastic cutting boards. Trace the foot, cut out two pieces.
- In back loops: 32sc
- 32sc
- 31sc — short round. The marker should be in the center of the heel.
- 10sc, 6dec, 10sc (26)
- Insert the insole.
- 7sc, 6dec, 7sc (20)
- 6sc, 4dec, 6sc (16)
- (4sc, dec)*2, 4sc (14)
- 14sc (2 rounds)
- (inc, 6sc)*2 (16)
- 16sc
- 4sc, inc, 6sc, inc, 4sc (18)
- 18sc (10 rounds)
- 4sc, dec, 6sc, dec, 4sc (16)
- 7sc, 2inc, 7sc (18)
- 4sc, inc, 8sc, inc, 4sc (20)
- In back loops: 20sc
- Change to body color. Cut the cream yarn.
- 20sc (9 rounds)
- Change to cream. Cut the body color yarn.
- 20sc (2 rounds)
Crochet up to 6 extra stitches as needed to align the marker to the side. On the right leg, fasten off and cut the yarn.
Attach beige yarn to the front loop of round 29: (ch3, sl st)*20. Fasten off and hide the ends.
Left Leg
Crochet the left leg the same way as the right leg, but do not cut the yarn. Continue crocheting.
Joining the Legs and Body
- 10sc on the left leg, ch5, join the right leg. 20sc on the right leg, 5sc on the chain, 10sc on the left leg (50)
- 50sc (9 rounds)
- 4sc, dec, (8sc, dec)*4, 4sc (45)
- 45sc (2 rounds)
- dec (on the side), 22sc, dec (on the side), 9sc, dec (back centered), 8sc (42)
- 42sc (9 rounds)
- 35sc — short round. The marker should be in the center of the back.
- Change to body color. Cut the cream yarn.
- In back loops: 42sc
Joining the Arms
Make sure the arms are symmetrical on the sides of the body. Thumbs point forward.
- 8sc, 5sc on the inside of the arm and body, 16sc, 5sc on the inside of the arm and body, 8sc (42)
- 8sc, 5sc along the outside of the arm, 16sc, 5sc along the outside of the arm, 8sc (42)
Prepare a wire 1.5 mm thick and 22 cm long. Fold the edges as shown in the photos. Try the wire frame on the arms (your length may vary). Insulate the frame with adhesive plaster, insert it into the arms, and add fiberfill.
- (5sc, dec)*6 (36)
- 2sc, dec, (4sc, dec)*5, 2sc (30)
- (3sc, dec)*6 (24)
- (2sc, dec)*6 (18)
- (4sc, dec)*3 (15)
- 15sc (4 rounds)
Finish with sl st. Fasten off and leave an end for sewing.
How to Crochet the Head and Face
Crochet in body color. Stuff tightly as you go.
- 6sc in a MR (6)
- 6inc (12)
- (1sc, inc)*6 (18)
- 1sc, inc, (2sc, inc)*5, 1sc (24)
- (3sc, inc)*6 (30)
- 2sc, inc, (4sc, inc)*5, 2sc (36)
- (5sc, inc)*6 (42)
- 3sc, inc, (6sc, inc)*5, 3sc (48)
- (7sc, inc)*6 (54)
- 4sc, inc, (8sc, inc)*5, 4sc (60)
- 60sc (9 rounds)
Round 20: Crochet the holes for the eyes.
- 24sc, ch1, skip 1 stitch, 10sc, ch1, skip 1 stitch, 24sc (60)
- 60sc
- 20sc, (inc, 2sc)*3, 2sc, (2sc, inc)*3, 20sc (66)
- 66sc (3 rounds)
Insert safety eyes into the holes and secure with washers from the wrong side.
- 17sc, (dec, 1sc)*5, 2sc, (dec, 1sc)*5, 17sc (56)
- (26sc, dec)*2 (54)
- (7sc, dec)*6 (48)
- 3sc, dec, (6sc, dec)*5, 3sc (42)
- (5sc, dec)*6 (36)
- 2sc, dec, (4sc, dec)*5, 2sc (30)
- (3sc, dec)*6 (24)
- 1sc, dec, (2sc, dec)*5, 1sc (18)
- (3sc, dec)*3, 2sc, sl st (15)
Fasten off and hide the ends.
Ears (Make 2)
Make 2 in body color. Leave a long yarn end at the beginning for sewing.
- 5sc in a MR (5)
Cut the yarn, leaving a long end.
Face Needle Sculpting
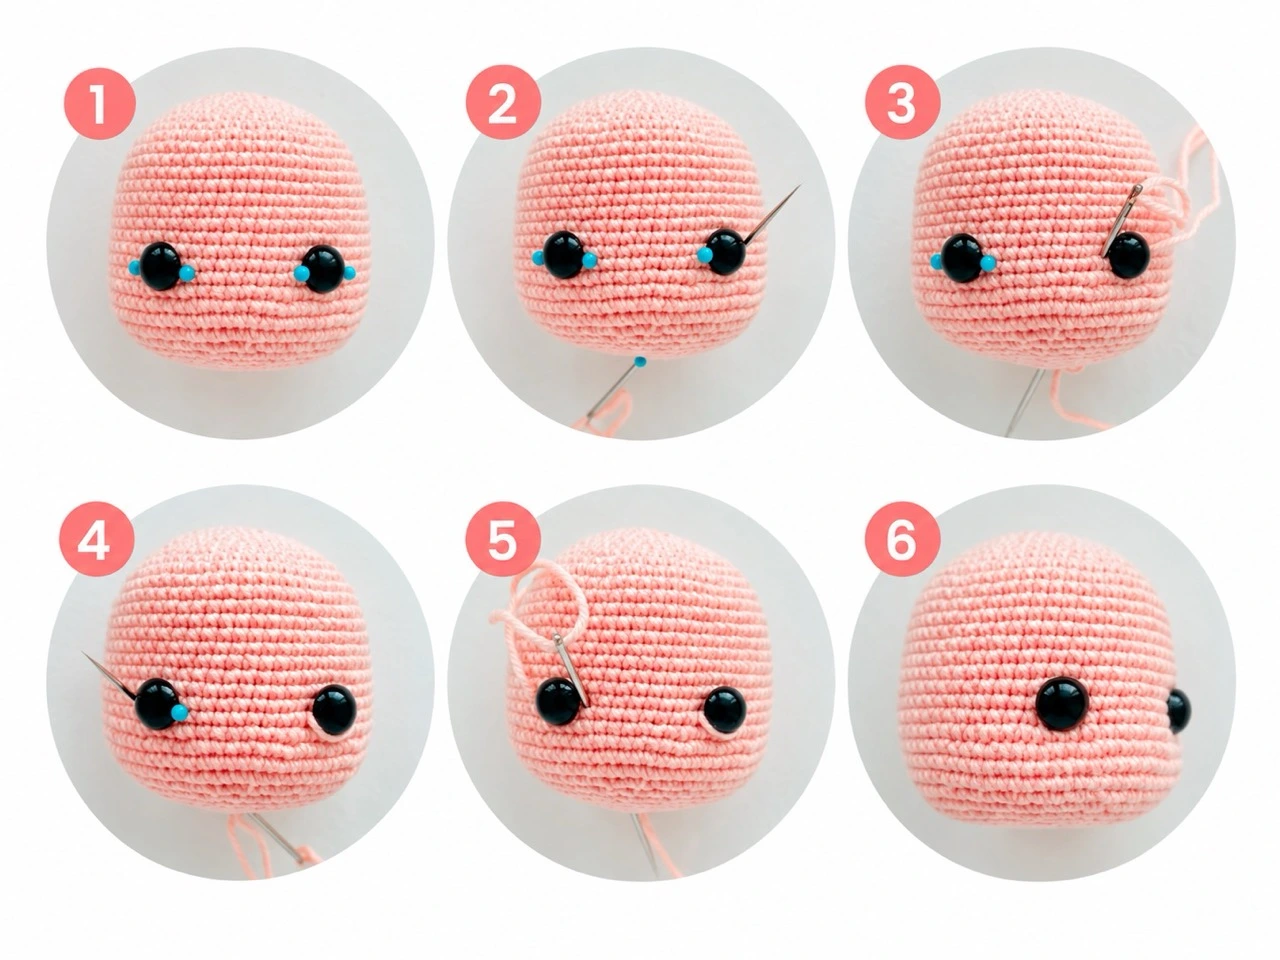
Take a long, strong thread (the same yarn used for the doll works well). Insert the needle as close to the eyes as possible.
Points 5 and 6 are located in the last round of the head, in the front middle. Insert the needle at point 5 and exit through point 1. Insert the needle at point 2 and exit through point 6. Pull the second eye. Insert the needle at point 5 and exit through point 3. Enter at point 4 and exit through point 6. Pull the ends very gently, trying to pull the eyes evenly and not too much. Tie a knot and hide it inside.
Nose and Embroidery
Mark 2 points with pins between rounds 22 and 23 of the head. The distance between the points is 3sc. Make two stitches with body color thread from one pin to the other. Using a needle, wrap these stitches with the same thread.
Sew on the ears. Mark 2 points with pins: the upper edge between rounds 20 and 21, the lower one between rounds 22 and 23. From the edge of the eye, 8sc. Sew the ears to the head.
Using white thread, make stitches from the outside of the eyes. Embroider eyelashes above the eyes with black thread. Embroider eyebrows with brown thread. Exit all threads through the hole in the head, tie the ends into a knot, and hide inside.
Lightly tint the cheeks and nose with blush or dry pink pastel. Use brown shadows or dry pastel to tint the eyebrows and upper lashes.
Making the Curly Hair Wig
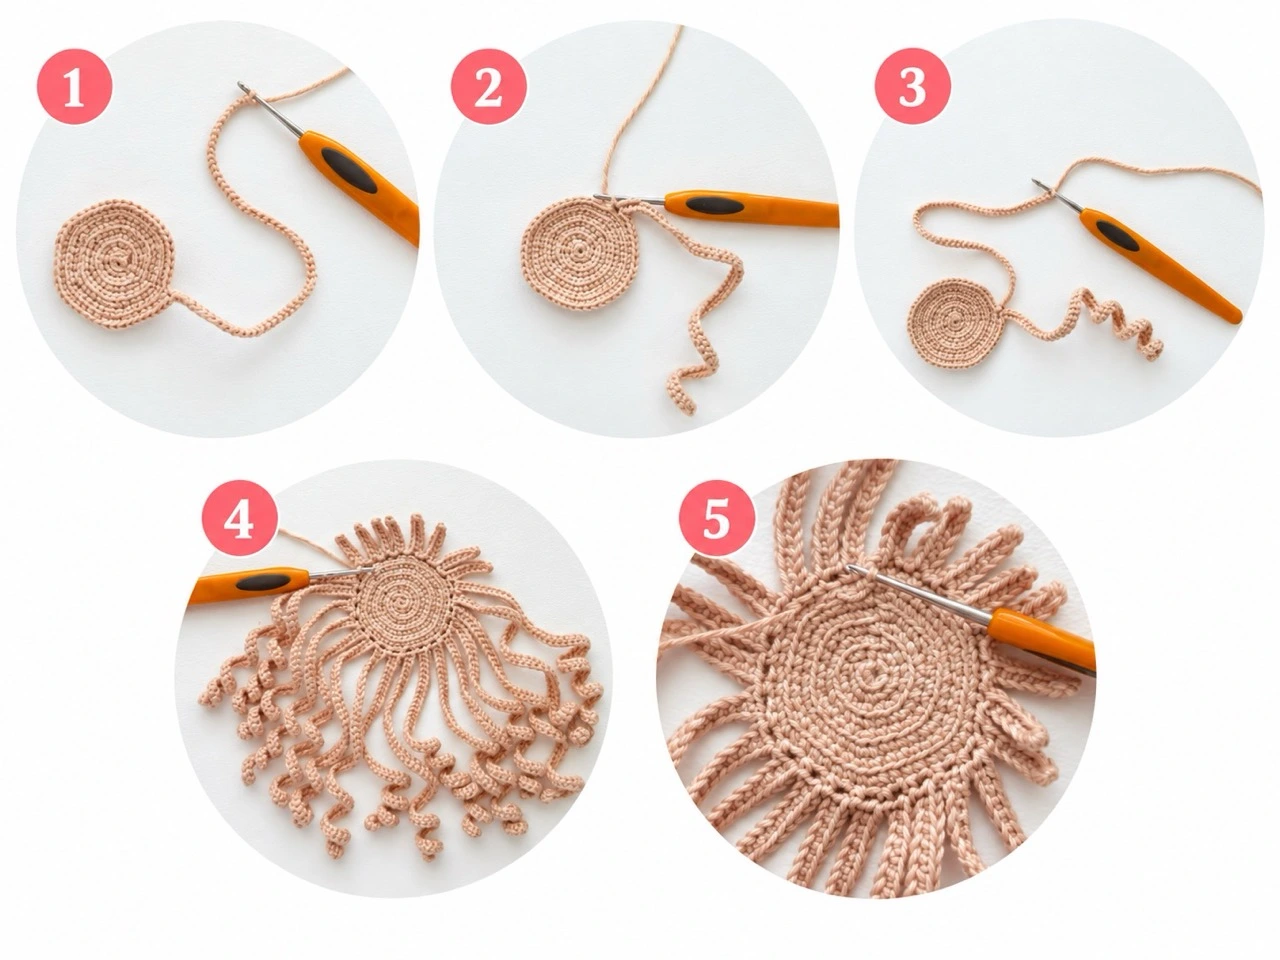
- 6sc in a MR (6)
- In back loops: 6inc (12)
- (1sc, inc)*6 (18)
- In back loops: (2sc, inc)*6 (24)
- (3sc, inc)*6 (30)
- In back loops: (4sc, inc)*6 (36)
- (5sc, inc)*6 (42)
- In back loops: (6sc, inc)*6 (48)
Round 9 (strands): (ch60, from the 2nd chain on the hook: 59sc, skip 1 stitch on the base, 1sc)*16. Bangs: (ch7, from the 2nd chain on the hook: 6sc, 2sl st)*8.
- Go to the next round with 2 sl st. Work in front loops of round 7: strands — (ch60, from the second chain: 59sc, skip one stitch on the base, 1sc)*21.
- Go to the next round with 2 sl st. Work in front loops of round 5: strands — (ch60, from the second chain: 59sc, skip one stitch on the base, 1sc)*15.
- Go to the next round with 2 sl st. Work in front loops of round 3: strands — (ch60, from the second chain: 59sc, skip one stitch on the base, 1sc)*9.
- Go to the next round with 2 sl st. Work in front loops of round 1: strands — (ch60, from the second chain: 59sc, skip one stitch on the base, 1sc)*3.
Fasten off and weave in the ends.
Hairdo: Try the wig on the head. Fix each strand of the bottom row with pins. Place the short strands (bangs) in front. Fix the wig with pins. Sew the long strands on both sides using a back stitch. Sew the bangs by inserting the needle into the hole in the head, exiting through the pin, grabbing the tip of the strand, and inserting it back into the same point.
How to Crochet the Dress and Petticoat
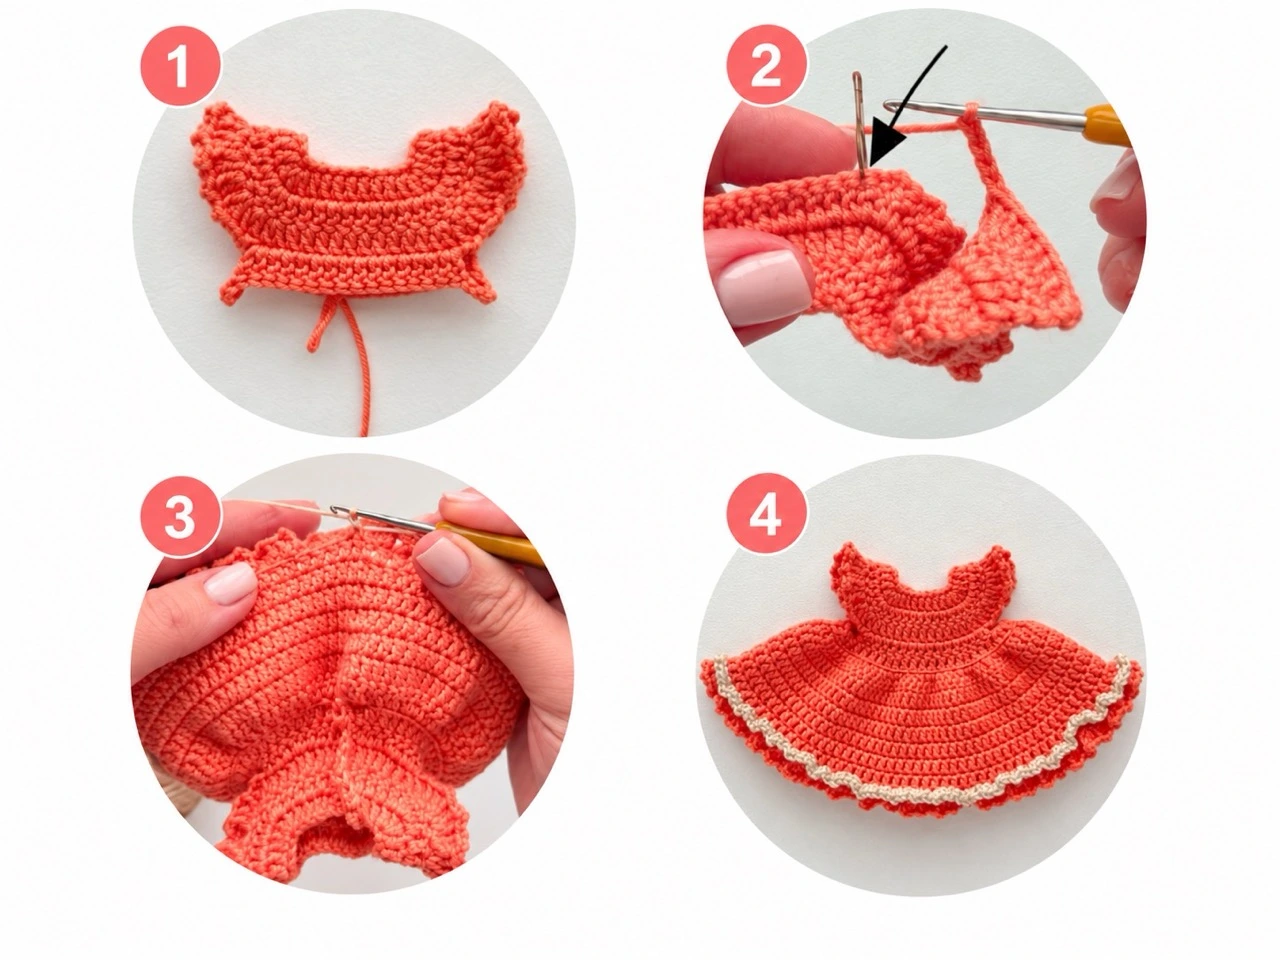
Crochet in orange color. The top of the dress is worked in rows with dc. Since gauge varies, you may need a larger or smaller hook.
Ch30 + 2 turning chains.
- Start on the third chain from the hook: 4dc, 3 dc in one stitch, 5dc, 3 dc in one stitch, 8dc, 3 dc in one stitch, 5dc, 3 dc in one stitch, 4dc (38)
- 2 t-ch, 5dc, 3 dc in one stitch, 7dc, 3 dc in one stitch, 10dc, 3 dc in one stitch, 7dc, 3 dc in one stitch, 5dc (46)
- 2 t-ch, 2dc, dcinc, 3dc; sleeve: in one stitch — (dc, ch2, dc)*11, dcinc, 10dc, dcinc, sleeve: in one stitch — (dc, ch2, dc)*11, 3dc, dcinc, 2dc (72)
- 2 t-ch, 3dc, dcinc, 3dc, ch5, skip stitches of the sleeve, dcinc, 12dc, dcinc, ch5, skip stitches of the sleeve, 3dc, dcinc, 3dc (42)
- 2 t-ch, 3dc, dcinc, (6dc, dcinc)*5, 3dc (48)
- In front loops: 2 t-ch, 48dcinc (96)
- 2 t-ch, 96dc
Join the round with sl st. Work in the round from here, starting each round with 2 t-ch and finishing with sl st.
- 96sc (5 rounds)
- In back loops: in one stitch — (dc, ch2, dc)*96 (192)
Fasten off and weave in the ends.
Attach beige yarn to the front loop of round 12 from the back. In one loop: (1sc, ch1, 1sc)*96 (192). Fasten off and weave in the ends.
Work around the edges with sc. Make two button loops of ch5 on one side of the dress. Fasten off and weave in the ends.
Flounces: Ch something (the pattern says “1Row: start on the 2nd chain from the hook: 3sc, 2hdcinc, 4dcinc, 12trinc, 4dcinc, 2hdcinc, 3sc”). Fasten off and weave in the ends. Mark the location of the flounces on the front between rows 5 and 6 of the dress. The distance between points is 8 dc. Behind the edge, 3dc. Fix the flounces to the dress and sew them on using a beige thread.
Petticoat: Take tulle. Sew a basting stitch along the top of the petticoat along its entire length. Form the folds. Turn the dress inside out. Secure the tulle with pins between rows 5 and 6 of the dress. Sew on the petticoat. Sew an applique or decor to the front of the dress. Sew two buttons on the back.
How to Crochet the Shoes
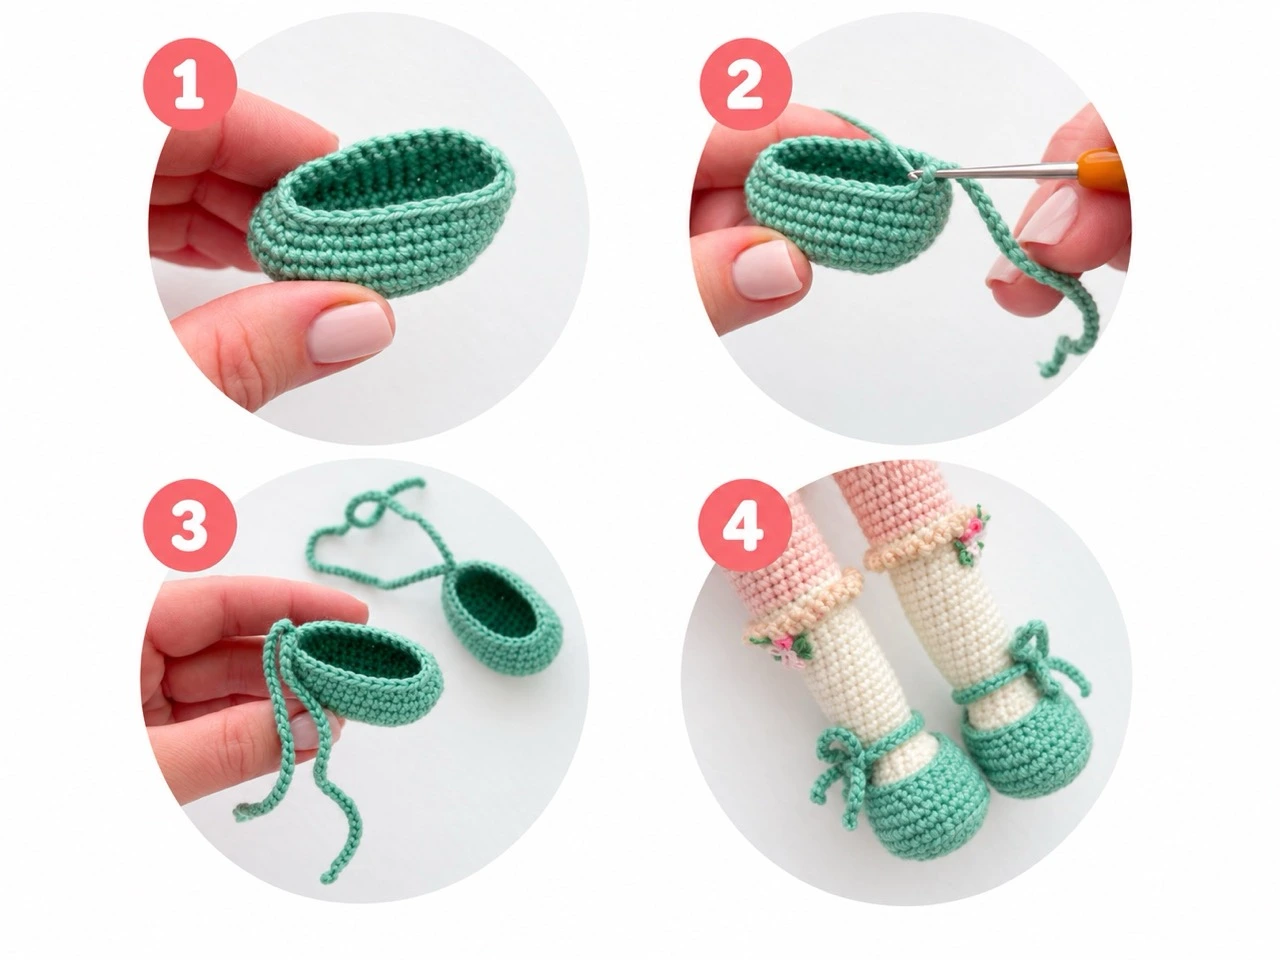
- Ch7, start on the second chain from the hook: 5sc, 3sc in the last chain, on the other side of the chain — 4sc, inc (14)
- inc, 4sc, 3inc, 4sc, 2inc (20)
- sc, inc, 4sc, (sc, inc)*3, 4sc, (sc, inc)*2 (26)
- 2sc, inc, 4sc, (2sc, inc)*3, 4sc, (2sc, inc)*2 (32)
- 3sc, inc, 4sc, (3sc, inc)*3, 4sc, (3sc, inc)*2 (38)
- In back loops: 38sc
- 38sc
- 37sc — short round, marker is in the center of the heel.
- 10sc, (1sc, dec)*6, 10sc (32)
- 14sc, 2dec, 14sc (30)
Finish with sl st. Fasten off and hide the ends. Using a green thread, make ch35. Using a sl st, attach the chain to the back center of the shoe. Ch35. Fasten off and cut the yarn. Crochet the second shoe in the same way.
How to Crochet the Pumpkin
- 7sc in a MR (7)
- 7inc (14)
- (1sc, inc)*7 (21)
- (2sc, inc)*7 (28)
- (3sc, inc)*7 (35)
- (4sc, inc)*7 (42)
- 42sc (6 rounds)
- (4sc, dec)*7 (35)
- (3sc, dec)*7 (28)
- (2sc, dec)*7 (21)
- (1sc, dec)*7 (14)
- 7dec (7)
Fasten off and leave a long end to close the hole. Hide the ends inside.
Leaves: Crochet in green. Ch8, start from the second chain on the hook: 7inc. Ch8, start from the second chain on the hook: 7inc. Again ch8, start from the second chain on the hook: 7inc. Fasten off and leave the end for sewing.
Assembly: Make ribs on the pumpkin. Insert a needle with beige thread into the center of the MR, pierce it through, and exit it through the center on the opposite side. Lay the beige thread, focusing on the increases and decreases. Pull the thread to form a rib. Make 7 ribs this way. Try to keep the pieces approximately the same size. Sew the leaves on top in the center.
Putting Your Crochet Pattern Pumpkin Doll Together
Take a wire 11 cm long and insulate the ends with adhesive plaster. Insert the wire into the doll’s body. Add fiberfill into the neck. The neck should be stuffed tightly. Place the head on the neck and secure with pins. Sew firmly in a circle.
Put on the dress and tie a decorative bow on the head.
Helpful Tips for a Neater Crochet Pattern Pumpkin Doll
- Keep your tension tight. The pattern explicitly says to crochet tightly so there are no holes. This is especially important for the body and head.
- Use a stitch marker. The pattern uses spiral rounds and specific short rounds. A marker helps you keep track of where you are.
- Make the insoles first. Cutting the plastic inserts before you close the feet makes them much easier to slide in.
- Align the marker at the back. For the legs and body, the marker should run down the center back. Add or subtract shift stitches as needed to make that happen.
- Stuff firmly but evenly. The neck needs to be tightly stuffed to support the head. The arms and legs should be firm but not lumpy.
- Try the wig on before sewing. Pin the strands in place and check the placement from all angles.
- Wire frame matters. The wire in the arms and neck lets the doll hold her pose and carry the pumpkin without flopping over.
FAQ About the Crochet Pattern Pumpkin Doll
What skill level is this crochet pattern pumpkin doll?
It’s rated intermediate. You need to know basic crochet skills, and the pattern does not contain crochet lessons. Familiarity with increases, decreases, working in rounds, and basic embroidery will help.
How big is the finished crochet pattern pumpkin doll?
When you use the recommended materials and a 1.75 mm hook, the finished doll is about 24 cm tall.
What yarn is used for the crochet pattern pumpkin doll?
The body uses Alize Cotton Gold in color 401. The cream bodysuit and knee socks use Alize Cotton Gold in color 62. The dress uses Gazzal Baby Cotton in orange, and the hair uses YarnArt Baby Cotton in light beige.
Can I make this crochet pattern pumpkin doll without wire?
Yes, you can skip the wire frame, but the doll won’t be able to hold poses or support her head as well. The wire in the neck is especially helpful for keeping the head upright.
How do I make the hair for the crochet pattern pumpkin doll?
The hair is a crocheted wig cap with long strands attached. You’ll crochet chains, work back down them with single crochet, and attach them to the front loops of the wig cap. The bangs are shorter strands sewn individually.
One Comment