Free Crochet Husky Amigurumi Pattern Step by Step
Amigurumi · Plush Husky Pattern
Free Crochet Husky Amigurumi Pattern Step by Step
⏱ Intermediate make · Super-bulky velvet yarn · 3.5 mm hook
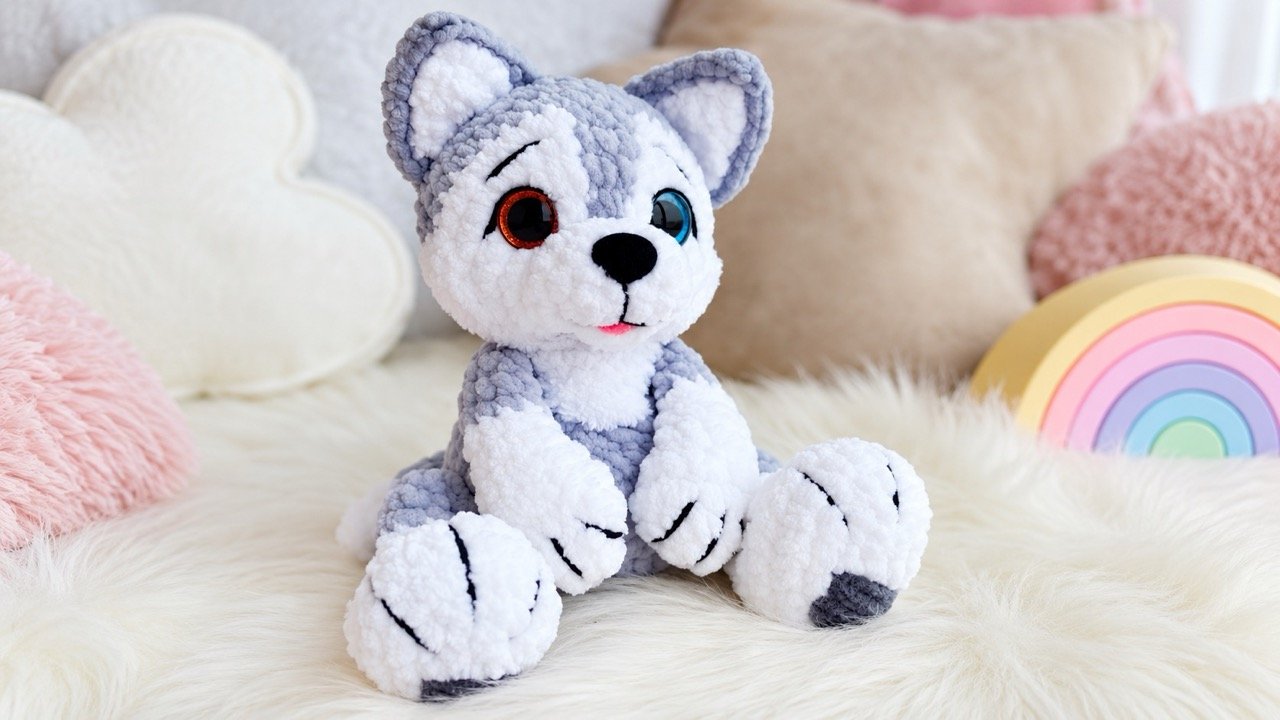
🧶 Your starting point This free crochet husky amigurumi pattern makes a soft, playful puppy with bright eyes, upright ears, puffy cheeks, and a tiny tongue. Work it in grey and white Himalaya Dolphin Baby yarn for a classic husky look, or choose your own colours for a one-of-a-kind companion.
This husky is worked as separate ears, head, legs, arms, tail, and body. The limbs and tail are joined as you crochet the body; keep a stitch marker in the first stitch of every round and add stuffing gradually so the muzzle and cheeks stay full.
On this page
Contents
What You Need Before You Start
Yarn and hook
| Item | What to use |
|---|---|
| Main yarn | Himalaya Dolphin Baby (100 g / 120 m) or similar super-bulky velvet yarn |
| Grey yarn | No. 351 or a similar grey, about 35–40 g |
| White yarn | No. 301 or a similar white, about 30–35 g |
| Detail yarn | Black YarnArt Jeans for embroidery |
| Optional faux fur | White Himalaya Koala, YarnArt Mink, or Scheepjes Furry Tales for cheeks and chest |
| Hook | 3.5 mm |
Notions and tools
| Item | What to use |
|---|---|
| Safety eyes | 16 mm |
| Safety nose | 15 × 13 mm or 16 × 14 mm |
| Sculpting tools | An 8–10 cm needle and strong nylon thread |
| Assembly tools | Fibre fill, wide-eye needle, stitch marker, scissors, and thin knitting needles |
Safety note: Safety eyes are not suitable for children under three; embroider the face instead for a baby-safe version. Follow the manufacturer guidance for all safety parts. If using a lighter to seal yarn ends, work carefully and away from yarn and stuffing.
When substituting yarn, compare the label with the Craft Yarn Council yarn weight system and make a small gauge swatch first.
Stitch Guide and Colour Changes
| Abbreviation | Meaning |
|---|---|
| ch | chain |
| sl st | slip stitch |
| MR | magic ring |
| sc | single crochet |
| inc | increase: 2 sc in one stitch |
| dec | decrease: crochet 2 stitches together |
| 3 sc inc (V) | crochet 3 sc in one stitch |
Numbers in parentheses are the stitch count for the round. When changing colour, pull the new yarn through the final two loops of the last stitch in the old colour.
The Pattern
· Ear Options
Choose one ear style. Make a left and a right ear, keeping at least 8 sc along the edge that joins the head.
Option 1 · Two-piece ears
Make 2 white pieces in rows:
- R1: Ch 6; from the second chain from hook, 5 sc. (5)
- R2: Turning ch, 3 sc, dec. (4)
- R3: Turning ch, dec, 2 sc. (3)
- R4: Turning ch, 1 sc, dec. (2)
- R5: Turning ch, dec. (1)
Cut the white yarn, leaving short ends. Make 2 grey pieces in exactly the same way, but keep the working yarn attached.
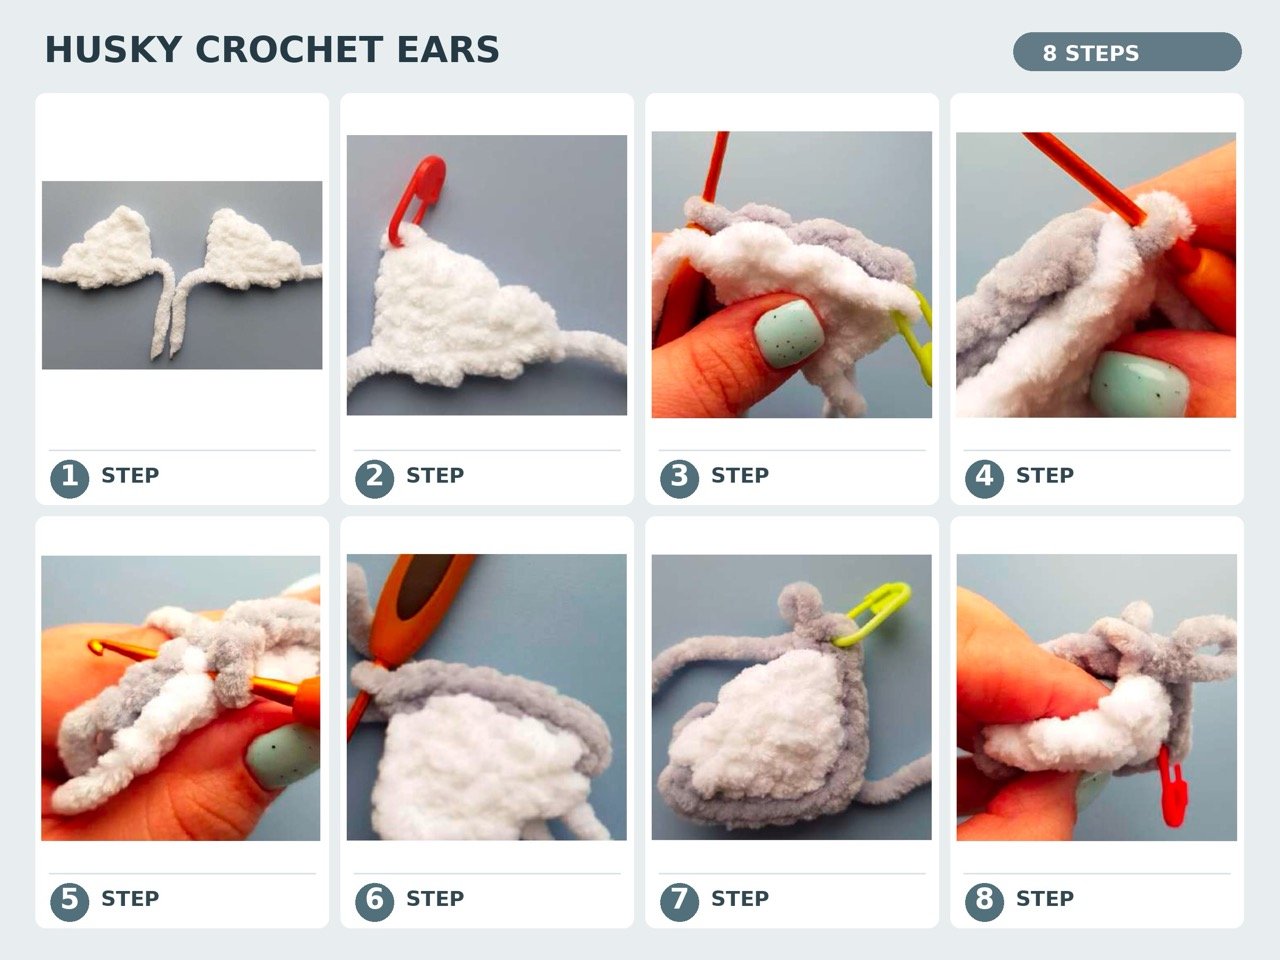
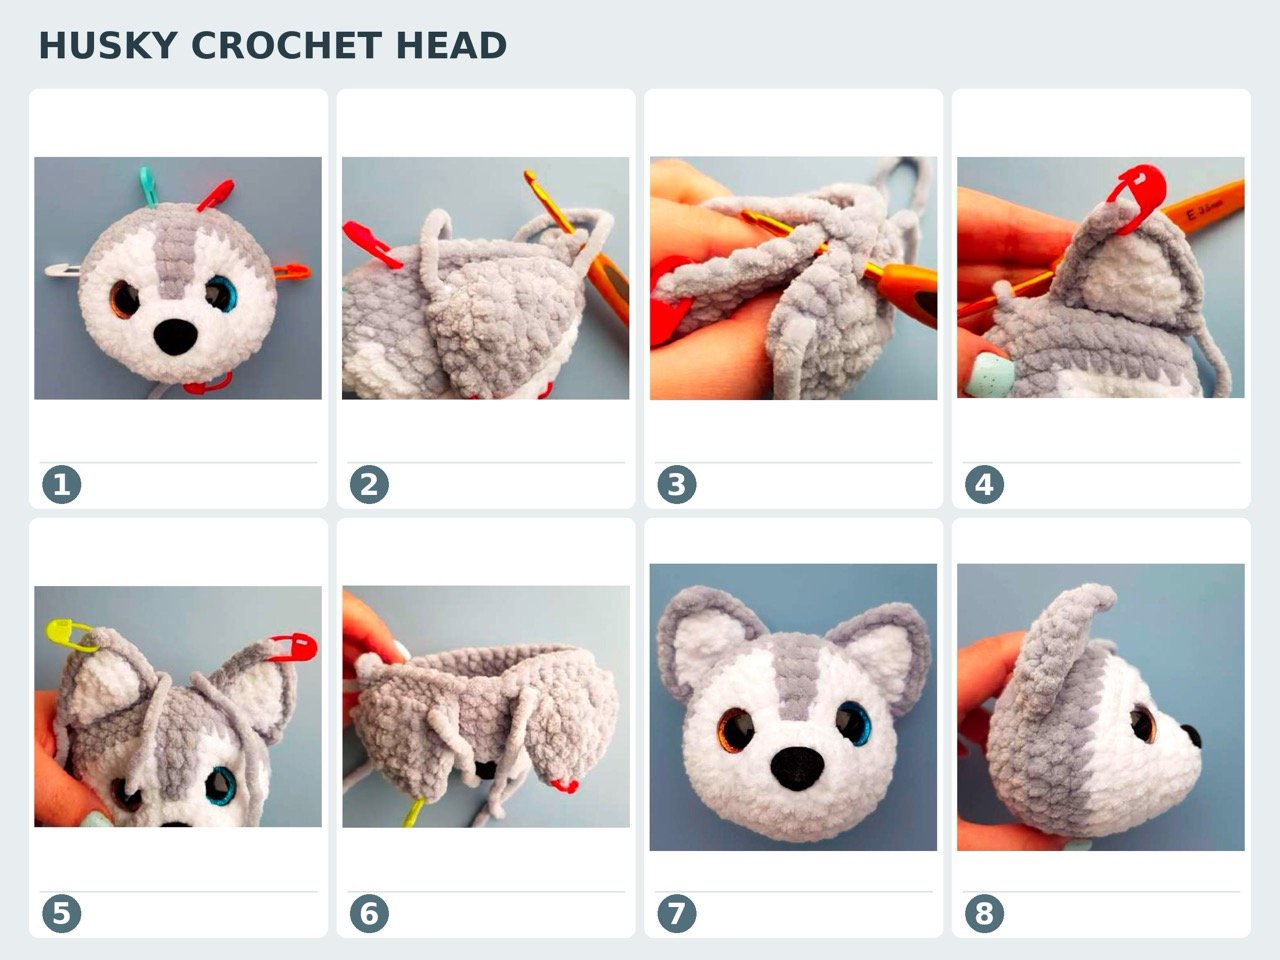
Place a white piece over a grey piece, with the points aligned. Draw the working grey loop to the white side, ch 1, and crochet sc around the edge. Work 2 sc in each side corner. At the pinned top point, work (1 sc, ch 1, 1 sc) and place a marker in the ch-1 space. Hide the white ends inside.
Option 2 · Simple folded ears
- R1: 6 sc in MR. (6)
- R2: (1 sc, inc) × 3. (9)
- R3: 9 sc.
- R4: (2 sc, inc) × 3. (12)
- R5: (2 sc, inc) × 4. (16)
Fold the ear in half and work 8 sc through both layers. Leave a sewing tail. Embroider a white triangle onto each ear with white yarn.
· Head
Start in white yarn.
- R1: Ch 5. From the second chain from hook: inc, 2 sc, 3 sc in the last chain, then 3 sc along the other side. (10)
- R2: 2 inc, 2 sc, 3 inc, 2 sc, inc. (16)
- R3–R4: 16 sc.
- R5: In white: inc, (3 sc inc) × 4; in grey: 3 sc inc; in white: (3 sc inc) × 4, inc, 5 sc. (36)
- R6–R8: White: 14 sc; grey: 3 sc; white: 19 sc. (36)
- R9: Change to grey; 36 sc. Cut white yarn.
- R10–R11: 36 sc.
Place 16 mm safety eyes in R5 at the increase points, with 13 sc between the eye posts. Place the safety nose in R2 of the snout, on the border of R1–R2 and slightly above centre, following these placement steps.
- R12: Join ears: 7 sc, 8 sc through the ear, 2 sc, 8 sc through the ear, 11 sc. (36)
- R13: (4 sc, dec) × 6. (30)
- R14: (3 sc, dec) × 6. (24)
- R15: (2 sc, dec) × 6. (18)
Stuff the head, pushing fibre fill into the muzzle and out toward the cheeks.
- R16: (1 sc, dec) × 6. (12); finish stuffing.
- R17: 6 dec. (6)
Fasten off with a sl st and close the opening with a needle.
· Legs and Arms
Legs · Make 2
Start in white yarn.
- R1: 6 sc in MR. (6)
- R2: 6 inc. (12)
- R3: (1 sc, inc) × 6. (18)
- R4: (inc, 2 sc) × 6. (24)
- R5: 24 sc.
- R6: 6 sc, 6 dec, 6 sc. (18)
- R7: 5 sc, 4 dec, 5 sc. (14)
- R8: 5 sc, 2 dec, 5 sc. (12)
- R9–R11: 12 sc.
- R12: Change to grey; 12 sc.
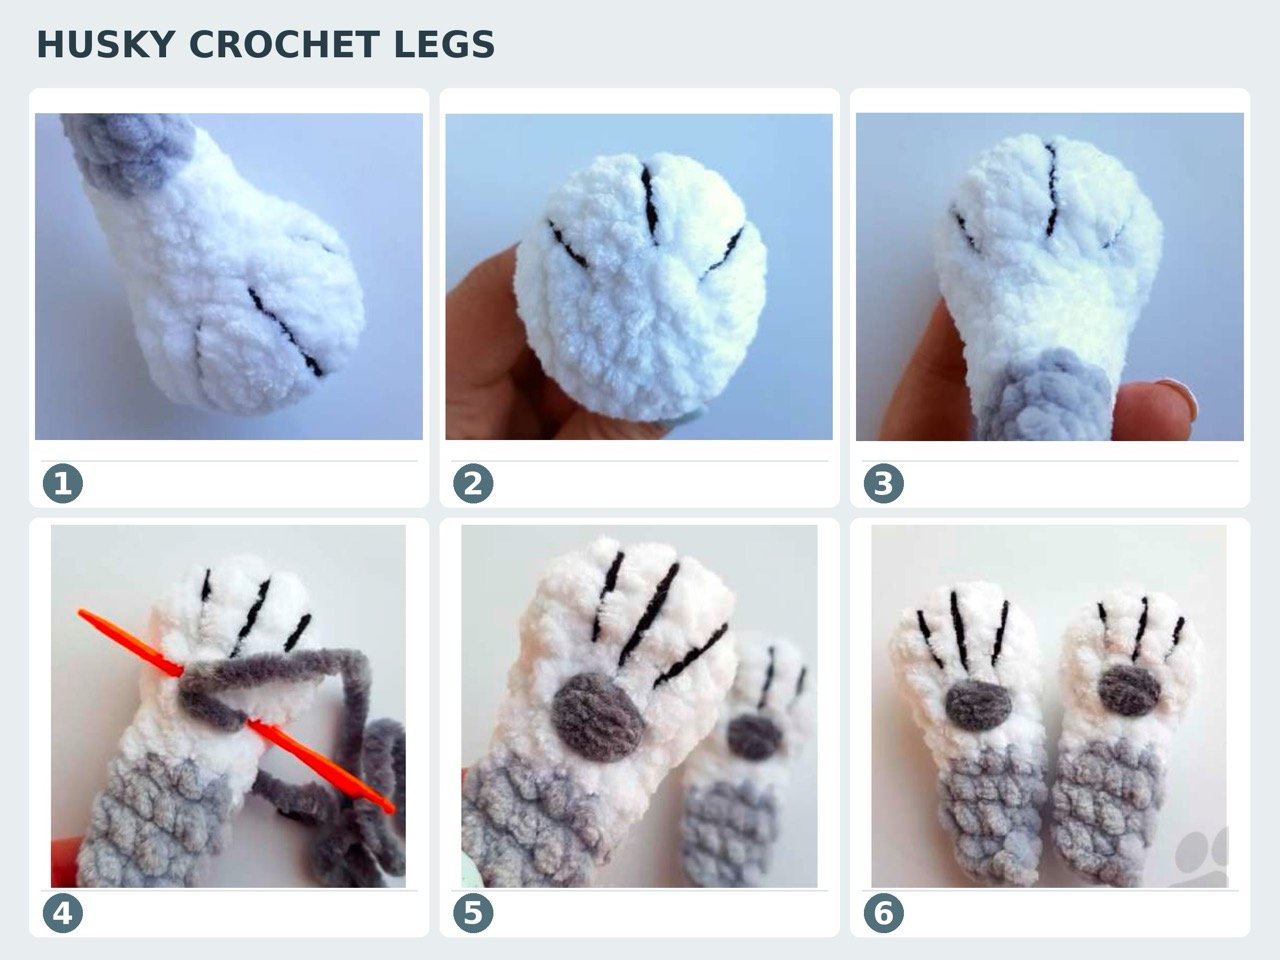
Stuff only to R10. Work R13: 12 sc, then R14: (4 sc, dec) × 2. (10) Do not add more stuffing. Work 1 extra sc, flatten the opening, and crochet 5 sc through both layers.
Use contrasting thread to divide the toes: make one stitch through the centre of the foot, then one on each side. Pull gently, knot, and hide the ends. Embroidered chenille pads are optional.
Arms · Make 2
Start in white yarn.
- R1: 6 sc in MR. (6)
- R2: 6 inc. (12)
- R3: 3 sc, 2 inc, 7 sc. (14)
- R4: 10 sc, 2 dec. (12)
- R5: 8 sc, 2 dec. (10)
- R6: 8 sc, dec. (9)
- R7: 9 sc.
- R8: Change to grey; 9 sc.
Stuff the white palm lightly so it stays a little flat. Work R9: 9 sc, then R10: (1 sc, dec) × 3. (6) Do not stuff further. Fold in half and crochet 3 sc through both layers.
Divide the fingers with contrasting thread in the same centre, right, and left sequence as the toes. Knot and hide the ends; embroidered pads are optional.
· Tail
Start in white yarn.
- R1: 6 sc in MR. (6)
- R2: 6 sc.
- R3: (1 sc, inc) × 3. (9)
- R4: 9 sc.
- Change to grey.
- R5: (2 sc, inc) × 3. (12)
- R6–R8: 12 sc.
- R9: (2 sc, dec) × 3. (9)
- R10: 9 sc.
- R11: (1 sc, dec) × 3. (6)
Stuff lightly, fold in half, and crochet 3 sc through both layers. Fasten off.
· Body and Joined Limbs
- R1: 6 sc in MR. (6)
- R2: 6 inc. (12)
- R3: (1 sc, inc) × 6. (18)
- R4: (inc, 2 sc) × 6. (24)
- R5: (3 sc, inc) × 6. (30)
- R6: 1 sc, inc, (4 sc, inc) × 5, 3 sc. (36)
- R7: 36 sc.
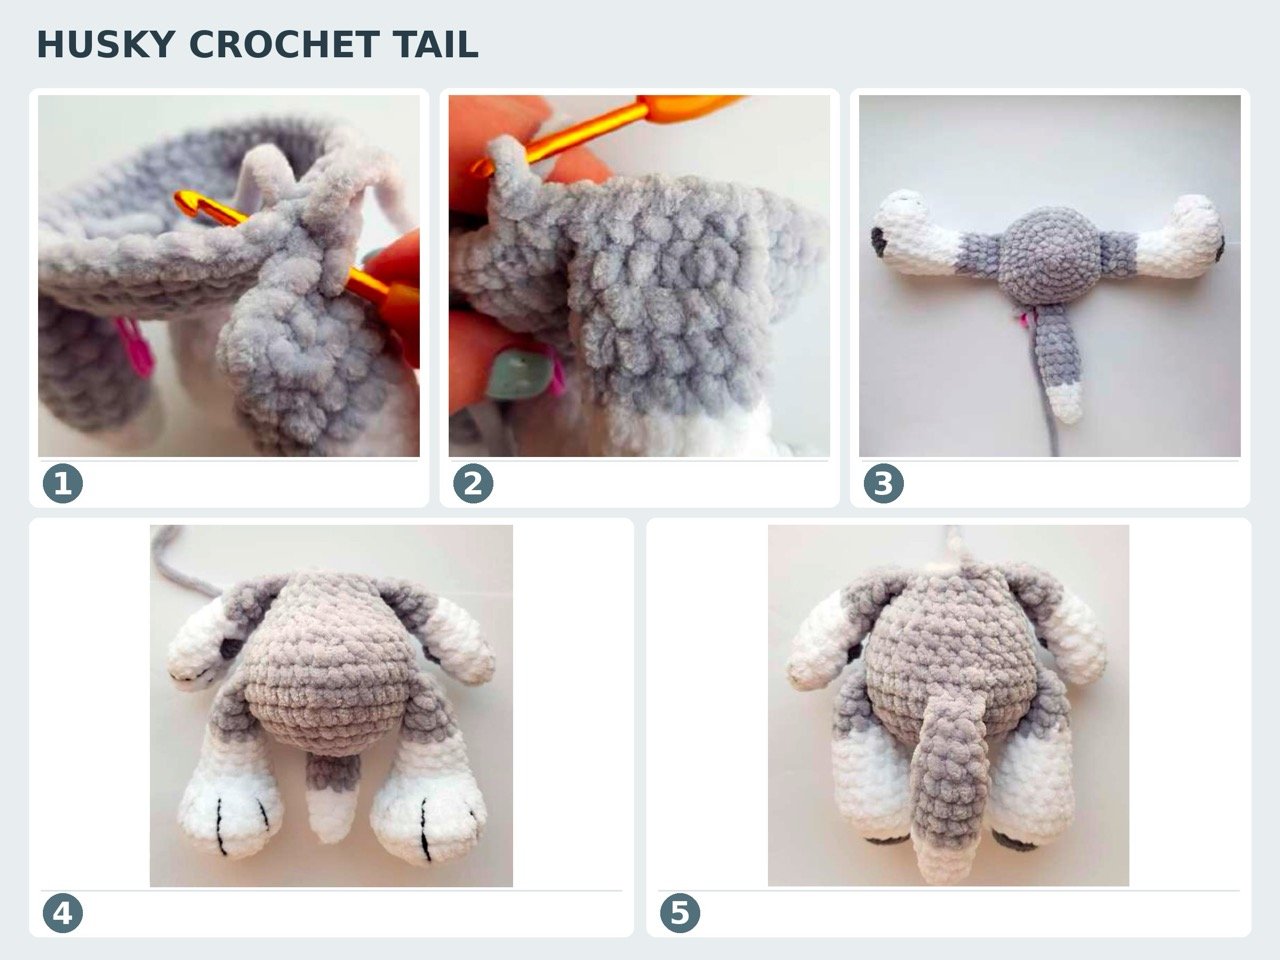
- R8: Join tail and legs: 3 sc through tail, 5 sc on body, 5 sc through leg, 13 sc on body, 5 sc through leg, 5 sc on body. (36)
- R9: (4 sc, dec) × 6. (30)
- R10: 30 sc.
- R11: 11 sc, 6 dec, 7 sc. (24)
- R12: 24 sc.
- R13: (2 sc, dec) × 6. (18)
- R14: 18 sc.
- R15: Join arms: 5 sc on body, 3 sc through first arm, 6 sc, 3 sc through second arm, 1 sc on body. (18)
Check that the decreases sit evenly between the legs for a softly rounded tummy and that the arms line up with the legs. Work 2 extra sc and 1 sl st. Leave a long sewing tail and stuff the body.
· Assembly and Needle Sculpting
Sculpt the face before sewing the head to the body. Use a long needle and strong nylon thread.
- Enter between R4 and R5 at point A; exit beside an eye at point B.
- Enter at point C on the grey-and-white border; exit near A at point D.
- Enter at A; exit at point E on the grey-and-white border.
- Enter beside the other eye at point F; return through D.
- Pull both ends gently while pressing the eyes and muzzle into place. When the cheeks are even, knot and hide the thread inside the head.
· Face Decoration
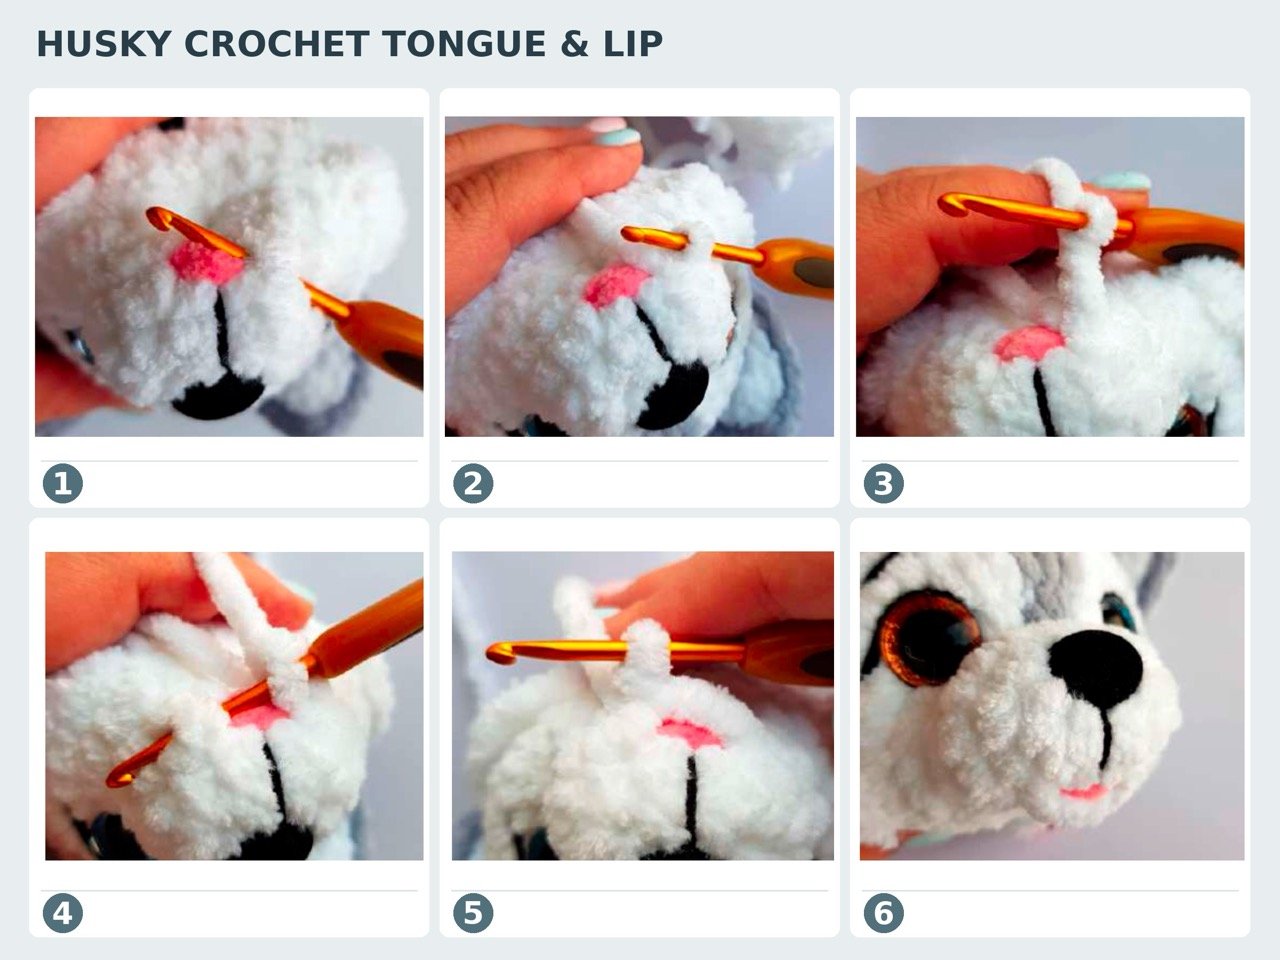
Use black YarnArt Jeans and a suitable needle to embroider the eyelids, eyebrows, and mouth. For extra fluff, embroider the cheeks with optional white faux fur yarn.
For an optional tongue, make 3–4 pink stitches across 2 sc. Insert the hook beside the tongue, catch white yarn, ch 3–4, and attach on the opposite side with a sl st. Secure and hide the ends. Add a short horizontal black stitch beside the tongue to complete the smile.
Finish Your Husky
- Sew the head to the body, using thin knitting needles to check even placement.
- Position the neck line close to the muzzle sculpting and sew with the long body tail or strong thread.
- Reinforce the neck with a little fibre fill.
- Add optional faux-fur chest embroidery.
Helpful Finishing Tips
- Use a 3.5 mm hook or smaller for a close fabric without gaps.
- Stuff the muzzle and cheeks firmly, but do not overstuff the limbs.
- Check ear placement from the front before joining or sewing them.
- Count every round; the stitch counts change often.
- Take your time with the sculpting and face embroidery—it creates the husky’s expression.
FAQ
What skill level is this crochet husky amigurumi pattern?
It is intermediate. You should know magic ring, single crochet, increases, decreases, colour changes, and basic assembly. Needle sculpting gives the face its final shape.
How big is the finished husky?
About 20 cm tall with Himalaya Dolphin Baby yarn and a 3.5 mm hook.
Can I skip needle sculpting?
Yes, but the cheeks and muzzle will have less definition.
What size safety eyes do I need?
Use 16 mm safety eyes, placed about 13 sc apart as described in the head instructions.
Which ear option should I use?
Choose the two-piece version for a more detailed colour-blocked ear, or the folded version for a quicker make.
Ready for the Next Stitch?
From the snowy colourwork to the little sculpted cheeks, this husky becomes a playful companion one round at a time. Start with the first magic ring, work the sections in order, and enjoy bringing your puppy to life.
Happy crocheting!
Looking for another dog make? Try our Crochet Snoopy Dog Amigurumi pattern next.
Ready for your next soft make?
Save this pattern, share your finished puppy, and explore another character-filled amigurumi next.