Crochet Pattern Frieren Doll: Create a 27 cm Elf Mage Amigurumi With Hair, Cape, and Staff
Crochet Pattern Frieren Doll Elf Mage Amigurumi With Hair, Cape, and Staff
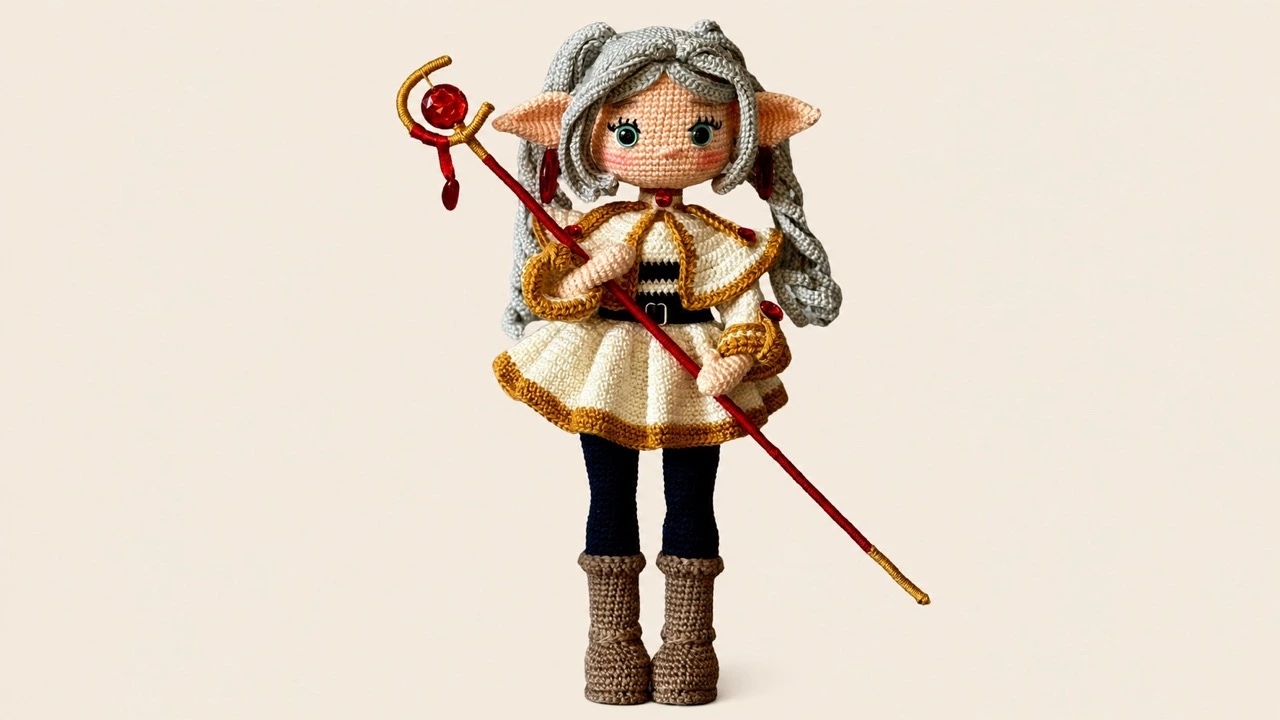
There’s something special about bringing a character from a story into your hands. If you’ve watched Frieren: Beyond Journey’s End, you already know the quiet, timeless feel of the elf mage. Now imagine crocheting her — not as a flat drawing, but as a 27 cm doll with pointed ears, long silver hair, a layered white dress, a mustard-trimmed cape, and a tiny staff with a red crystal. It’s an intermediate project with detailed shaping, wire support, and beautiful finishing touches. Below is a complete guide to the pattern. You’ll find the materials, special stitches, head and face instructions, hair construction, body and limb assembly, dress, cape, wand, and final tips. Use this as your roadmap, and keep the guide nearby for photos and visual references.
Why This Crochet Pattern Frieren Doll Stands Out
Plenty of amigurumi dolls exist, but this one captures a specific character with care.
- Difficulty: Intermediate. You should already know basic crochet stitches and be comfortable with shaping.
- Finished size: About 27 cm when using the recommended yarn and hook.
- Detailed face: Safety eyes, embroidered eyelashes, eyebrows, nose, and eye whites give her Frieren’s calm expression.
- Wire support: Electrical wire runs through the arms and legs so the doll can hold poses and carry her staff.
- Layered outfit: The white dress has navy lines, a ruffled skirt, and mustard edging. The cape adds another layer with red crystal buttons.
- Handmade hair: The wig and ponytails are crocheted separately and sewn on, creating long silver strands.
- A staff: The wand uses wire, yarn, and glass beads to make a miniature magical weapon.
Use the instructions and materials in this guide as a starting point, and check applicable laws and platform terms before sharing or selling finished items.
What You Need Before You Start
Gather your supplies first. This project uses specific yarns, wire, and small beads.
Yarn and Hook
- Catania TR 263 skin-colored yarn — for the head, ears, arms, and legs.
- Catania 124 navy — for leggings and dress lines.
- Catania 105 white — for the dress and cape.
- Catania 254 brown — for boots.
- Catania 431 mustard yellow — for dress edging, cape trim, and wand details.
- Catania 172 gray — for hair.
- Hook size: 2.00 mm.
Eyes, Wire, and Embellishments
- 10 mm locked aqua green eyes.
- 1 meter of electrical wire.
- 15 cm long, 8 mm wide navy blue leather (belt).
- Belt buckle with a 1 cm diameter.
- 2 cm long red glass bead (earrings).
- Red glass crystal button, 12 mm, 2 pieces (dress sleeves).
- 7 mm red glass crystal button, 3 pieces (cape).
- Two separate electrical wires cut to 30 cm and 10 cm (wand).
- 2 cm diameter crystal bead (wand).
- 1.5 cm diameter glass bead (wand).
- Polyester toy filling (fiberfill).
- Yarn needle, sewing pins, scissors, stitch marker.
- Black and white embroidery thread.
- Blush or dry pastel for toning.
Stitch Terms and Special Techniques
Before you start, get familiar with these abbreviations.
- MR — magic ring
- sc — single crochet
- ch — chain
- slst — slip stitch
- inc — increase
- dec — decrease
- W — insert in same stitch 3 times
- M — decrease 3 stitches together
- BLO — back loop only
- FLO — front loop only
- ISS — in same stitch
- hdc — half double crochet
- hdcinc — increase with hdc
- hdcdec — decrease with hdc
- dc — double crochet
- dcinc — increase with dc
- dcdec — decrease with dc
- tr — treble crochet
- trinc — increase with tr
- (…)* — repeat the instructions in brackets
- ESC — pulling up single crochet in 2 movements. This is the cross single crochet technique used for the dress.
The ESC Stitch
From row 18 of the dress onward, you’ll use the ESC technique. Instead of finishing the single crochet in one motion, you pull up the loop in two steps. This creates a slightly different texture. Work the single crochets through the hook in two steps.
How to Crochet the Head and Face
Use skin-colored yarn and a 2.00 mm hook. The head is worked in a spiral.
- Into MR: 6sc = 6sc
- 1inc into each stitch = 12sc
- (1sc, 1inc)* = 18sc
- 1sc, 1inc, (2sc, 1inc)*5, 1sc = 24sc
- (3sc, 1inc)*6 = 30sc
- 2sc, 1inc, (4sc, 1inc)*5, 2sc = 36sc
- (5sc, 1inc)*6 = 42sc
- 3sc, 1inc, (6sc, 1inc)*5, 3sc = 48sc
- (7sc, 1inc)*6 = 54sc
- 4sc, 1inc, (8sc, 1inc)*5, 4sc = 60sc
- 60sc (10 rows)
- 25sc, 1ch skip 1sc, 9sc, 1ch skip 1sc, 24sc = 60sc
- 25sc, 1sc on 1ch, 9sc, 1sc on 1ch, 24sc = 60sc
- 17sc, (2sc, 1inc)*3, 9sc, (1inc, 2sc)*3, 16sc = 66sc
- 66sc (4 rows)
- 17sc, (2sc, 1dec)*3, 9sc, (1dec, 2sc)*3, 16sc = 60sc
- 4sc, 1dec, (8sc, 1dec)*5, 4sc = 54sc
- (7sc, 1dec)*6 = 48sc
- 3sc, 1dec, (6sc, 1dec)*5, 3sc = 42sc
- (5sc, 1dec)*6 = 36sc
- 2sc, 1dec, (4sc, 1dec)*5, 2sc = 30sc
- (3sc, 1dec)*6 = 24sc
- (2sc, 1dec)*6 = 18sc
- (1sc, 1dec)*6 = 12sc
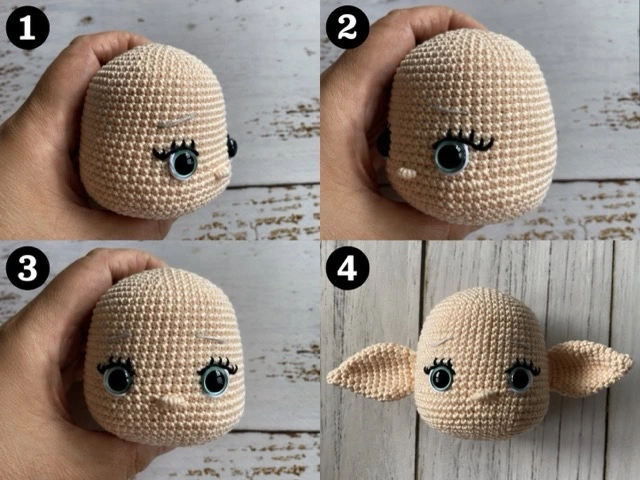
Cut the yarn. Attach the 10 mm green safety eyes into the spaces where you made 1ch in row 21.
Face Shaping and Embroidery
- Embroider the eye whites with 4 strands of white yarn.
- Embroider eyelashes with 2 strands of black yarn.
- Embroider eyebrows above the eyes with 2 strands of hair yarn, about 4sc long.
- Embroider the nose by wrapping, 1 row under the eyes, between 2sc, using skin-colored yarn.
- Sew the ears at a distance of 8sc from the ending point of the eyes.
How to Crochet the Ears and Earrings
Use skin-colored yarn and a 2.00 mm hook. Make two.
- 5sc into MR = 5sc
- 4sc, 1inc = 6sc
- (2sc, 1inc)*2 = 8sc
- (1sc, 1inc)*4 = 12sc
- (5sc, 1inc)*2 = 14sc
- (6sc, 1inc)*2 = 16sc
- (7sc, 1inc)*2 = 18sc
- (8sc, 1inc)*2 = 20sc
- (9sc, 1inc)*2 = 22sc
- 22sc (2 rows)
- (9sc, 1dec)*2 = 20sc
- (3sc, 1dec)*4 = 16sc
- (6sc, 1dec)*2 = 14sc
- Join the two ends with single crochet, then 7sc.
Cut the yarn, leaving a long end for sewing. Sew the earrings to the ears as shown in the visuals.
How to Make the Hair and Ponytails
Use gray yarn and a 2.00 mm hook. The wig is worked in a spiral.
- Into MR: 6sc = 6sc
- 1inc into each stitch = 12sc
- (1sc, 1inc)*6 = 18sc
- (2sc, 1inc)*6 = 24sc
- (3sc, 1inc)*6 = 30sc
- 2sc, 1inc, (4sc, 1inc)*5, 2sc = 36sc
- (5sc, 1inc)*6 = 42sc
- 3sc, 1inc, (6sc, 1inc)*5, 3sc = 48sc
- (7sc, 1inc)*6 = 54sc
- 4sc, 1inc, (8sc, 1inc)*5, 4sc = 60sc
- (9sc, 1inc)*6 = 66sc
- 66sc (6 rows)
- 30sc, BLO: 6sc, 30sc
- 32sc, (25ch, from the 2nd chain: 24hdc, slst to side stitch)*2, 32sc
Cut the yarn. Now work on the FLO stitches of the BLO stitches in row 18. Attach yarn to the first FLO stitch:
- (36ch, from the 2nd chain: 35hdc)*6, slst.
Cut the yarn.
Ponytails (Make 2)
- 8ch, from the 2nd chain: 7sc.
- (61ch, from the yarn: 60sc)*6, slst.
Cut the yarn long and join the two ends.
Hair Designing
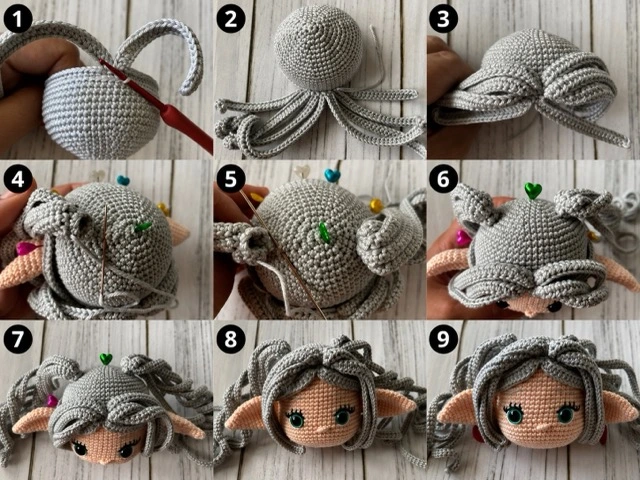
Sew the wig to the head from the pinned areas, or attach it with fabric glue. Sew the ponytail to the wig using the images as a reference.
How to Crochet the Arms, Legs, and Boots
Arms (Make 2)
Use skin-colored yarn.
- 6sc into MR = 6sc
- (1sc, 1inc)*3 = 9sc
- (2sc, 1inc)*3 = 12sc
- 12sc
- 6sc, 1 popcorn (4dc in same stitch and pull them altogether), 5sc = 12sc
- (2sc, 1dec)*3 = 9sc
- 9sc (22 rows)
Cut the yarn.
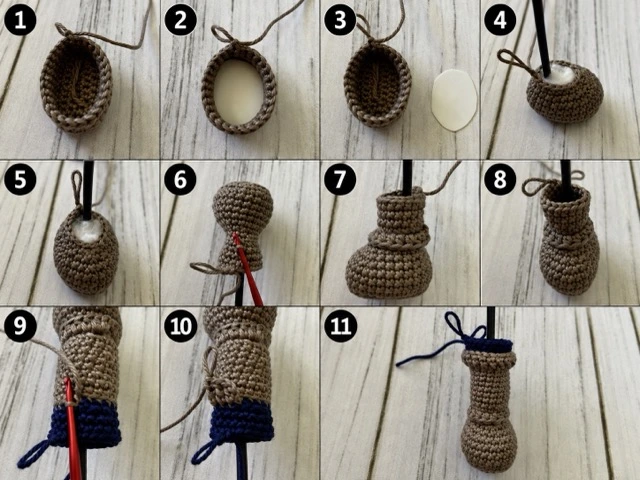
Boots and Legs (Make 2)
Start with brown yarn.
- 8ch, from the 2nd chain: 1inc, 5sc, 3sc to last chain. On the other side of the chain: 5sc, 1inc = 17sc
- 1inc, 6sc, 4inc, 5sc, 1inc = 23sc
- 1sc, 1inc, 7sc, (1sc, 1inc)*3, 7sc, 1inc = 28sc
- BLO: 28sc
- 28sc (3 rows). Crochet 1sc more. You should be at the back center. Place a plastic piece on the sole.
- 8sc, (1dec, 2sc)*3, 8sc = 25sc
- 8sc, (1dec, 1sc)*3, 8sc = 22sc
- 1dec, 6sc, 3dec, 6sc, 1dec = 17sc. Insert the 30 cm wire into the leg and add fiberfill every 2–3 rows.
- 6sc, 2dec, 7sc = 15sc
- 1inc, 13sc, 1inc = 17sc
- BLO: 17sc. After crocheting 2–3 rows, work 17hdc to the FLO stitches.
- 17sc (2 rows)
- 1inc, 16sc = 18sc (increase at back center)
- 18sc (2 rows)
- 1inc, 17sc = 19sc (increase at back center)
- 19sc (2 rows)
Continue with navy yarn, setting the brown yarn aside.
- BLO: 19sc. After 2–3 rows, work 19tr to the FLO stitches.
- 1sc, 1inc, 17sc = 20sc (increase at back center)
- 20sc (6 rows)
- 1dec, 1sc, 1dec, 15sc = 18sc (decreases at back center)
- 1sc, 1dec, 15sc = 17sc (decrease at back center)
- 9sc, 3inc, 5sc = 20sc (3inc knee increase in front)
- 7sc, 1dec, 6sc, 1dec, 3sc = 18sc (decreases on sides)
- 18sc
- 1sc, 1inc, 16sc = 19sc (increase at back center)
- 19sc (2 rows)
- 2sc, 1inc, 16sc = 20sc
- 20sc (2 rows)
- 3sc, 1inc, 16sc = 21sc
- 21sc (7 rows). Finish off at the inner center part. Make 28sc to the FLO stitches in row 4.
Crochet the second leg the same way, then crochet 12sc more to reach the inner center section.
Leg Assembly
Hold the legs with the backs facing you. Join them with 3ch.
- 21sc, 3sc on 3ch, 21sc, 3sc on 3ch = 48sc
- 48sc (6 rows)
- (6sc, 1dec)*6 = 42sc
- 42sc
- 6sc, 1dec, 4sc, 1dec, 13sc, 1dec, 4sc, 1dec, 7sc = 38sc
- 5sc, 1dec, 4sc, 1dec, 12sc, 1dec, 4sc, 1dec, 5sc = 34sc
Continue with skin-colored yarn.
- 34sc (13 rows)
Arm Assembly
- 7sc, 4sc with arm, 13sc, 4sc with arm, 6sc = 34sc
- 7sc, 5sc stitches left from the arm, 13sc, 5sc stitches left from the arm, 6sc = 36sc
- 36sc
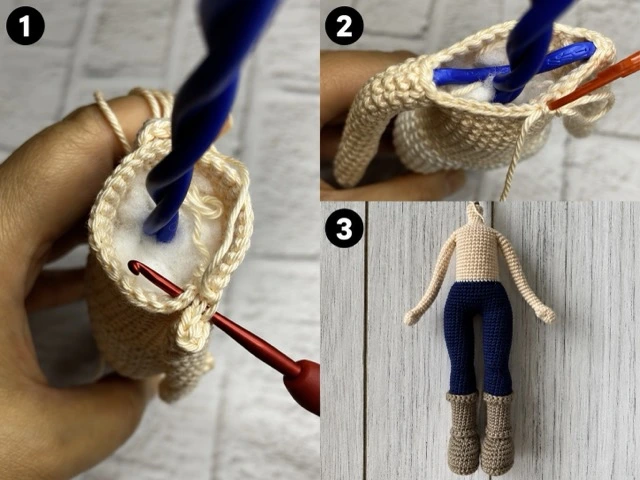
Place 25 cm wire in the arms in this section.
- 7sc, 1dec, 3sc, 1dec, 13sc, (1dec, 3sc)*2 = 32sc. Decreases should be on the shoulder.
- 6sc, 1dec, 1M, 1dec, 10sc, 1dec, 1M, 1dec, 2sc = 24sc. Decreases on the shoulder.
- (4sc, 4dec)*2 = 16sc
- (4sc, 2dec)*2 = 12sc
- 12sc (5 rows)
Cut the yarn long for sewing.
How to Crochet the Dress and Sleeves
Use white yarn and a 2.00 mm hook.
- 38ch, skip 6ch (buttonhole), from the 7th chain: 5sc, W, 4sc, W, 10sc, W, 4sc, W, 5sc = 40sc. 1ch, turn.
- 40sc, 1ch, turn.
- (6sc, W)*2, 12sc, W, 6sc, W, 6sc = 48sc, 1ch, turn.
- 48sc, 1ch, turn.
- 8sc, 1inc, 7sc, 1inc, 14sc, 1inc, 8sc, 1inc, 7sc = 52sc, 1ch, turn.
- 52sc, 6ch turn (buttonhole).
- 8sc, 5ch skip 9sc, (with navy yarn 17sc), with white yarn: 5ch, skip 9sc, 9sc = 44sc, 1ch, turn.
- 14sc, (with navy yarn 17sc), with white yarn 13sc = 44sc, 1ch, turn.
- With white yarn: 44sc, 1ch, turn.
- With white yarn: 13sc, (with navy yarn 17sc), with white yarn 14sc = 44sc, 1ch, turn.
- With white yarn: 14sc, (with navy yarn 17sc), with white yarn 13sc = 44sc, 6ch turn (buttonhole).
- 44sc (3 rows), 1ch, turn.
- 44inc = 88sc, 1ch, turn.
- (1sc, 1inc)*44 = 132sc. Join two ends with slst, 2ch.
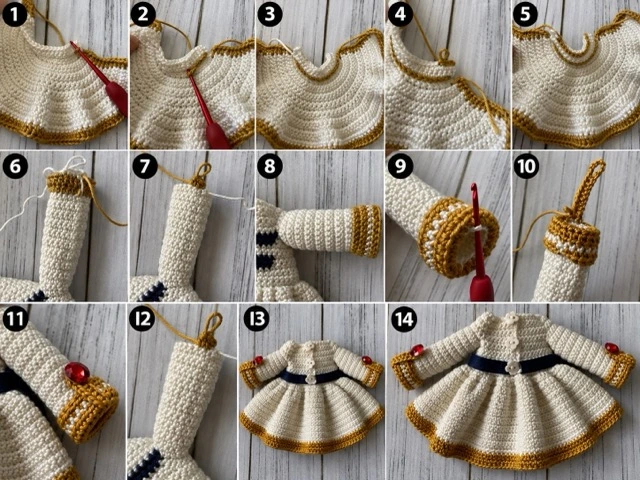
From this row onward, continue using the ESC technique.
- 132esc, slst 2ch.
- 132esc (8 rows), slst 2ch.
Continue with mustard color.
- 132esc (2 rows).
Cut the yarn.
Sleeves (Make 2)
- Pull up 18sc, slst 1ch, turn to opposite side.
- 1inc, 16sc, 1inc = 20sc, slst 1ch, turn to other side.
- 20sc (13 rows), slst 1ch, turn to other side.
With mustard color:
- FLO: (4hdc, 1hdcinc)*4 = 24hdc, slst 1ch.
- 24hdc, slst 1ch.
Continue with white yarn:
- 24sc, slst 1ch.
With mustard colored yarn:
- 24hdc. Cut the yarn.
Center the sleeve and attach the yarn to the FLO stitches of row 21: 14ch, skip 6ch (buttonhole), 8hdc. Cut the yarn. Sew the red glass buttons onto the sleeves.
Glue the 15 cm navy blue leather belt onto the dress using fabric adhesive, and add the belt buckle.
How to Crochet the Cape
Use white yarn.
- 19ch, from the 2nd chain: 18sc, 1ch, turn.
- 18inc = 36sc, 1ch, turn.
- 36sc (4 rows), 1ch, turn.
- (5sc, 1inc)*6 = 42sc, 1ch, turn.
- (6sc, 1inc)*6 = 48sc, 1ch, turn.
- (7sc, 1inc)*6 = 54sc, 1ch, turn.
- (2sc, 1inc)*18 = 72sc, 1ch, turn.
- 72sc, 1ch, turn.
- (3sc, 1inc)*18 = 90sc, 1ch, turn.
- (4sc, 1inc)*18 = 108sc, 1ch, turn.
- 108sc, 1ch, turn.
Continue with mustard yellow yarn:
- 107hdc, 3hdc to last chain, make 13hdc upwards. Cut the yarn.
Attach mustard yarn to the collar beginning on the other side: 1. 13hdc. Cut the yarn.
Attach white yarn to the beginning of the collar:
- 18sc, 1ch, turn.
- 18sc (2 rows), (6ch, slst buttonhole). Cut the yarn.
Rest of the Cape
Attach mustard-colored yarn between the first stitches of the neckline: 18slst. Cut the yarn.
Attach yarn again at the beginning of the 3rd row of the neckline: 18slst. Cut the yarn.
Attach yarn to the 4th stitch of the slst you made between the stitches:
- 16ch, skip 6ch (buttonhole), 10hdc, slst. Cut the yarn.
Repeat on the other side.
Sew the 7 mm red glass bead buttons onto the cape using the images as a reference.
How to Make the Wand
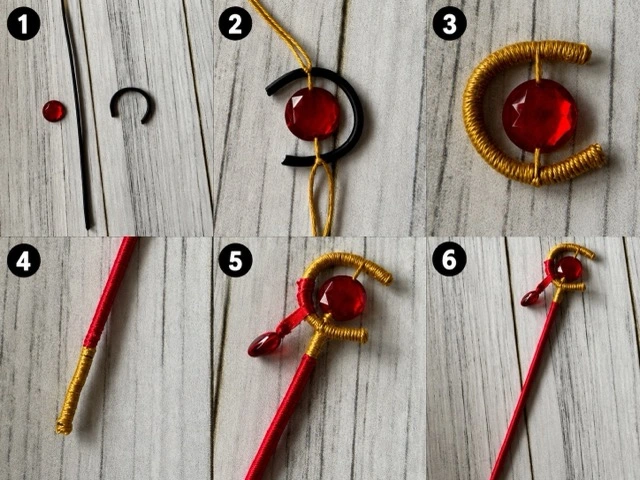
Use 30 cm and 10 cm lengths of electrical wire, mustard yellow yarn, red yarn, a red crystal bead with a 2 cm diameter, and a red glass bead with a 1.5 cm diameter. Follow the visuals to wrap the wire, attach the beads, and shape the staff. The final wand should have a curved top with the large red bead and a smaller bead hanging below.
Putting Your Crochet Pattern Frieren Doll Together
- Sew the head to the body. The neck should be stuffed firmly.
- Attach the ears and earrings.
- Sew the wig and ponytails to the head.
- Put the dress on the doll and secure the belt.
- Add the cape around the shoulders.
- Sew the arms to the body if not already joined.
- Place the wand in her hand or attach it with a small stitch.
- Tint the cheeks with blush or dry pastel.
- Hide all yarn ends inside the body.
Helpful Tips for a Neater Crochet Pattern Frieren Doll
- Keep your tension even. The pattern uses a 2.00 mm hook, and small inconsistencies show on a 27 cm doll.
- Use the wire early. Insert the wire into the legs and arms before you stuff them completely. It’s much harder to add later.
- Stuff firmly but not lumpy. The body should hold its shape, but the arms and legs should still bend.
- Pin the hair before sewing. The wig and ponytails need to sit symmetrically. Use plenty of pins.
- Work the ESC rows carefully. The dress texture depends on pulling up the single crochet in two steps.
- Try the dress on as you go. If it feels tight or loose, adjust your hook size or tension.
- Use fabric glue for the belt. It keeps the leather strip flat and neat.
- Embroider the face before attaching the hair. It’s easier to reach the head without the wig in the way.
FAQ About the Crochet Pattern Frieren Doll
What skill level is this crochet pattern Frieren doll?
It’s intermediate. You need to know basic crochet skills, and the pattern does not include lessons. Familiarity with increases, decreases, BLO, FLO, and working with wire will help.
How big is the finished crochet pattern Frieren doll?
When you use the recommended yarn and a 2.00 mm hook, the finished doll is about 27 cm tall. If you use different yarn or tension, the size may vary.
What yarn is used for the crochet pattern Frieren doll?
The pattern uses Catania yarns: TR 263 for skin, 124 navy for leggings and dress lines, 105 white for the dress and cape, 254 brown for boots, 431 mustard yellow for edging and wand, and 172 gray for hair.
Can I make this crochet pattern Frieren doll without wire?
You can, but the doll won’t hold poses or support the staff as well. The wire in the arms and legs is part of what makes her stand and carry the wand.
How do I make the hair for the crochet pattern Frieren doll?
The hair is a crocheted wig cap with long strands worked into the front loops. You’ll also make two ponytails with long chains and hdc stitches, then sew them to the wig.
Your Next Stitch
Making a crochet pattern Frieren doll is a project that asks for patience, precision, and a little bit of magic. You’ll shape a face, build a tiny wardrobe, wire a body, and sew on strand after strand of silver hair. By the time you place the staff in her hand, you’ll have a 27 cm elf mage who looks like she stepped out of the story.
So gather your Catania yarn, check your hook size, and start with the first magic ring. If you get stuck on the hair or the wand, come back to this guide and work through it step by step. When your Frieren doll is finished, share a photo and show off your work. Your next project might be exactly what someone else needs to see.
Looking for another doll project? Explore our crochet pumpkin doll pattern. For a refresher on stitch terminology, see the Craft Yarn Council crochet abbreviations guide.
Happy crocheting!